Tuning Umarex M1A1 Thompson Repair

born2fly: Yeah I have been looking at the exploded parts diagram to plan the disassembly but that will have to wait, I have some traveling to do in the next two weeks; including our annual get together with my friend. So I will keep you posted.


: I noticed that all of my mags (all 4 of them0 were not catching the sliding bolt and continued to dry fire. "Referenced from above.
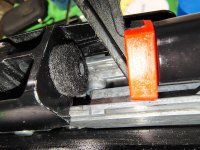
This was just the sear not meeting the upper "bolt" correctly; this is the real problem with the Umarex M1A1.
Cheap ass design of the Taiwan engineers. Using a Steel sear which hits a soft "white metal" cast stop; cheap but REALLY STUPID, BAD, BAD engineers.
For anyone's information, the Umarex Legends BB/pellet guns are all made with mostly cast "White Metal"
I will eventually fix that next probably with a 606T aluminum or a little steel block stop in the gun, I haven't decided yet.
One problem at a time.

Even though I have had to do some slight repair (After @11,000 BBs) My favorite BBs gun is still the Umarex M1A1 Thompson.
Yes … they’re all made of white metal. And doomed to wear out rather quickly. Fortunately we can use the existing parts as patterns to make proper replacements as you suggested, and end up with something that will last. 👍
 
Yes … they’re all made of white metal. And doomed to wear out rather quickly. Fortunately we can use the existing parts as patterns to make proper replacements as you suggested, and end up with something that will last. 👍
Thank born2fly.
I am going on the 6th year (guessing... could be longer) with my M1A1 and at least 11K BBs thru it probably more judging by the large full box empty co2 cartridge's. With wood furniture... as I wrote before; "it is my favorite BB gun. I am thinking about getting another one and making some more "Kit videos" on how to improve and stabilize to gun indefinitely and making the kits to sell for those who want to keep them working.
The more I think about this, the more I think the right solution might be to modify the cone valve.
I’m thinking that the bolt needs to move rearward more slowly but still slam forward with enough momentum to activate the poppet valve. That sounds a bit like the way a shock absorber works. Not sure if I’d want to try making such a thing for this application.
Alternatively, perhaps modify the cone valve so that it does not close completely, but permits some gas to leak out the barrel instead of redirecting it all to push the bolt back (a small spacer behind the delicate little cone valve spring might work). Less gas pushing the bolt would mean slower rearward travel. Just so long as it gets back far enough to reset the trigger. Forward travel would not change, as it would still be governed by the bolt spring.
I’m just brainstorming …
Pictured below is an 8mm felt pad shaped in a circle. There is a hole in the center of the 8mm buffer pad to fit the poppet valve actuator which is fixed.
the picture has a side view and face view. It is not going to move because the spring assembly is always pressed on it. Cock the bolt back pull the trigger now because the 8mm pad is is absorbing the energy buy the pad. As the auto action moves the pad back with the bolt energy is absorbed by the "doughnut" (Pic No. 1) 8mm pad buffer. Picture (No.2 buffer inserted) is the buffer in place.
i think it will also make the sear lever use less energy to stop the bolt, As the buffer pad is always there it should absorb at least some energy of the spring and action. I will have to test this (maybe this weekend) and see if it does anything.

Felt 8mm Buffer (1).jpg
 

Attachments

  • Bolt poppet valve actuator 1.jpg
    Bolt poppet valve actuator 1.jpg
    3.8 MB · Views: 2
  • 8mm Felt buffer on poppet valve actuator 1.jpg
    8mm Felt buffer on poppet valve actuator 1.jpg
    4.3 MB · Views: 1
Last edited:
  • Like
Reactions: borne2fly
Pictured below is an 8mm felt pad shaped in a circle. There is a hole in the center of the 8mm buffer pad to fit the poppet valve actuator which is fixed.
the picture has a side view and face view. It is not going to move because the spring assembly is always pressed on it. Cock the bolt back pull the trigger now because the 8mm pad is is absorbing the energy buy the pad. As the auto action moves the pad back with the bolt energy is absorbed by the "doughnut" (Pic No. 1) 8mm pad buffer. Picture (No.2 buffer inserted) is the buffer in place.
i think it will also make the sear lever use less energy to stop the bolt, As the buffer pad is always there it should absorb at least some energy of the spring and action. I will have to test this (maybe this weekend) and see if it does anything.

View attachment 587817

View attachment 587818
That should ease the impact as you say.
My MP40 suffered a broken dowel pin early on as a result of the bolt slamming against it (I suspect ). Said dowel pin splintered in such a way as to indicate poor heat treatment. I replaced it with a domestically made pin and have had no problems since. However, the next time I tear it down I want to install some sort of recoil buffer.
 
  • Like
Reactions: ninersix
That should ease the impact as you say.
My MP40 suffered a broken dowel pin early on as a result of the bolt slamming against it (I suspect ). Said dowel pin splintered in such a way as to indicate poor heat treatment. I replaced it with a domestically made pin and have had no problems since. However, the next time I tear it down I want to install some sort of recoil buffer.
I suspected that the pin is exposed to some real stress the head looked a little flattened. The first felt pad was a not real felt but a "syntactic" felt and very thin. So I got a thicker (8mm thick) and is much MUCH more firm. I am anxious to try it out. By the way I used a simple hole punch set so it was so simple/easy to do, took about 2 min.
 
  • Like
Reactions: borne2fly
That should ease the impact as you say.
My MP40 suffered a broken dowel pin early on as a result of the bolt slamming against it (I suspect ). Said dowel pin splintered in such a way as to indicate poor heat treatment. I replaced it with a domestically made pin and have had no problems since. However, the next time I tear it down I want to install some sort of recoil buffer.
By the way born2fly taking down the MP40 is no easy task. I posted this German guy taking it apart ... so many screws and so many pins. To top it all off he was speaking in German. If you do it again record it for me (and everyone else).
 
By the way born2fly taking down the MP40 is no easy task. I posted this German guy taking it apart ... so many screws and so many pins. To top it all off he was speaking in German. If you do it again record it for me (and everyone else).
That’s the video I used to help me pull the thing apart. I don’t speak German so had to go strictly by the images. The fire control mechanics are pretty complex so it helps to take a lot of pictures. Had a towel over it when I pulled the halves apart in case any tiny springs went flying. The M712 has a few of those and they can fly halfway across the room.
 
  • Like
Reactions: ninersix
That’s the video I used to help me pull the thing apart. I don’t speak German so had to go strictly by the images. The fire control mechanics are pretty complex so it helps to take a lot of pictures. Had a towel over it when I pulled the halves apart in case any tiny springs went flying. The M712 has a few of those and they can fly halfway across the room.
Ok, I did not know that. I must confirm to you that nothing is wrong with my MP40 at this time. It had some problems when I first got it (dry firing), but that issue was solved by application of thicker silicone oil on the BB/magazine sear. The MP40 is more complex than the M1A1 mechanically, e.g. putting a buffer/doughnut on the poppet valve for example. I will examine the MP40 (take it apart) after my project on the M1A1 is complete or cannot meet my criteria e.g., "the ability to return the gun to factory condition".