Hi Guys and Girls!
I thought I’d take the time to share my target shooting box with you. I hope you enjoy!
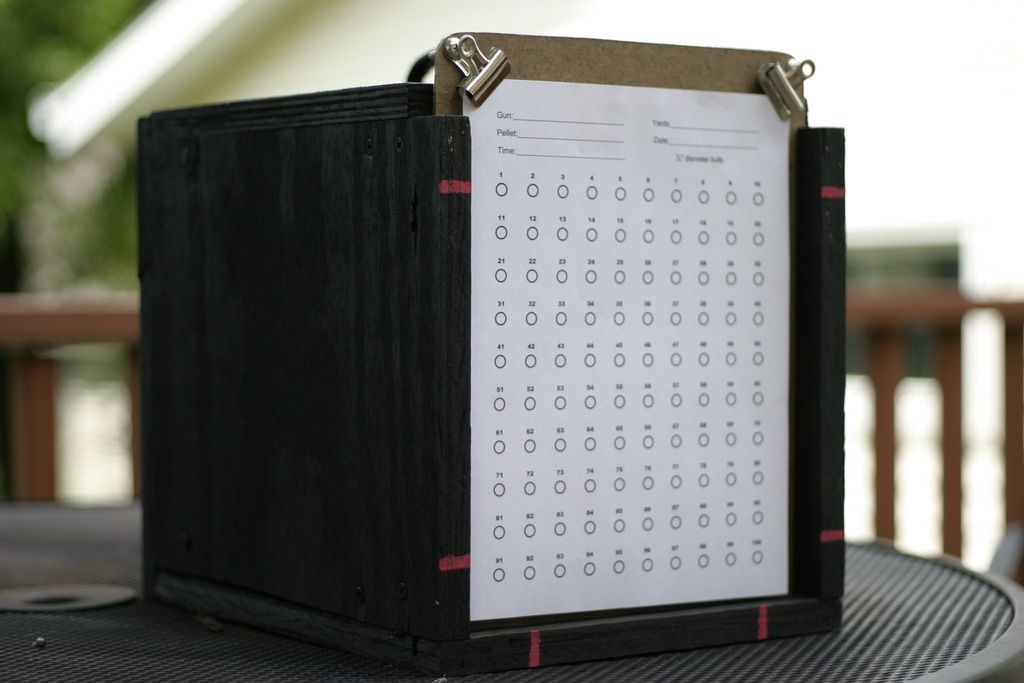
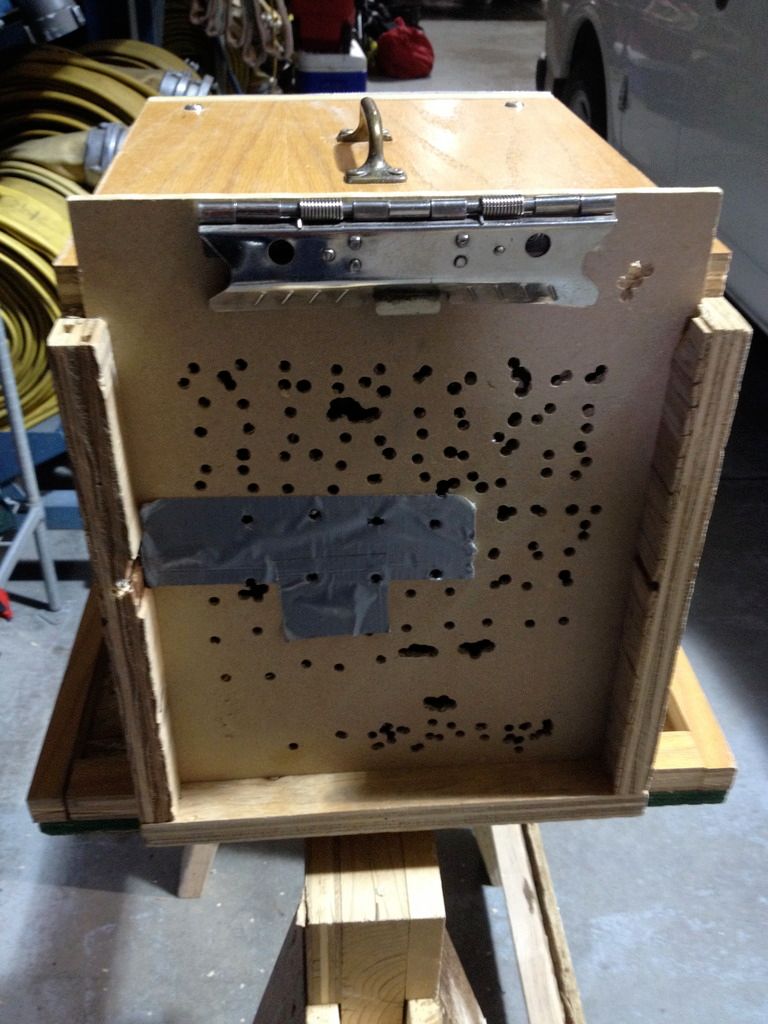
It’s basically rubber mulch in a plywood box that marries up to my saw horses. This was inspired by Ted and his chrony setup where he filled a cardboard box with rubber mulch. I just made mine beefier! I’ll be posting measurements for the shot box, the shelf, and the saw horses below.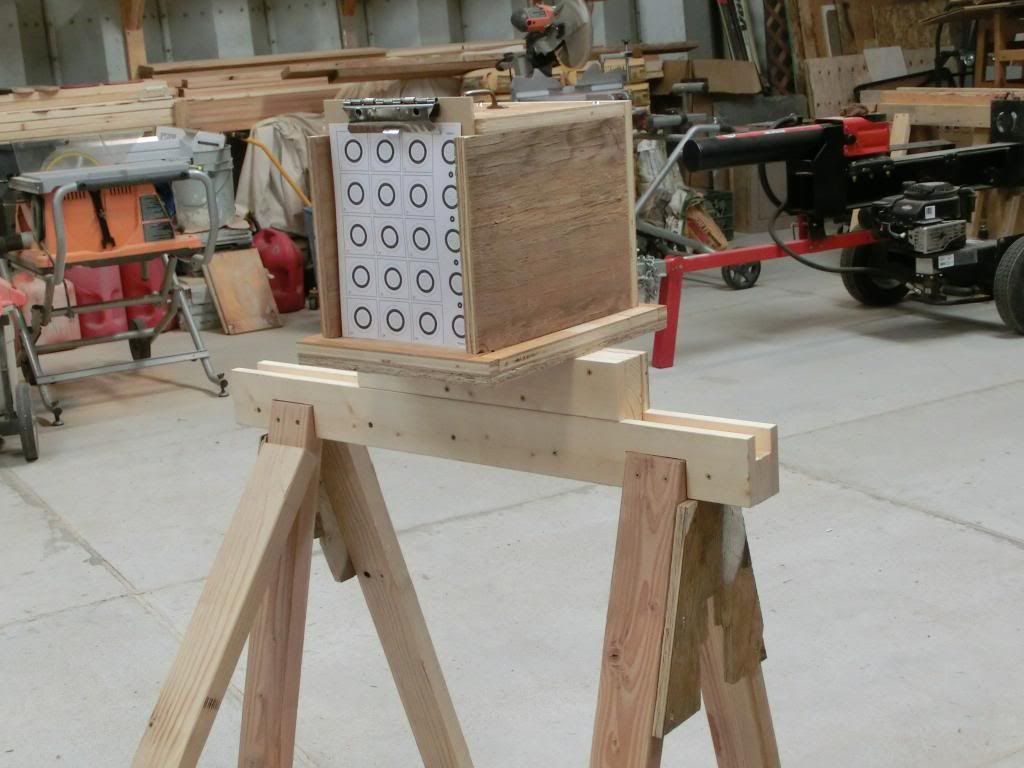 The shot box has a replaceable 1/4” thick MDF clipboard that slips down into a slot. If/when you want to clean out some pellet lead, you just put the box on its back and slip the clipboard out to gain access to the rubber mulch.
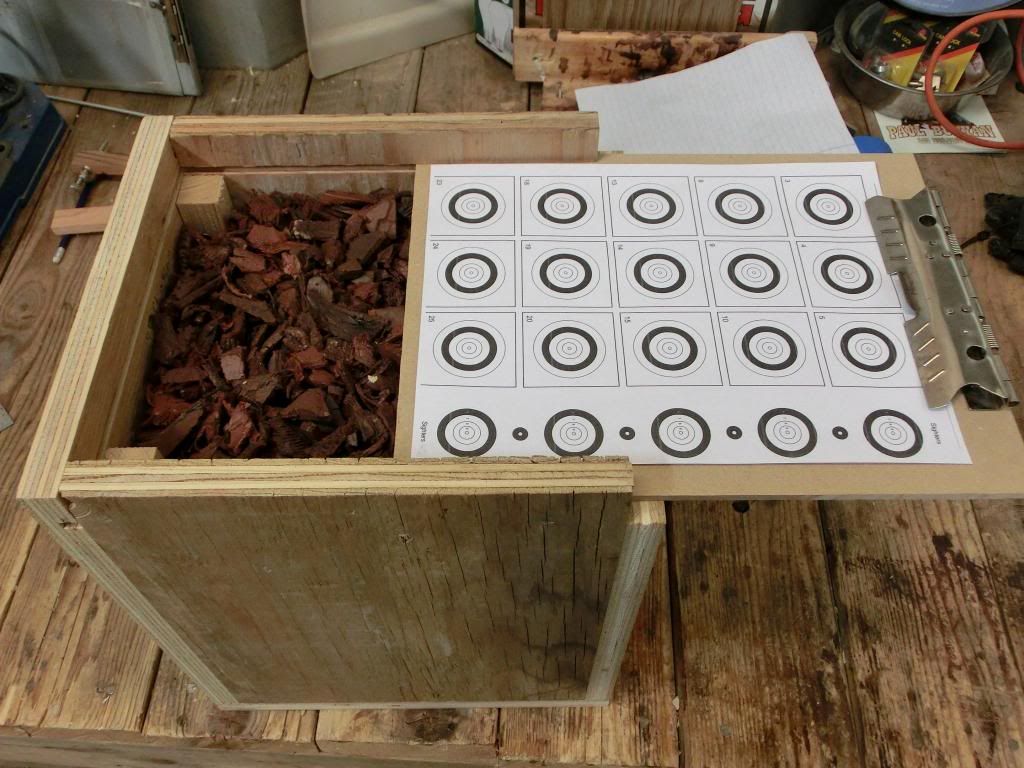
1 bag of rubber mulch (~$7) will fill it with almost none left over. But, It’s heavy (34lbs) and it’s overkill (IMO). I’ve shot this with .22 and .25 pellets as well as 22lr, 5.56 rifle, and 9mm handgun. The 9mm went the furthest into the mulch. While it does stop these PB calibers, that’s not what I built it for. With that in mind, I think it could be about 1/2 the depth and still work just fine. I also added a piece of aluminum to the back of the box to serve as a “You shall not pass!” backstop. If I had to do it again I would have put the metal inside the box right up against the back wall. This would give it more strength to stop a projectile. The shelf could also be used by itself to set targets on. Knockdowns? Silhouettes? Chrony?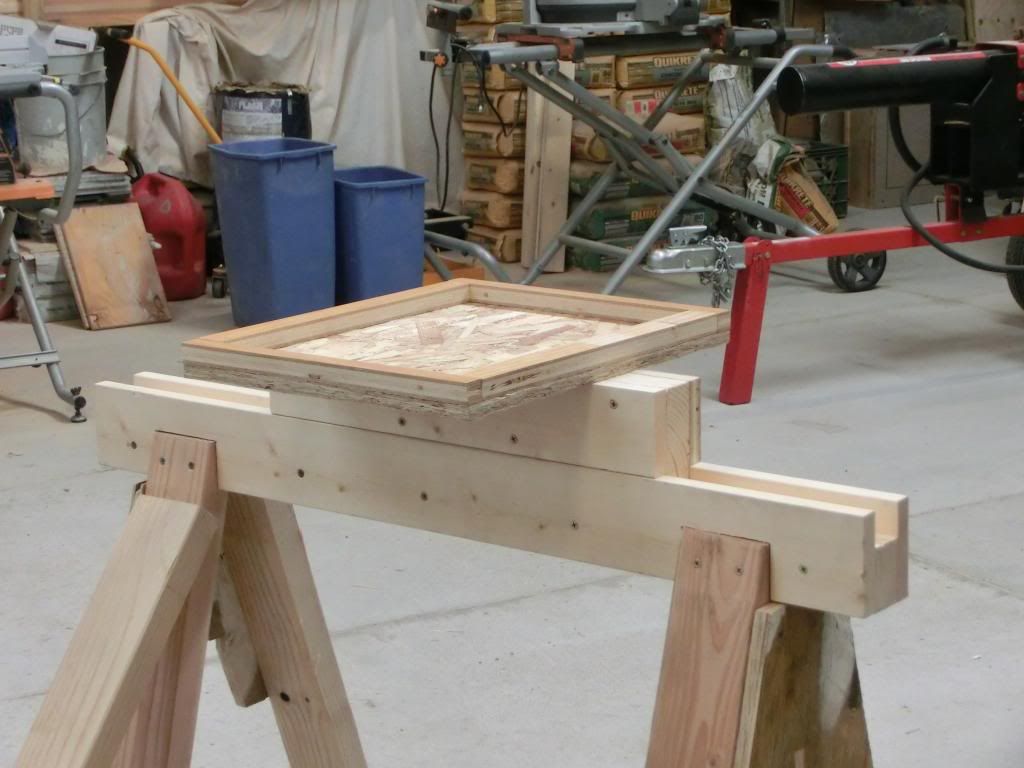 I CONSTANTLY use these saw horses in my shop! If you end up making these for yourself, you might want to make 2 or 3 of them... or 4 or 5 (I have 4 of these and sometimes have to break out my other 2 fold-up ones as well)
 ") They are very strong, stackable (optional), have a shelf to hold plywood for cutting or marking, and a sacrificial 2x4 that can be adjusted to level (if needed) via 2 leveling screws (optional).
They are very strong, stackable (optional), have a shelf to hold plywood for cutting or marking, and a sacrificial 2x4 that can be adjusted to level (if needed) via 2 leveling screws (optional). 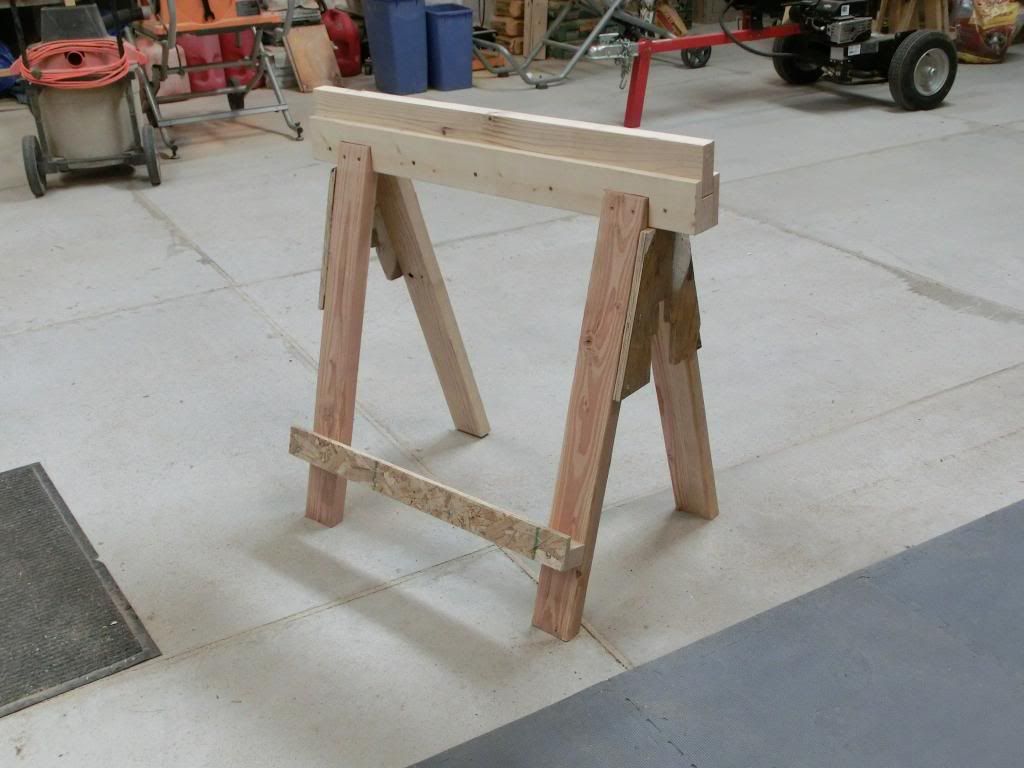
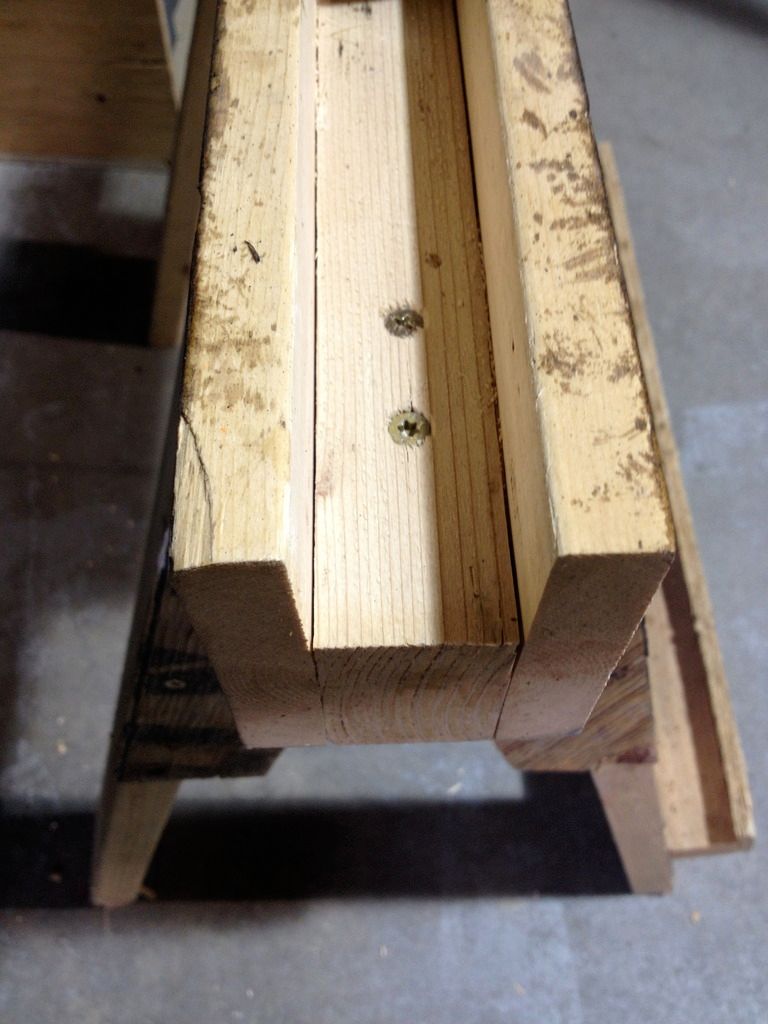
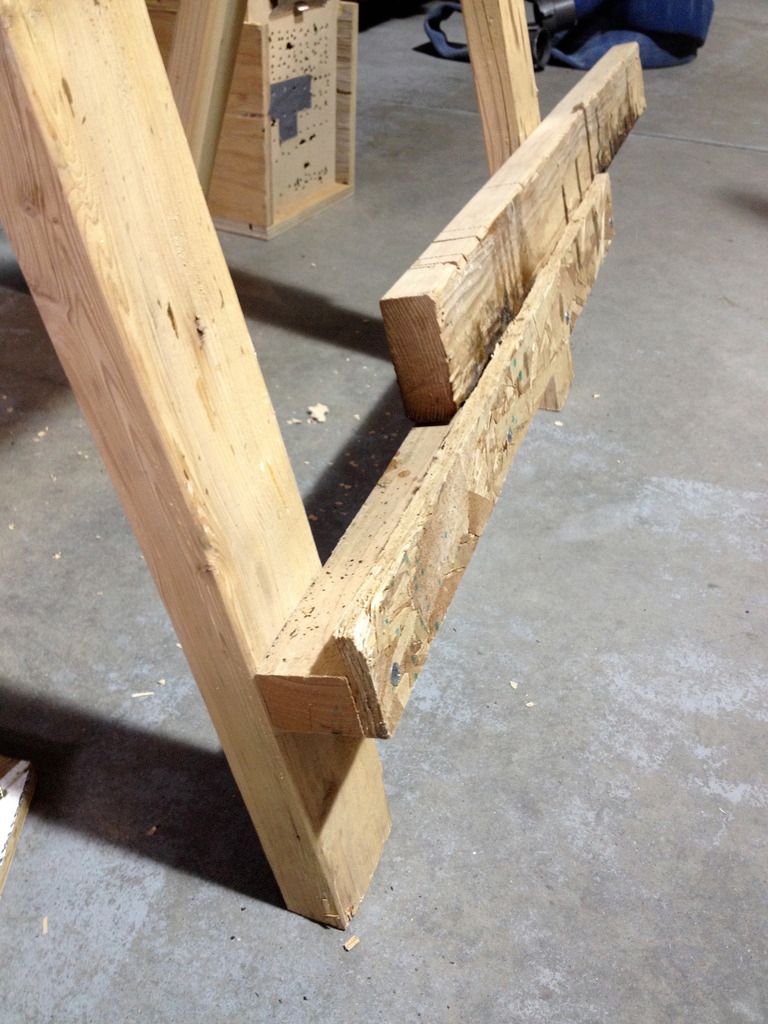
Here's the leveling screws. 1 philips and 1 torx on each end. I rarely use them but, it's nice to have them there just in case.
-----------------------------------------------------------------------------------------------------
Shot Box
Dimensions
3/4 x 10-1/2 x 13-3/8 Base *
3/4 x 10-3/8 x 13-3/8 (x2) Sides *
3/4 x 10-1/2 x 11-7/8 Back
3/4 x 10-1/2 x 12-1/8 Top
1 x 1 x 12-1/8 Assembly pieces
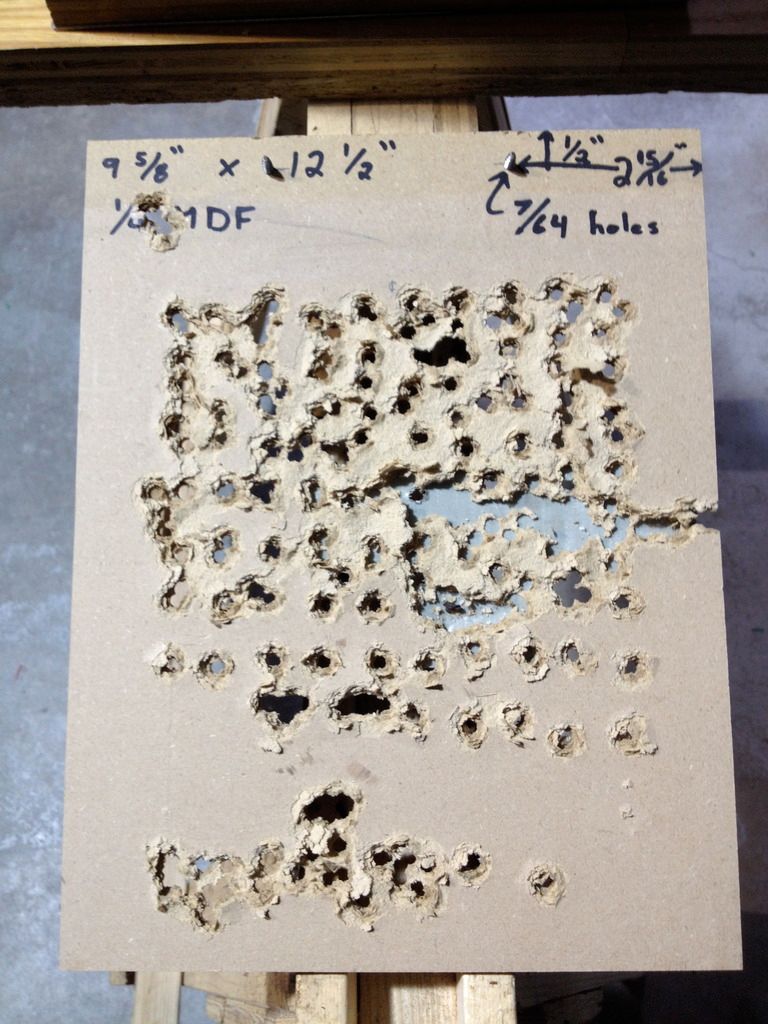
1/4 x 9-5/8 x 12-1/2 MDF Clipboard
1/8 x 10-1/2 x 11-7/8 Aluminum sheet (same dimensions as Back)
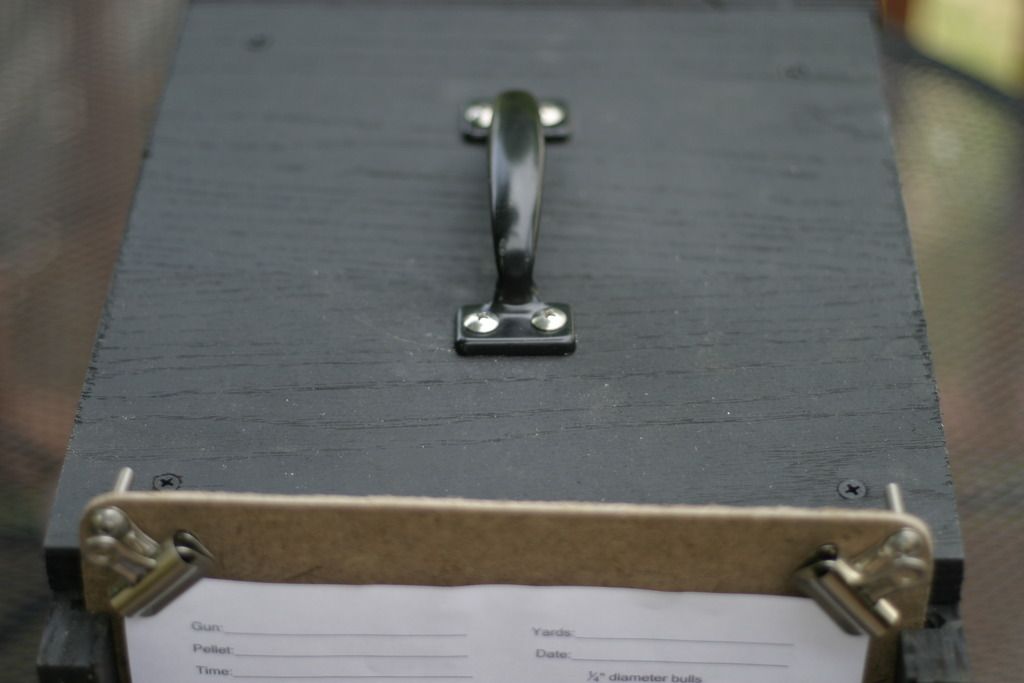
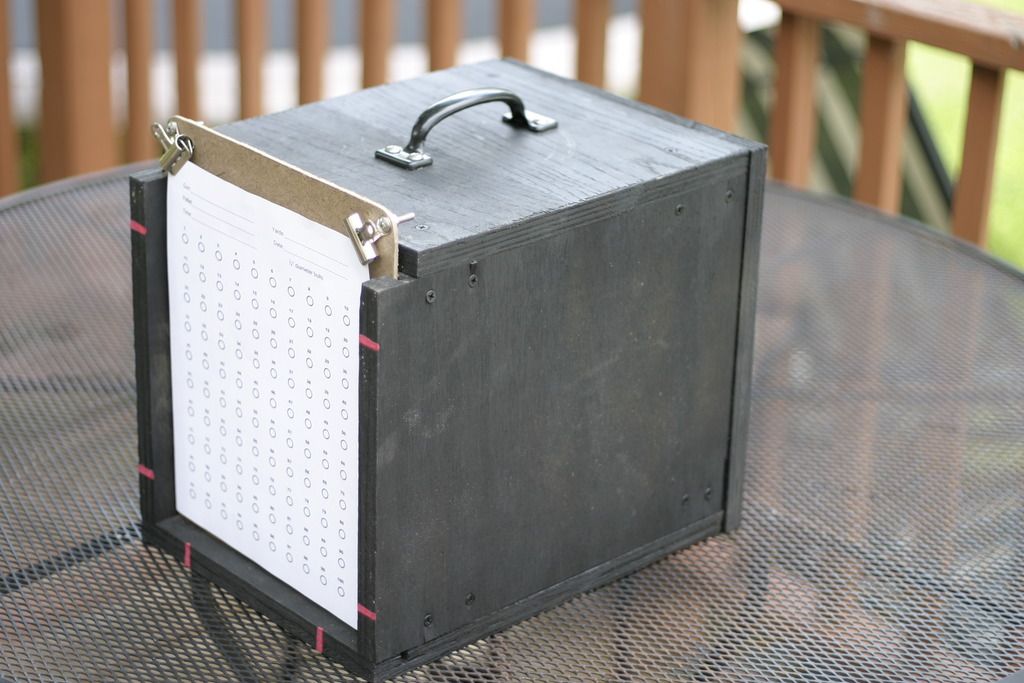
I also added a handle to the top of mine. My plywood doesn't match because I just used whatever scraps I had lying around.
*The sides and the base have a 1/4” slot cut in them that is 3/8” deep. It is 1” back from the front and must line up after assembly. This is what the clipboard will slide into. It’s best to cut the slot into all the pieces at the same time for the most consistent results.
The top piece should line up flush with the back of this slot.
I sacrificed a clipboard and just screwed the clip part into the 1/4” MDF. As long as I shoot below the metal I’m ok. I failed to do this while shooting some sighters during a Manabe challenge. LOL! I also ran a line of pellets off the left side cutting a slice right into everything while running some chrony strings. It just goes to show you that you should always have a proper backstop! Once you blow a big hole in the clipboard, just cover it up with some duct tape and you’re good to go again. At some point you’ll have to replace it. So, when you cut your clipboard to size, cut a bunch of them!
-----------------------------------------
Shelf
Dimensions
1-1/2 x 4-1/4 x 18
3/4 x 3 x 18
3/4 x 1-3/16 to 1-1/8 x 14-1/4 (x2)*
3/4 x 3/4 x 12-7/8 (x2)
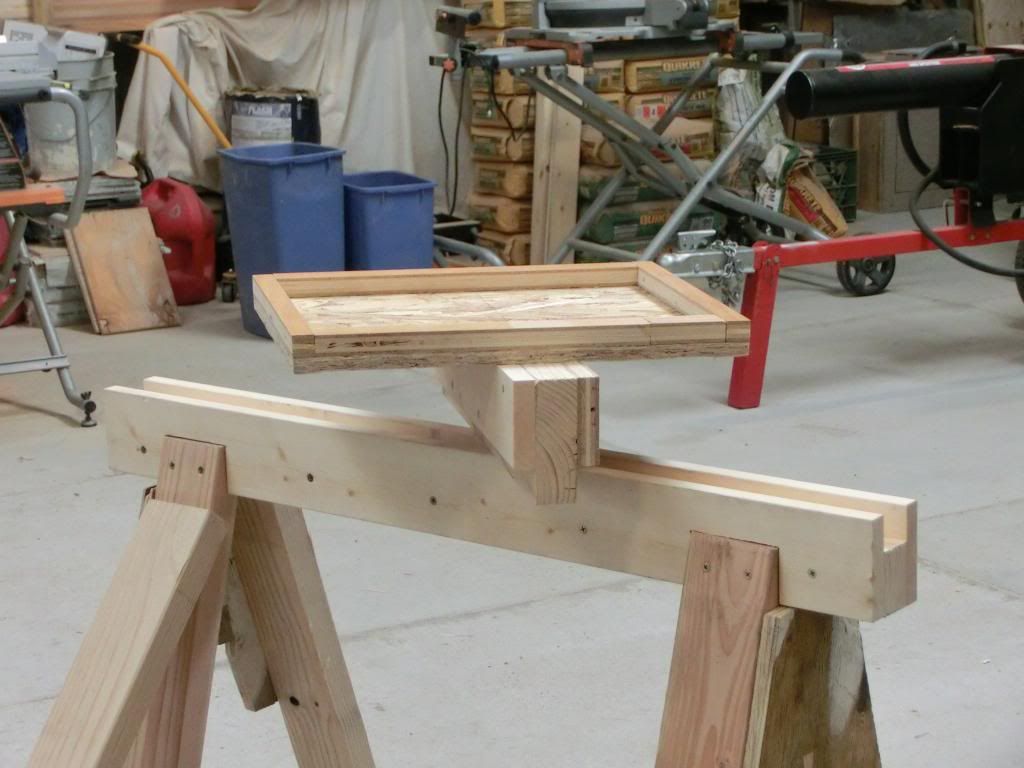
*Size may vary with final box dimensions. When you attach the shelf to its base, It’s important to find the front-rear balance point of your base/shot box combination and attach it there. Otherwise you have a lot of weight trying to tip everything forward or back.
--------------------------------------------------------
Saw Horses
I tweaked the dimensions for my purposes. The way I cut them out, they line up with my tablesaw for an out-feed and are nice height for skill saw cutting and staining. I have also made in and out-feed ramps for my planer and used some plastic pipe and 2x4's cut to proper height to make sheet goods sliders for when I'm cutting them on the table saw. I take no credit for the design. These are from “Woodsmith” Magazine. Here’s a link with detailed plans, cut angles, and measurements...http://www.woodworkingtips.com/etips/2007/02/23/wb/
Here are my tweaked dimensions (for 1 saw horse)
1-1/2 x 3-1/2 x 36 Replaceable Insert
1-1/2 x 2-1/8 x 36 Spacer
3/4 x 3-1/2 x 36 (x2) Rails
1-1/2 x 3-1/2 x 32-3/4 (x4) Legs
3/4 x 10-3/4 x 11 (x2) Gussets*
1-1/2 x 2 x 28-1/2 Plywood Rest
5/8 or 3/4 x 2-1/2 x 28-1/2 Plywood Catch
* My gussets are larger than the plans call for. I knew I'd be pushing the weight limits from time to time. I also had to cut out a different shaped area for stacking.
It’s best to have a chop saw to make some of these cuts. I also did not add the Hex Bolt to anchor the sacrificial board. But, I’m thinking about adding it in to anchor the Shelf.
I also added the plywood holder. It comes in handy from time to time to place plywood or other things on and adds some stability to the legs. I use it mostly for holding the sacrificial board when I've got other attachments on.
I just used long screws to go through the plywood rest and into the legs. Then I added the plywood catch with some shorter screws. If I did it again, I might consider pocket screws instead.
The nice thing about the shot box is that it is strong and portable. You don't need to build all the other stuff if you don't want to. I like this setup because when I'm shooting from a bench it lines up at approx the same elevation. So, I'm not shooting at a downward angle.
Please let me know if you have any questions on this. I tried to include everything I could but, may have missed something.
I hope you enjoyed. Shoot me a + if you did!
Thanks and Happy Safe Shooting!
Tom
I thought I’d take the time to share my target shooting box with you. I hope you enjoy!
It’s basically rubber mulch in a plywood box that marries up to my saw horses. This was inspired by Ted and his chrony setup where he filled a cardboard box with rubber mulch. I just made mine beefier! I’ll be posting measurements for the shot box, the shelf, and the saw horses below.
The shot box has a replaceable 1/4” thick MDF clipboard that slips down into a slot. If/when you want to clean out some pellet lead, you just put the box on its back and slip the clipboard out to gain access to the rubber mulch.1 bag of rubber mulch (~$7) will fill it with almost none left over. But, It’s heavy (34lbs) and it’s overkill (IMO). I’ve shot this with .22 and .25 pellets as well as 22lr, 5.56 rifle, and 9mm handgun. The 9mm went the furthest into the mulch. While it does stop these PB calibers, that’s not what I built it for. With that in mind, I think it could be about 1/2 the depth and still work just fine. I also added a piece of aluminum to the back of the box to serve as a “You shall not pass!” backstop. If I had to do it again I would have put the metal inside the box right up against the back wall. This would give it more strength to stop a projectile. The shelf could also be used by itself to set targets on. Knockdowns? Silhouettes? Chrony?
I CONSTANTLY use these saw horses in my shop! If you end up making these for yourself, you might want to make 2 or 3 of them... or 4 or 5 (I have 4 of these and sometimes have to break out my other 2 fold-up ones as well) They are very strong, stackable (optional), have a shelf to hold plywood for cutting or marking, and a sacrificial 2x4 that can be adjusted to level (if needed) via 2 leveling screws (optional). Here's the leveling screws. 1 philips and 1 torx on each end. I rarely use them but, it's nice to have them there just in case.
-----------------------------------------------------------------------------------------------------
Shot Box
Dimensions
3/4 x 10-1/2 x 13-3/8 Base *
3/4 x 10-3/8 x 13-3/8 (x2) Sides *
3/4 x 10-1/2 x 11-7/8 Back
3/4 x 10-1/2 x 12-1/8 Top
1 x 1 x 12-1/8 Assembly pieces
1/4 x 9-5/8 x 12-1/2 MDF Clipboard
1/8 x 10-1/2 x 11-7/8 Aluminum sheet (same dimensions as Back)
I also added a handle to the top of mine. My plywood doesn't match because I just used whatever scraps I had lying around.
*The sides and the base have a 1/4” slot cut in them that is 3/8” deep. It is 1” back from the front and must line up after assembly. This is what the clipboard will slide into. It’s best to cut the slot into all the pieces at the same time for the most consistent results.
The top piece should line up flush with the back of this slot.
I sacrificed a clipboard and just screwed the clip part into the 1/4” MDF. As long as I shoot below the metal I’m ok. I failed to do this while shooting some sighters during a Manabe challenge. LOL! I also ran a line of pellets off the left side cutting a slice right into everything while running some chrony strings. It just goes to show you that you should always have a proper backstop! Once you blow a big hole in the clipboard, just cover it up with some duct tape and you’re good to go again. At some point you’ll have to replace it. So, when you cut your clipboard to size, cut a bunch of them!
-----------------------------------------
Shelf
Dimensions
1-1/2 x 4-1/4 x 18
3/4 x 3 x 18
3/4 x 1-3/16 to 1-1/8 x 14-1/4 (x2)*
3/4 x 3/4 x 12-7/8 (x2)
*Size may vary with final box dimensions. When you attach the shelf to its base, It’s important to find the front-rear balance point of your base/shot box combination and attach it there. Otherwise you have a lot of weight trying to tip everything forward or back.
--------------------------------------------------------
Saw Horses
I tweaked the dimensions for my purposes. The way I cut them out, they line up with my tablesaw for an out-feed and are nice height for skill saw cutting and staining. I have also made in and out-feed ramps for my planer and used some plastic pipe and 2x4's cut to proper height to make sheet goods sliders for when I'm cutting them on the table saw. I take no credit for the design. These are from “Woodsmith” Magazine. Here’s a link with detailed plans, cut angles, and measurements...http://www.woodworkingtips.com/etips/2007/02/23/wb/
Here are my tweaked dimensions (for 1 saw horse)
1-1/2 x 3-1/2 x 36 Replaceable Insert
1-1/2 x 2-1/8 x 36 Spacer
3/4 x 3-1/2 x 36 (x2) Rails
1-1/2 x 3-1/2 x 32-3/4 (x4) Legs
3/4 x 10-3/4 x 11 (x2) Gussets*
1-1/2 x 2 x 28-1/2 Plywood Rest
5/8 or 3/4 x 2-1/2 x 28-1/2 Plywood Catch
* My gussets are larger than the plans call for. I knew I'd be pushing the weight limits from time to time. I also had to cut out a different shaped area for stacking.
It’s best to have a chop saw to make some of these cuts. I also did not add the Hex Bolt to anchor the sacrificial board. But, I’m thinking about adding it in to anchor the Shelf.
I also added the plywood holder. It comes in handy from time to time to place plywood or other things on and adds some stability to the legs. I use it mostly for holding the sacrificial board when I've got other attachments on.
I just used long screws to go through the plywood rest and into the legs. Then I added the plywood catch with some shorter screws. If I did it again, I might consider pocket screws instead.
The nice thing about the shot box is that it is strong and portable. You don't need to build all the other stuff if you don't want to. I like this setup because when I'm shooting from a bench it lines up at approx the same elevation. So, I'm not shooting at a downward angle.
Please let me know if you have any questions on this. I tried to include everything I could but, may have missed something.
I hope you enjoyed. Shoot me a + if you did!
Thanks and Happy Safe Shooting!
Tom