Making a carbon fiber stock: part 1 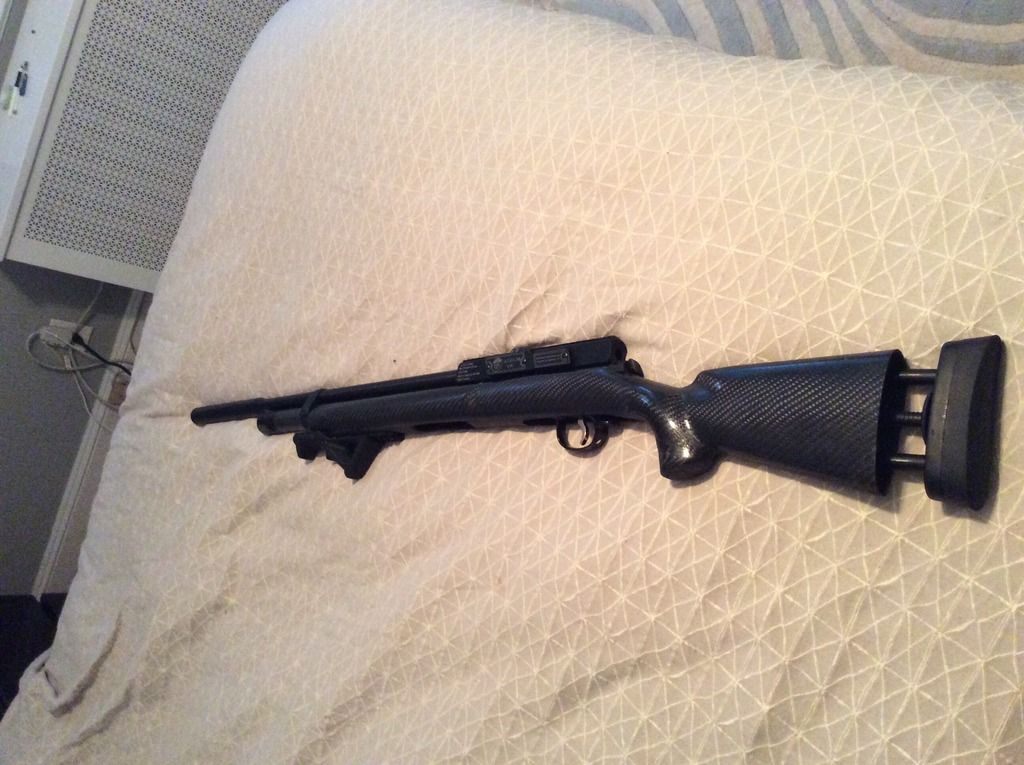
[color=rgba(0, 0, 0, 0.701961)]Ok my fellow air gun enthusiasts, get ready for a new addiction - making stuff with carbon fiber. Once you learn, you will want to replace everything you own with a carbon fiber version up to and including some family members.[/color]
I am going to show you a number of different methods of making lightweight carbon fiber stocks including: a cosmetic piece, stocks made with carbon fiber sheet molding compound (like the ones made by Steyr), an easy "structural piece" with a coated surface, custom carbon fiber grips molded to the shape of your hand and how to make cf tubes for handguards and LDC's.
There is a lot to write so I am going to post it in sections so bear with me. I know there is a lot of text but if you don't have the patience to read it, I promise you don't have the patience to make a cf stock and I don't want to leave you with more questions than answers.
All of these methods can be used to make a stock for any type of air rifle. They can also be made by anyone with arms and a face. No special talent required! We are going to start with a cosmetic piece (with exposed glossy carbon fiber) which is what I assume most people want / expect to see with a cf stock. If you intend to paint your cf stock then you might want to wait for the second project write-up as it will show an easier / quicker method.
I am going to state upfront that my method is not the absolute best way or the quickest, or the one you would choose if you were starting a business with tons of cash to invest. There are limitations. It is however a method that can be done at home on a smaller budget without buying any special equipment and it works very well. If you follow the process, you will end up with a stock that is as good or better than most of the commercial cf stocks currently on sale - a bold statement that I will stand behind (where nobody can see me).
You are going to need a budget of around $200 in raw materials. It's not a cheap diy project but it's a bargain compared to store-bought composite stocks. For comparison, a version of the M24 / Remington 700 pattern stock I made for this tutorial is available to buy from the awesome Russian company "Raven Arms" (who also make the cf Ataman BR stocks) for $1100 plus shipping.
As with any diy project, you are responsible for your own safety and researching any safety measures etc etc.... This is well covered in lots of others websites so I am not going to spend much time on it. Just make sure to buy a decent respirator before sanding any carbon fiber...
The basics:
Carbon fiber is typically bought as a woven fabric which is coated in an epoxy resin and pushed into a mold where it hardens into your chosen shape. The cf fabrics come in different style weaves, weights and yarn tightness. You can research the different styles on your own but for the most part, your selection will be based on how it will conform to your pattern (shape) and which one you like the look of best. Some weave styles drape over corners better than others. We'll get to that in more detail later....
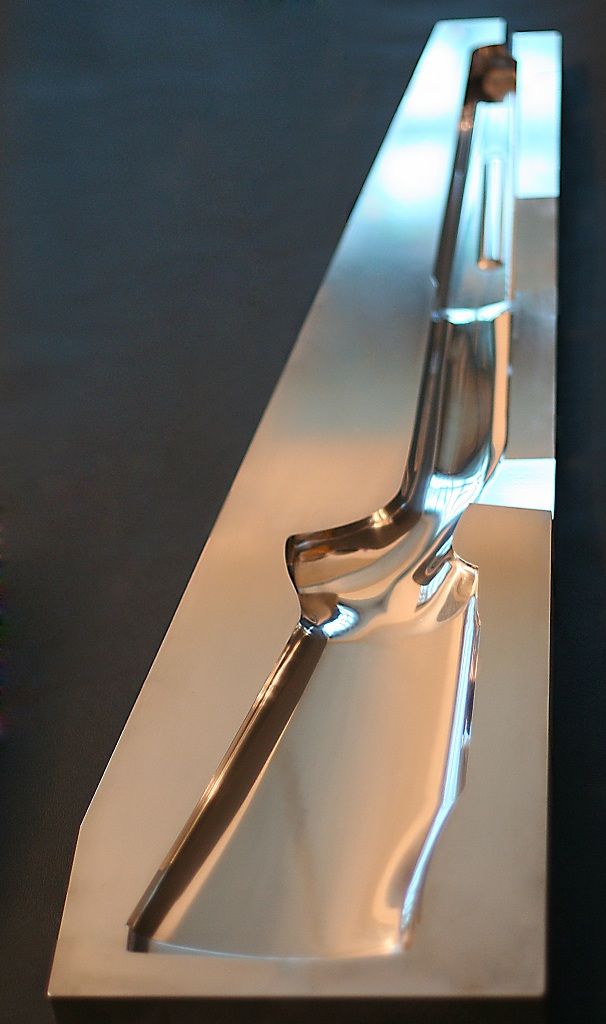
Step 1 - select a pattern and prep it for mold making. Making a mold is imo the most difficult, annoying, frustrating and expensive step to get right so don't give up too early as the process gets easier in the steps that follow. The cost of the mold is largely responsible for the high cost of commercial cf products. The cnc cut aluminum molds used in commercial operations can cost up to $80,000. The high price means many operations only have one or two which is abottleneck of inefficiency. This is what the Raven Arms molds look like:
There is a misconception that you can't achieve good results without a metal mold. The only real difference between the metal molds and what we'll use here is durability. Those metal molds will last for hundreds or thousands of uses while ours only needs to survive for 2-3 but we are going to achieve the same high quality finish believe it or not. My molds have all survived many more uses than that BTW.
It is worth putting in the time upfront for the mold because the quality of your stock surface will mirror the surface of the mold cavity. Any major imperfections in your mold will also reflect in your final product. Unlike wood, carbon fiber does not sand well into new shapes so you won't be able to fix a lot of problems later on.
In most cases the mold will be in 3 parts - left side, right side and inletting. We are going to deal with the inletting separately in this method so for now, we're going to make a 2-part mold for the outer shell or "blank". You'll then be able to use this same mold to make cf stocks for all your rifles.
The aim is to create two mold halves that fit perfectly together so we can eventually pull finished stocks from it without any alignment issues. You are going to start with the master stock known as the "plug". This can be an existing stock you want to replicate in carbon fiber or an original design that you carved out of foam, wood, plastic etc. I'll cover plug making separately so for now, we'll assume you have a stock pattern to copy. For the purpose of this tutorial, I am going to make a cf version of this M24 stock which is an easier beginners project than some of the CF bullpup stocks I have made:

Regular shaped stocks like this one are the easiest to make in carbon fiber because there are no tight corners, long flat sides or 90 degree angles which are all difficult to replicate with composites. Think about that when choosing your stock design. Remember that cf starts as a relatively thick woven fabric that is folded into the shape you want. It's hard to fold any thick fabric into complex shapes so a simple stock pattern gives less headaches. The rounded edges are also optimal for strength in composites as they don't flex like flat sided shapes.
If possible, avoid using an uncoated wood stock as the master because wood is porous so it won't release as well from your mold. You should be fine with a wood stock with a glossy coating (like many commercial wood stocks have). If you are carving your own stock pattern from wood, buy a decent plug coating from a composites store or something to seal it first.
If your plug is a stock you don't mind altering / ruining, then prep it by sanding it glossy smooth. If you plan to alter the shape of an original stock then do it before you start this project so you are creating a mold from the new shape. If you plan to replicate a stock that you want to use again, you might want to wait for the next project write up where I'll show you a more appropriate method. Remember, you can use any stock as the pattern as long as the outer dimensions are wide enough to fit your action / air cylinder. It doesn't have to be the one that came with your air gun. I chose the M24 pattern because it is a long range sniper rifle designed to accommodate heavy barrels. It has plenty of width for a 1.25" or even a 1.5" tube without the original inletting.
Sand off any textured coating. A textured surface will stick to the mold and cause air bubbles in the CF . I'm going to assume that you know how to work a piece of sand paper. Start at 150 and go all the way up to 2000. Wet sand when you get above 600. This is the most time consuming part of the process but it is worth doing it right. Don't use sand paper that is rougher than 150 unless you have to. Don't paint the stock or you will end up with chipped off paint stuck in your mold surface and then in your cf part.
A CF mold is ideally mirror smooth. The pros can spend weeks polishing their metal molds before use. You won't have to if you get your plug smooth enough at this stage. We don't need a mirror finish for this process but the smoother the better. Anywhere that isn't smooth will cause a gap between the cf and the mold which will mean air bubbles in the surface of your cf part. You can sand the mold surface later if you miss some texture but it is much easier to sand the plug now where you won't bump up against the walls of the mold.
When you are done sanding, wash it thoroughly. Loose dirt will get stuck in your mold surface and then get into the surface of your cf part and you won't be able to remove it at that stage if it is engrained between the fibers. If you are going to wipe the plug with rubbing alcohol then let it dry and wash it off before the next step as it can cause it to stick to the mold.
Step 2 - applying mold release wax
Next, apply mold release wax to the stock one side at a time. Mold release wax is cheap and easily available on eBay. I use a buffing pad to apply it, or a paper towel. Each layer should be thin and buffed shiny smooth. I use Meguiars mold release wax. It stinks and gives me headaches but an eBay seller accidentally sent me a whole crate when I ordered one pot so I am stuck with it for a while. It seems to be the go to brand for projects of this nature.
Feel free to try other brands but only use proper mold release wax. Don't substitute with auto wax etc. They aren't the same and plenty of people have ruined cf parts by assuming that any old wax or oil would be fine. Make sure what you use is compatible with pva. This is important if you want to be able to pull the stock out of the mold ever. In fact, this goes for the whole project. Don't substitute materials.
Let the first layer of wax dry and apply a second layer. I use 2 layers of wax. Some people use more but whatever. The key is to make the layer thin and not noticeable. If you can see large clumps of wax then you have too much on. On the other hand, don't over-buff and wipe all the wax off either. I use an auto buffing cloth (which I got from Walmart for $3) to buff the surface coat glossy smooth. Even if you apply the wax with a paper towel, buy something made for buffing to polish it smooth after. It may look like you wiped all the wax off but unless you see it all stuck to your buffing cloth then it is still on your plug. Wax shouldn't be visible if you have done it right. Less is more.
When the wax is dry, repeat the process for the other side of the plug. Rest the stock on a clean surface while doing this or bits of dirt will get stuck to your mold release and as anyone who attended Sunday school will tell you, dirt in your wax makes baby Jesus cry.
Wear disposable gloves when applying wax. You don't want fingerprints and it's hard to get the nasty smell of that wax off your hands. It really is filthy nasty stuff. In fact, wear disposable gloves for every part of this project. Buy vinyl or Nitrile, not latex.
Step 3 - apply PVA mold release
Coat the plug with PVA mold release (on top of the wax). It should be applied thin and smooth. A little goes a long way. A 24oz bottle will last for a number of projects. Buy the purple one unless you plan on heat curing which we aren't for this project. I got mine on eBay for less than $10. Don't worry about using pva on your stock. It dissolves away with warm water when you are done (with no residue). I spray it on or apply it with an auto buffing cloth but I have used a paper towel before too. Don't use a brush or toilet paper though. You don't want brush marks or bits of wet paper stuck in the pva coating. I learnt that the hard way....
You shouldn't be able to see the first layer of pva when it's dry. If your plug is light in color, you might see a faint purple tint but nothing more. Any excess drips should be wiped off before they dry or you will have to wash it off and start the whole thing again. There will only be drips if you are using too much btw. Don't think that pouring on an extra thick layer will help parts release easier or save you time, or make your original stock safer. It won't. The opposite is true. As always, less is more.
Apologies if I'm over-stressing the "apply it thin" point. It's just that I ruined a number of projects early on with that mistake.
Wait for the first layer of pva to dry (which won't take long) and apply a second layer. When dry, apply one more. I use a total of 3 layers of pva . Some people like to use more. I have never found a benefit as long as you cover the whole surface properly.
Repeat the process to apply pva to the other side of the stock and let it dry.
Step 4 - prevent mechanical locks
Next, Fill any cavities on your stock with something that is easily removed after. I use play doh which works very well and is cheap. Buy enough to fill the inletting cavity, screw holes and any other holes that could cause the mold to get stuck (if mold making materials get in them). You don't want to create a "mechanical lock". Even the mold release won't help if the stock is trapped in a poorly thought out mold.
Leave clean (smooth) edges with the play doh and don't cover any of the outside of the stock. You don't want bits of play doh stuck in you mold. As a side note, if you plan on using heat cure resin ever, don't use play doh. Even a tiny amount stuck to your mold causes it to release horrible smoke in the oven. It burnt my throat and eyes last time I made that mistake... It really was nasty.
Step 5 - making the first mold half
Now we're ready to make the first half of the mold. The basic idea that most mold-makers follow is that the part is separated into two halves by a flat board before resin is poured over it. I don't like trying to do that with uneven shapes like a stock where the center line is at different heights at the rear than it is at the front. Read step 3 of this guys mold making process if you can't visualize what I'm talking about here:
http://makezine.com/projects/make-24/making-a-hard-shell-mold/
I get around this problem by using epoxy putty as my mold material instead of pouring a liquid resin or using fiberglass. With Epoxy putty, you can carefully cover just the first half without needing anything to separate the two halves. It may not sound like it but trust me, it's a huge time and hair saver. I nearly gave up after trying it the other way. If you find it easier, you can draw a line down the center of the plug before you start so you have a guide. I just eye-ball it because I'm the dare-devil type.
There are various types of epoxy putty. The ideal is "tooling epoxy putty" which is designed just for this purpose. The main difference between epoxy putty types is strength, heat tolerance and ease of use. You don't want it to break when you demold (obviously), melt in the oven or stick to your gloves...
For more traditional carbon fiber production methods, a mold is required to be able to withstand heat and pressure. That isn't important for this method but if you plan on using your mold with a vacuum or with commercial prepreg, then buy proper tooling putty. It's more expensive but that is what you need and make sure to check the "heat deflection temperature".
I use a cheaper putty from Smooth-On. I love that store because they ship so quickly and it's an Aladdin's cave of fun diy materials to experiment with. Just don't try and ask them for any advice as they don't know carbon fiber. My epoxy putty cost around $80 (plus shipping) for a gallon which is way more than enough. If your stock isn't very big, you might be able to get away with one of their $25 "trial size" pots which is approx 2 quarts. The one I use is called "Free Form Air". It's not the strongest but it is strong enough if applied in thick enough layers.
Free form Air is very light and easy to use. Importantly for me, it has a low "shore hardness". Shore hardness is a measure of how easily you can scratch or dent the surface. For our purposes here, a low shore hardness means it will sand easily. I hate sanding so I prefer to spend less time on it.... Curiously, they proudly advertise that it will cure even under water. I bet many great men drowned to bring us that info....
It will be easy to damage a mold with a low shore hardness but that only matters if you plan on making tons of stocks. For reference,I have pulled 8-10 parts from a Free Form Air mold without so much as a scratch. The other reason I chose free form air is because I use it for a number of other things. It's good for making new designs, altering existing stocks and sticking parts together. Smooth-on also sell a flame retardant / heat tolerant putty which is much stronger and probably better for making molds. It is much harder to work with though and you can't apply it with your hands (it just sticks to your gloves). Choose the one that is best for your needs though. Tooling putty can be found at composites stores btw.
Most epoxy putty products come in two parts which are mixed together before use. Free Form Air has an easy 1:1 mix ratio so you could eye-ball it. I prefer to weigh it though. One part is gray, the other is white. When you see the white putty, try to resist the temptation to spread it on a bagel: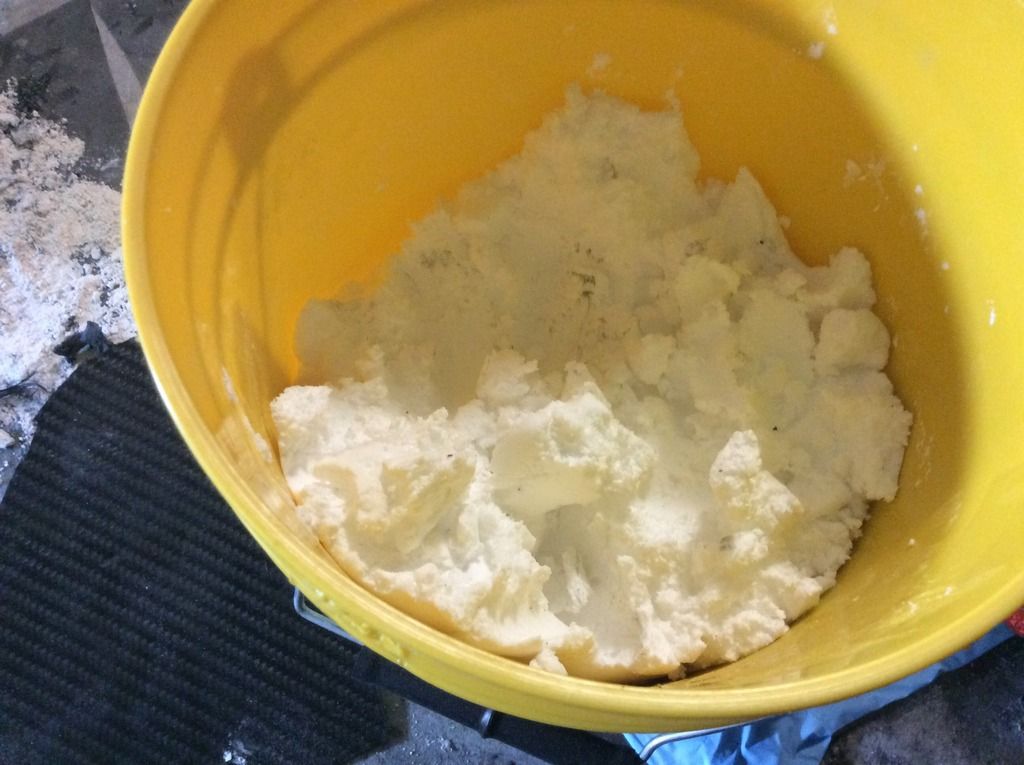
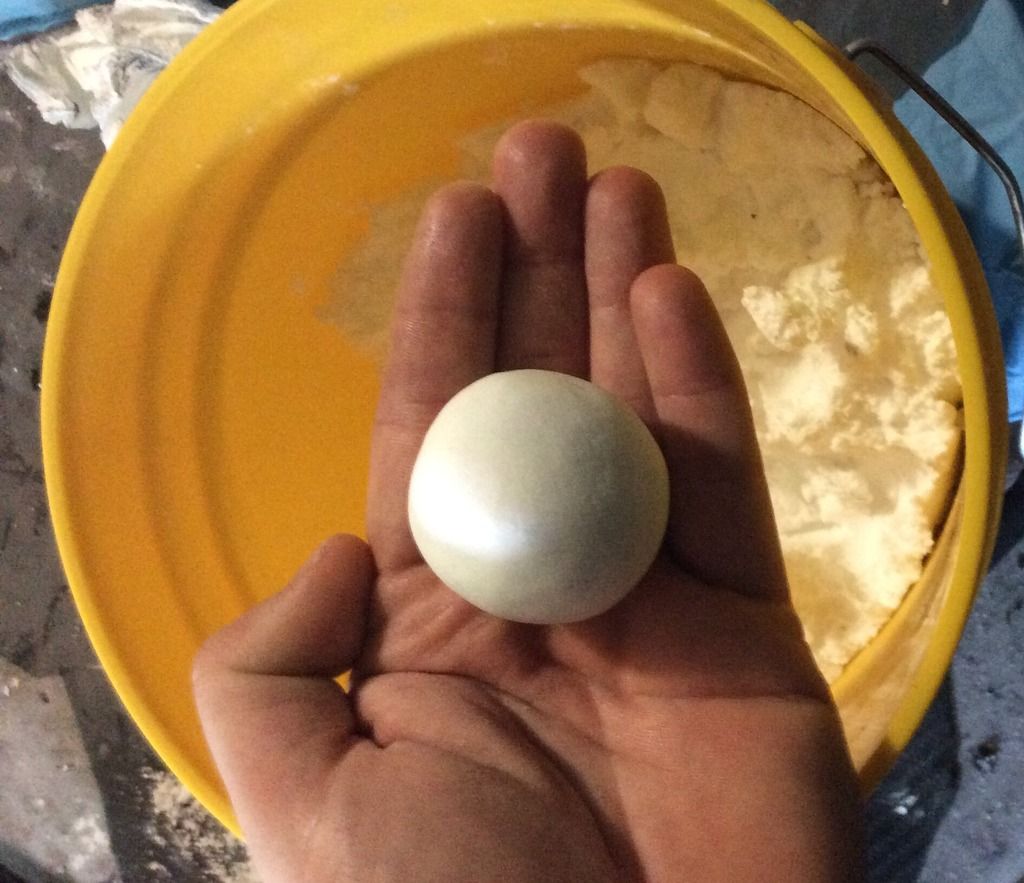
Like all room temp epoxy products, free form air's cure time depends on temp and volume. Normally, it has around 30 mins to an hour of working time before it starts to set which is perfect. If you mix too much at once and / or the room is hot, it might set too quickly. I like to mix ping pong ball sized pieces which I measure out ahead of time.
Curiously, a ping pong ball sized piece of the white putty look exactly like an actualping png ball:
Mix your putty and apply it to the first half of the plug. Push it into the surface firmly to avoid air pockets which would result in a cavity in your mold surface. A good tip is to spread a thin layer onto the surface first (like you were spreading butter), then a thicker piece will stick better. Just be carful to not disturb you mold release surface and only use a gloved finger to apply it. My hands were covered in gray goo when I was doing this step so I couldn't take a pic but, for reference, here is a pic of somebody else applying the stuff to something completely unrelated:

Don't worry about making the edges super straight and even. It is actually better if they aren't perfectly straight. If you are determined to create neat flat sides, you will need to add keys to make the two parts fit together. Google mold-making for an explanation of keys if that is the way you want to go. I don't bother as rough edges do the same job for me (they make it so it only fits together in the right position). As a side note, if your goal is to have neat exposed seams between the two halves, you can go slightly passed the center line and sand the edges into a flat straight edge after it has dried. I plan to cover the bottom of the stock with something with a little grip so no need to bother with that step here.
Now, you are going to have to use a little common sense to identify areas that need extra reinforcements so you don't snap the mold when you pull your plug. I like to make the perimeter and the middle a little thicker. 1/2" - 3/4" thick should be plenty thick enough for most of it. At 1" thick, you couldn't snap it if you tried.
On most stocks, the neck or the area just after the comb in the middle are the most vulnerable to snapping.

Step 6 - smooth the rear surface of the mold
When you have covered the first half of the plug in putty, go over it and smooth any major cracks with a gloved finger. I use Vaseline to smooth the surface. Small cracks can become large cracks when under pressure or when you are demolding so remove as many cracks as you can. You will go through a lot of Vaseline with this process so buy a big tub.
When waiting in line at the drugstore with a bunch of Vaseline and rubber gloves, you may feel the need to explain yourself to people. Don't, it's your God-given red white and blue right to buy whatever you want and who cares if they assume you are some kind of pervert! If a woman with young kids is shaking her head at you with a revolted look on her face, take it as a sign that you have bought enough gloves and Vaseline. When you are done, it should look something like this:
Leave it to dry overnight in a warm room. I leave mine next to the boiler. When you come back the next day it should be rock solid.
Step 7 - demold the first half
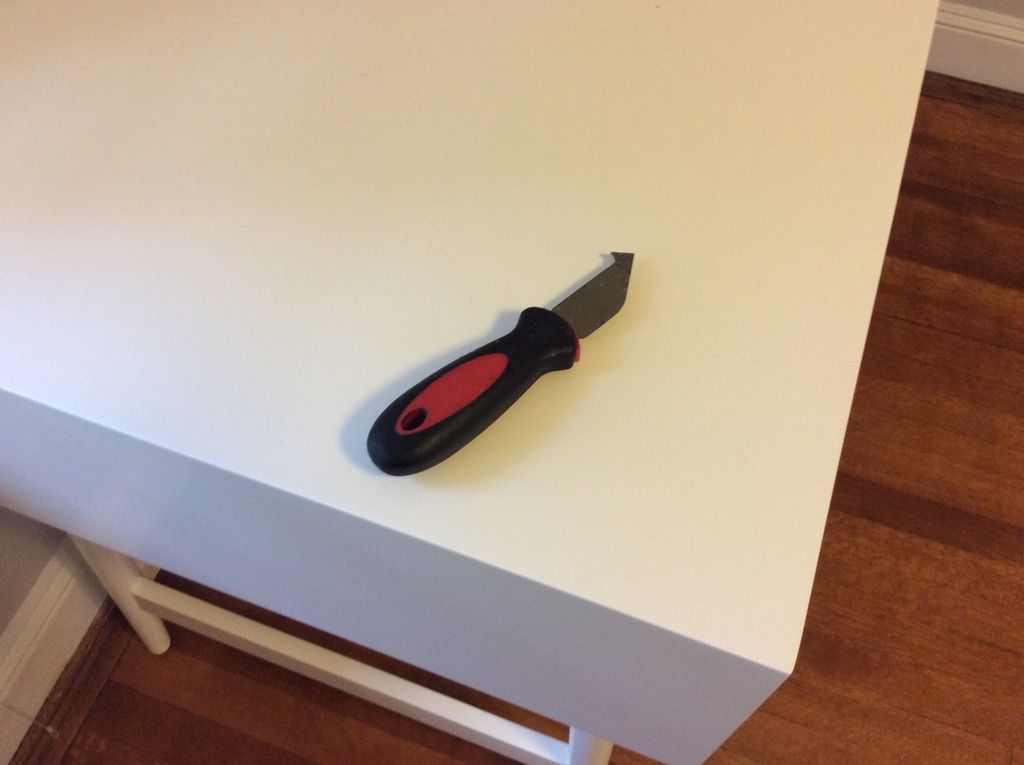
Before we make the second half of the mold, we are going to check that the first half releases properly. It might seem like it is stuck when you first attempt to demold and you'll be muttering something about this being the last time you take diy advice from a Zebra. Don't worry. If you run it under hot water for a few minutes while going round the edges and gently easing them free with a flathead screw driver, the PVA will dissolve. I use this glass cutting tool which cost $3 from Home Depot and it's one the most useful tools I own for this process:
As an edge is pulled away from the plug, I let hot water pour into the space to melt more of the PVA. It could take up to 30 minutes to release the mold. This step is a real PIA. Don't get impatient and put too much pressure on any one edge or you will break your mold. Gentle even pressure and warm water will eventually get it free. In case you are wondering how the pros do it, they use compressed air. They jam a wedge into a space they created between the mold and part and feed a compressed air line into it and the mold just pops free. If you have a compressor, feel free to do the same. I actually do have a compressor but I don't use it for this as it can just as easily break this type of mold and I can't be bothered setting it up.
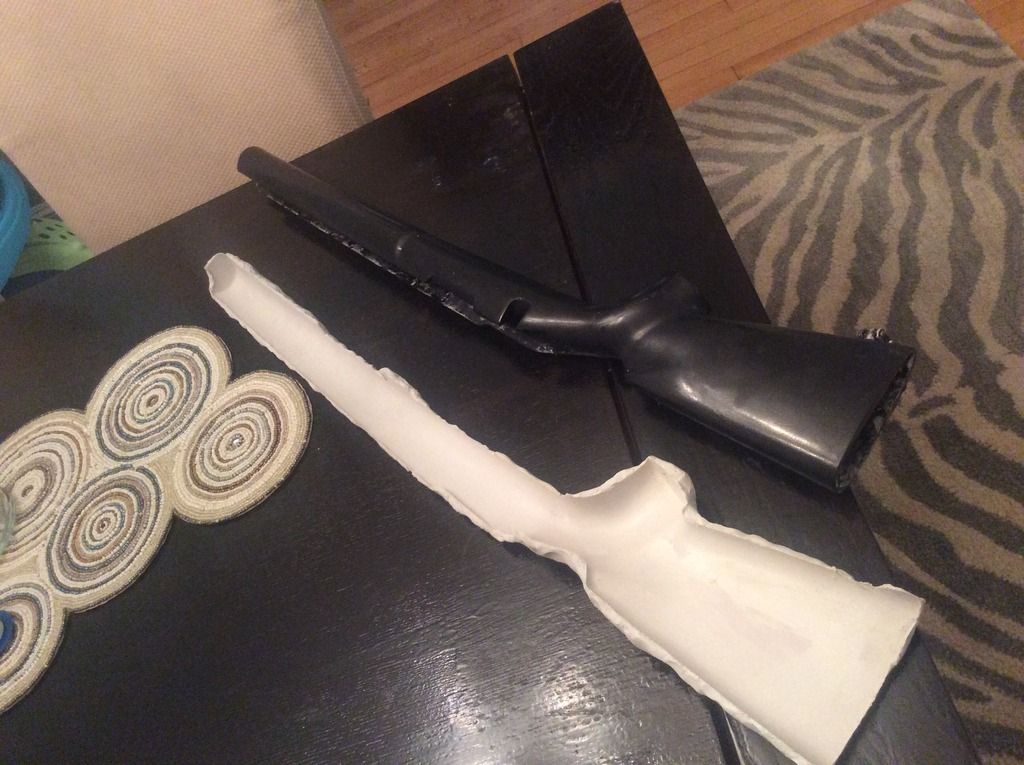
This is what my first mold half looked like:
Step 8 - inspect your work
Inspect the surface of your first mold half to make sure there is no major defects that are too big to repair. There might be a few small defects but don't worry about these. We'll fix those later. This is to be expected with epoxy putty. If you want to avoid this problem, buy a gel coat from a composites store to coat you plug before applying the epoxy putty. Read up on that on elsewhere as most cf mold making tutorials use a gel coat. I deliberately leave it out of this process to save costs and make sanding easier.
Step 9 - redo the mold release step and grease her up
If you had to use hot water to remove the plug, you probably have to redo the mold release step before you can go on to make the second half of the mold. Clean the plug and redo that step for both sides even though you already have your first mold half. It can still get stuck again when you put it back in.
Grease up the first mold half over the whole surface and around the edges with Vaseline,then, put the plug back in the mold. The Vaseline will help you ease your plug back in without cracking it. You still want to be careful though. I have broken a number of molds at this stage thinking I was home free. No fat lady has sung yet.
Step 10 - prep the mold edge
Coat the outside edge of the first mold half with Vaseline with a line that is at least 1" wide all the way around the perimeter. The second mold half is going to overlap the first half so you get a perfect fit. The Vaseline will act as a mold release to make sure the two halves don't stick together so layer it on thick. Just like my wife always says, don't be stingy with the Vaseline. Um... Anyway....
Step 11 - make the second mold half
Cover the exposed half of the stock with putty like you did with the first half. Remember to push it firmly against the surface again to avoid trapped air pockets. Go over the edge of the first half a little but obviously don't go passed where you put the layer of Vaseline. It should look something like this when you are done:
Leave it to dry overnight again.
Step 12 - demold
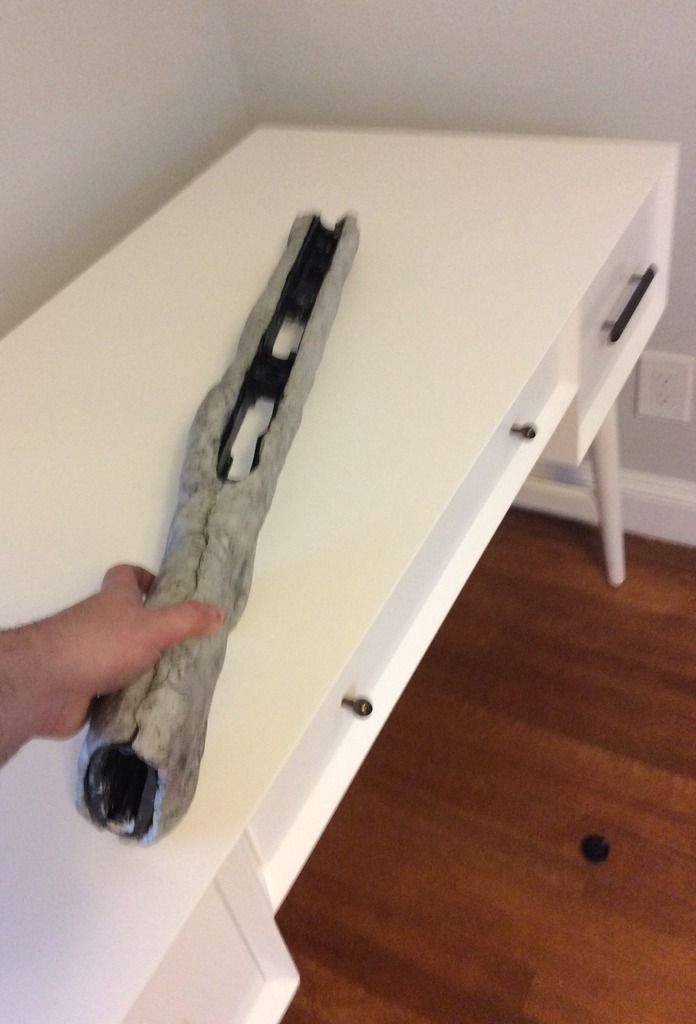
When it is dry, ease the two mold halves apart by going round the edges with the same tool you used to get the first mold half free. Getting the second mold half off the plug will be just as annoying as the first I'm afraid. Don't get impatient with it. You are nearly done so don't screw it up this late in the game. This is what my two mold halves look like when I finally got them free:

Not as pretty as the $80,000 aluminum tooling but it will do the same job. If you do accidentally snap your mold, don't panic (too much). After an appropriate amount of time cursing, kicking your dog and banging your fist against the wall, you can fix it by putting both of the broken pieces of mold back on the plug and applying more putty to the back. If this happens, put an extra thick layer where it broke so it doesn't happen again. That was obviously a point of weakness we missed the first time round.
With epoxy putty, the two broken pieces will stick back together very well. You will still see a faint line in the mold surface where the joint is but it won't be visible in your finished part after you sand it smooth. Cf just doesn't pick up that level of detail (luckily for us). You can also apply a tiny amount of putty over the crack on the mold surface and sand it smooth later, if you are worried about the potential for a trapped air pocket there.
If all went according to plan, congrats, you now have a rigid carbon fiber mold to work with. Give yourself a brief but well deserved pat on the back. The most difficult part is over! Getting the finished cf parts out of the mold won't be nearly as difficult as pulling the mold off the plug, I promise.
Step 13 - finishing the mold surface
Run your fingers over the mold surface to check how smooth it is. It's hard to tell in the pics but mine came out fairly glossy smooth already.
Sand any rough patches using high number sand paper only. Start at 350. You want to make the mold surface as smooth as you can but don't drive yourself crazy over this. You don't want to burn the house down to catch a flee. Free Form Air Epoxy putty sands fairly easily so sanding too much can easily change the shape of your mold in a way that you don't want. Using 350 or higher sand paper should prevent this to some extent.
Sanding too much will create dents in the mold surface that you might not even be able to see on the gray putty but, every defect will be clearly visible on the glossy carbon fiber part. It is the least forgiving material ever.
As a reminder, carbon fiber does not sand well at all. You can sand it smooth but you can't shape it. You can't sand out a dent to make it flat, for example, so make sure the mold surface is in the shape you want and be extra carful. Any flat surfaces should be sanded with a sanding block to keep them flat. Fill any noticeable holes with epoxy putty and sand smooth when it's dry. Use only enough putty to fill the holes. A few tiny holes are ok for the method we are going to use. Carbon fiber doesn't pick up tiny details so a few pin holes won't show on the final product (although they would with every other method).
If you pushed the putty firmly into the plug when making the mold and prepped your plug properly, then you shouldn't have much repair work to do. I had some minor stuff that took all of 5 minutes. Check that your two mold halves fit together easily. You will see a line down the middle but that's ok, as long as it closes up for the most part when you squeeze the mold halves together. These will be clamped shut when used to make the cf part.
To be continued...

[color=rgba(0, 0, 0, 0.701961)]Ok my fellow air gun enthusiasts, get ready for a new addiction - making stuff with carbon fiber. Once you learn, you will want to replace everything you own with a carbon fiber version up to and including some family members.[/color]
I am going to show you a number of different methods of making lightweight carbon fiber stocks including: a cosmetic piece, stocks made with carbon fiber sheet molding compound (like the ones made by Steyr), an easy "structural piece" with a coated surface, custom carbon fiber grips molded to the shape of your hand and how to make cf tubes for handguards and LDC's.
There is a lot to write so I am going to post it in sections so bear with me. I know there is a lot of text but if you don't have the patience to read it, I promise you don't have the patience to make a cf stock and I don't want to leave you with more questions than answers.
All of these methods can be used to make a stock for any type of air rifle. They can also be made by anyone with arms and a face. No special talent required! We are going to start with a cosmetic piece (with exposed glossy carbon fiber) which is what I assume most people want / expect to see with a cf stock. If you intend to paint your cf stock then you might want to wait for the second project write-up as it will show an easier / quicker method.
I am going to state upfront that my method is not the absolute best way or the quickest, or the one you would choose if you were starting a business with tons of cash to invest. There are limitations. It is however a method that can be done at home on a smaller budget without buying any special equipment and it works very well. If you follow the process, you will end up with a stock that is as good or better than most of the commercial cf stocks currently on sale - a bold statement that I will stand behind (where nobody can see me).
You are going to need a budget of around $200 in raw materials. It's not a cheap diy project but it's a bargain compared to store-bought composite stocks. For comparison, a version of the M24 / Remington 700 pattern stock I made for this tutorial is available to buy from the awesome Russian company "Raven Arms" (who also make the cf Ataman BR stocks) for $1100 plus shipping.
As with any diy project, you are responsible for your own safety and researching any safety measures etc etc.... This is well covered in lots of others websites so I am not going to spend much time on it. Just make sure to buy a decent respirator before sanding any carbon fiber...
The basics:
Carbon fiber is typically bought as a woven fabric which is coated in an epoxy resin and pushed into a mold where it hardens into your chosen shape. The cf fabrics come in different style weaves, weights and yarn tightness. You can research the different styles on your own but for the most part, your selection will be based on how it will conform to your pattern (shape) and which one you like the look of best. Some weave styles drape over corners better than others. We'll get to that in more detail later....
Step 1 - select a pattern and prep it for mold making. Making a mold is imo the most difficult, annoying, frustrating and expensive step to get right so don't give up too early as the process gets easier in the steps that follow. The cost of the mold is largely responsible for the high cost of commercial cf products. The cnc cut aluminum molds used in commercial operations can cost up to $80,000. The high price means many operations only have one or two which is abottleneck of inefficiency. This is what the Raven Arms molds look like:

There is a misconception that you can't achieve good results without a metal mold. The only real difference between the metal molds and what we'll use here is durability. Those metal molds will last for hundreds or thousands of uses while ours only needs to survive for 2-3 but we are going to achieve the same high quality finish believe it or not. My molds have all survived many more uses than that BTW.
It is worth putting in the time upfront for the mold because the quality of your stock surface will mirror the surface of the mold cavity. Any major imperfections in your mold will also reflect in your final product. Unlike wood, carbon fiber does not sand well into new shapes so you won't be able to fix a lot of problems later on.
In most cases the mold will be in 3 parts - left side, right side and inletting. We are going to deal with the inletting separately in this method so for now, we're going to make a 2-part mold for the outer shell or "blank". You'll then be able to use this same mold to make cf stocks for all your rifles.
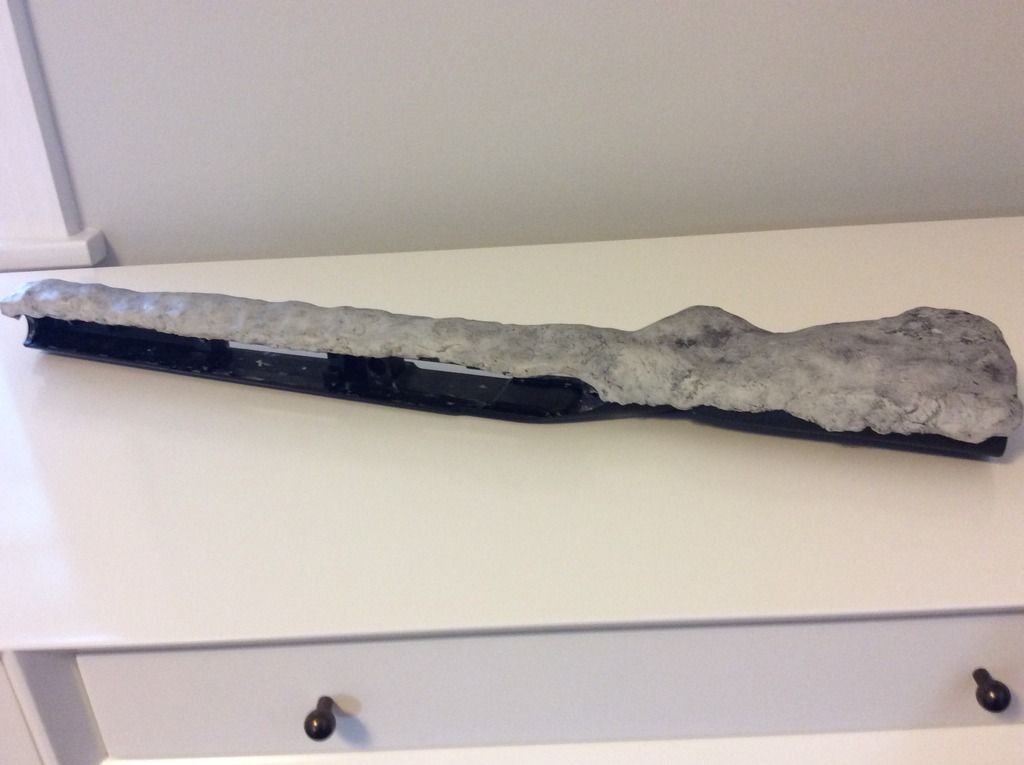
The aim is to create two mold halves that fit perfectly together so we can eventually pull finished stocks from it without any alignment issues. You are going to start with the master stock known as the "plug". This can be an existing stock you want to replicate in carbon fiber or an original design that you carved out of foam, wood, plastic etc. I'll cover plug making separately so for now, we'll assume you have a stock pattern to copy. For the purpose of this tutorial, I am going to make a cf version of this M24 stock which is an easier beginners project than some of the CF bullpup stocks I have made:

Regular shaped stocks like this one are the easiest to make in carbon fiber because there are no tight corners, long flat sides or 90 degree angles which are all difficult to replicate with composites. Think about that when choosing your stock design. Remember that cf starts as a relatively thick woven fabric that is folded into the shape you want. It's hard to fold any thick fabric into complex shapes so a simple stock pattern gives less headaches. The rounded edges are also optimal for strength in composites as they don't flex like flat sided shapes.
If possible, avoid using an uncoated wood stock as the master because wood is porous so it won't release as well from your mold. You should be fine with a wood stock with a glossy coating (like many commercial wood stocks have). If you are carving your own stock pattern from wood, buy a decent plug coating from a composites store or something to seal it first.
If your plug is a stock you don't mind altering / ruining, then prep it by sanding it glossy smooth. If you plan to alter the shape of an original stock then do it before you start this project so you are creating a mold from the new shape. If you plan to replicate a stock that you want to use again, you might want to wait for the next project write up where I'll show you a more appropriate method. Remember, you can use any stock as the pattern as long as the outer dimensions are wide enough to fit your action / air cylinder. It doesn't have to be the one that came with your air gun. I chose the M24 pattern because it is a long range sniper rifle designed to accommodate heavy barrels. It has plenty of width for a 1.25" or even a 1.5" tube without the original inletting.
Sand off any textured coating. A textured surface will stick to the mold and cause air bubbles in the CF . I'm going to assume that you know how to work a piece of sand paper. Start at 150 and go all the way up to 2000. Wet sand when you get above 600. This is the most time consuming part of the process but it is worth doing it right. Don't use sand paper that is rougher than 150 unless you have to. Don't paint the stock or you will end up with chipped off paint stuck in your mold surface and then in your cf part.
A CF mold is ideally mirror smooth. The pros can spend weeks polishing their metal molds before use. You won't have to if you get your plug smooth enough at this stage. We don't need a mirror finish for this process but the smoother the better. Anywhere that isn't smooth will cause a gap between the cf and the mold which will mean air bubbles in the surface of your cf part. You can sand the mold surface later if you miss some texture but it is much easier to sand the plug now where you won't bump up against the walls of the mold.
When you are done sanding, wash it thoroughly. Loose dirt will get stuck in your mold surface and then get into the surface of your cf part and you won't be able to remove it at that stage if it is engrained between the fibers. If you are going to wipe the plug with rubbing alcohol then let it dry and wash it off before the next step as it can cause it to stick to the mold.
Step 2 - applying mold release wax
Next, apply mold release wax to the stock one side at a time. Mold release wax is cheap and easily available on eBay. I use a buffing pad to apply it, or a paper towel. Each layer should be thin and buffed shiny smooth. I use Meguiars mold release wax. It stinks and gives me headaches but an eBay seller accidentally sent me a whole crate when I ordered one pot so I am stuck with it for a while. It seems to be the go to brand for projects of this nature.
Feel free to try other brands but only use proper mold release wax. Don't substitute with auto wax etc. They aren't the same and plenty of people have ruined cf parts by assuming that any old wax or oil would be fine. Make sure what you use is compatible with pva. This is important if you want to be able to pull the stock out of the mold ever. In fact, this goes for the whole project. Don't substitute materials.
Let the first layer of wax dry and apply a second layer. I use 2 layers of wax. Some people use more but whatever. The key is to make the layer thin and not noticeable. If you can see large clumps of wax then you have too much on. On the other hand, don't over-buff and wipe all the wax off either. I use an auto buffing cloth (which I got from Walmart for $3) to buff the surface coat glossy smooth. Even if you apply the wax with a paper towel, buy something made for buffing to polish it smooth after. It may look like you wiped all the wax off but unless you see it all stuck to your buffing cloth then it is still on your plug. Wax shouldn't be visible if you have done it right. Less is more.
When the wax is dry, repeat the process for the other side of the plug. Rest the stock on a clean surface while doing this or bits of dirt will get stuck to your mold release and as anyone who attended Sunday school will tell you, dirt in your wax makes baby Jesus cry.
Wear disposable gloves when applying wax. You don't want fingerprints and it's hard to get the nasty smell of that wax off your hands. It really is filthy nasty stuff. In fact, wear disposable gloves for every part of this project. Buy vinyl or Nitrile, not latex.
Step 3 - apply PVA mold release
Coat the plug with PVA mold release (on top of the wax). It should be applied thin and smooth. A little goes a long way. A 24oz bottle will last for a number of projects. Buy the purple one unless you plan on heat curing which we aren't for this project. I got mine on eBay for less than $10. Don't worry about using pva on your stock. It dissolves away with warm water when you are done (with no residue). I spray it on or apply it with an auto buffing cloth but I have used a paper towel before too. Don't use a brush or toilet paper though. You don't want brush marks or bits of wet paper stuck in the pva coating. I learnt that the hard way....
You shouldn't be able to see the first layer of pva when it's dry. If your plug is light in color, you might see a faint purple tint but nothing more. Any excess drips should be wiped off before they dry or you will have to wash it off and start the whole thing again. There will only be drips if you are using too much btw. Don't think that pouring on an extra thick layer will help parts release easier or save you time, or make your original stock safer. It won't. The opposite is true. As always, less is more.
Apologies if I'm over-stressing the "apply it thin" point. It's just that I ruined a number of projects early on with that mistake.
Wait for the first layer of pva to dry (which won't take long) and apply a second layer. When dry, apply one more. I use a total of 3 layers of pva . Some people like to use more. I have never found a benefit as long as you cover the whole surface properly.
Repeat the process to apply pva to the other side of the stock and let it dry.
Step 4 - prevent mechanical locks
Next, Fill any cavities on your stock with something that is easily removed after. I use play doh which works very well and is cheap. Buy enough to fill the inletting cavity, screw holes and any other holes that could cause the mold to get stuck (if mold making materials get in them). You don't want to create a "mechanical lock". Even the mold release won't help if the stock is trapped in a poorly thought out mold.
Leave clean (smooth) edges with the play doh and don't cover any of the outside of the stock. You don't want bits of play doh stuck in you mold. As a side note, if you plan on using heat cure resin ever, don't use play doh. Even a tiny amount stuck to your mold causes it to release horrible smoke in the oven. It burnt my throat and eyes last time I made that mistake... It really was nasty.
Step 5 - making the first mold half
Now we're ready to make the first half of the mold. The basic idea that most mold-makers follow is that the part is separated into two halves by a flat board before resin is poured over it. I don't like trying to do that with uneven shapes like a stock where the center line is at different heights at the rear than it is at the front. Read step 3 of this guys mold making process if you can't visualize what I'm talking about here:
http://makezine.com/projects/make-24/making-a-hard-shell-mold/
I get around this problem by using epoxy putty as my mold material instead of pouring a liquid resin or using fiberglass. With Epoxy putty, you can carefully cover just the first half without needing anything to separate the two halves. It may not sound like it but trust me, it's a huge time and hair saver. I nearly gave up after trying it the other way. If you find it easier, you can draw a line down the center of the plug before you start so you have a guide. I just eye-ball it because I'm the dare-devil type.
There are various types of epoxy putty. The ideal is "tooling epoxy putty" which is designed just for this purpose. The main difference between epoxy putty types is strength, heat tolerance and ease of use. You don't want it to break when you demold (obviously), melt in the oven or stick to your gloves...
For more traditional carbon fiber production methods, a mold is required to be able to withstand heat and pressure. That isn't important for this method but if you plan on using your mold with a vacuum or with commercial prepreg, then buy proper tooling putty. It's more expensive but that is what you need and make sure to check the "heat deflection temperature".
I use a cheaper putty from Smooth-On. I love that store because they ship so quickly and it's an Aladdin's cave of fun diy materials to experiment with. Just don't try and ask them for any advice as they don't know carbon fiber. My epoxy putty cost around $80 (plus shipping) for a gallon which is way more than enough. If your stock isn't very big, you might be able to get away with one of their $25 "trial size" pots which is approx 2 quarts. The one I use is called "Free Form Air". It's not the strongest but it is strong enough if applied in thick enough layers.
Free form Air is very light and easy to use. Importantly for me, it has a low "shore hardness". Shore hardness is a measure of how easily you can scratch or dent the surface. For our purposes here, a low shore hardness means it will sand easily. I hate sanding so I prefer to spend less time on it.... Curiously, they proudly advertise that it will cure even under water. I bet many great men drowned to bring us that info....
It will be easy to damage a mold with a low shore hardness but that only matters if you plan on making tons of stocks. For reference,I have pulled 8-10 parts from a Free Form Air mold without so much as a scratch. The other reason I chose free form air is because I use it for a number of other things. It's good for making new designs, altering existing stocks and sticking parts together. Smooth-on also sell a flame retardant / heat tolerant putty which is much stronger and probably better for making molds. It is much harder to work with though and you can't apply it with your hands (it just sticks to your gloves). Choose the one that is best for your needs though. Tooling putty can be found at composites stores btw.
Most epoxy putty products come in two parts which are mixed together before use. Free Form Air has an easy 1:1 mix ratio so you could eye-ball it. I prefer to weigh it though. One part is gray, the other is white. When you see the white putty, try to resist the temptation to spread it on a bagel:

Like all room temp epoxy products, free form air's cure time depends on temp and volume. Normally, it has around 30 mins to an hour of working time before it starts to set which is perfect. If you mix too much at once and / or the room is hot, it might set too quickly. I like to mix ping pong ball sized pieces which I measure out ahead of time.
Curiously, a ping pong ball sized piece of the white putty look exactly like an actualping png ball:

Mix your putty and apply it to the first half of the plug. Push it into the surface firmly to avoid air pockets which would result in a cavity in your mold surface. A good tip is to spread a thin layer onto the surface first (like you were spreading butter), then a thicker piece will stick better. Just be carful to not disturb you mold release surface and only use a gloved finger to apply it. My hands were covered in gray goo when I was doing this step so I couldn't take a pic but, for reference, here is a pic of somebody else applying the stuff to something completely unrelated:
Don't worry about making the edges super straight and even. It is actually better if they aren't perfectly straight. If you are determined to create neat flat sides, you will need to add keys to make the two parts fit together. Google mold-making for an explanation of keys if that is the way you want to go. I don't bother as rough edges do the same job for me (they make it so it only fits together in the right position). As a side note, if your goal is to have neat exposed seams between the two halves, you can go slightly passed the center line and sand the edges into a flat straight edge after it has dried. I plan to cover the bottom of the stock with something with a little grip so no need to bother with that step here.
Now, you are going to have to use a little common sense to identify areas that need extra reinforcements so you don't snap the mold when you pull your plug. I like to make the perimeter and the middle a little thicker. 1/2" - 3/4" thick should be plenty thick enough for most of it. At 1" thick, you couldn't snap it if you tried.
On most stocks, the neck or the area just after the comb in the middle are the most vulnerable to snapping.

Step 6 - smooth the rear surface of the mold
When you have covered the first half of the plug in putty, go over it and smooth any major cracks with a gloved finger. I use Vaseline to smooth the surface. Small cracks can become large cracks when under pressure or when you are demolding so remove as many cracks as you can. You will go through a lot of Vaseline with this process so buy a big tub.
When waiting in line at the drugstore with a bunch of Vaseline and rubber gloves, you may feel the need to explain yourself to people. Don't, it's your God-given red white and blue right to buy whatever you want and who cares if they assume you are some kind of pervert! If a woman with young kids is shaking her head at you with a revolted look on her face, take it as a sign that you have bought enough gloves and Vaseline. When you are done, it should look something like this:

Leave it to dry overnight in a warm room. I leave mine next to the boiler. When you come back the next day it should be rock solid.
Step 7 - demold the first half
Before we make the second half of the mold, we are going to check that the first half releases properly. It might seem like it is stuck when you first attempt to demold and you'll be muttering something about this being the last time you take diy advice from a Zebra. Don't worry. If you run it under hot water for a few minutes while going round the edges and gently easing them free with a flathead screw driver, the PVA will dissolve. I use this glass cutting tool which cost $3 from Home Depot and it's one the most useful tools I own for this process:

As an edge is pulled away from the plug, I let hot water pour into the space to melt more of the PVA. It could take up to 30 minutes to release the mold. This step is a real PIA. Don't get impatient and put too much pressure on any one edge or you will break your mold. Gentle even pressure and warm water will eventually get it free. In case you are wondering how the pros do it, they use compressed air. They jam a wedge into a space they created between the mold and part and feed a compressed air line into it and the mold just pops free. If you have a compressor, feel free to do the same. I actually do have a compressor but I don't use it for this as it can just as easily break this type of mold and I can't be bothered setting it up.
This is what my first mold half looked like:

Step 8 - inspect your work
Inspect the surface of your first mold half to make sure there is no major defects that are too big to repair. There might be a few small defects but don't worry about these. We'll fix those later. This is to be expected with epoxy putty. If you want to avoid this problem, buy a gel coat from a composites store to coat you plug before applying the epoxy putty. Read up on that on elsewhere as most cf mold making tutorials use a gel coat. I deliberately leave it out of this process to save costs and make sanding easier.
Step 9 - redo the mold release step and grease her up
If you had to use hot water to remove the plug, you probably have to redo the mold release step before you can go on to make the second half of the mold. Clean the plug and redo that step for both sides even though you already have your first mold half. It can still get stuck again when you put it back in.
Grease up the first mold half over the whole surface and around the edges with Vaseline,then, put the plug back in the mold. The Vaseline will help you ease your plug back in without cracking it. You still want to be careful though. I have broken a number of molds at this stage thinking I was home free. No fat lady has sung yet.
Step 10 - prep the mold edge
Coat the outside edge of the first mold half with Vaseline with a line that is at least 1" wide all the way around the perimeter. The second mold half is going to overlap the first half so you get a perfect fit. The Vaseline will act as a mold release to make sure the two halves don't stick together so layer it on thick. Just like my wife always says, don't be stingy with the Vaseline. Um... Anyway....
Step 11 - make the second mold half
Cover the exposed half of the stock with putty like you did with the first half. Remember to push it firmly against the surface again to avoid trapped air pockets. Go over the edge of the first half a little but obviously don't go passed where you put the layer of Vaseline. It should look something like this when you are done:

Leave it to dry overnight again.
Step 12 - demold
When it is dry, ease the two mold halves apart by going round the edges with the same tool you used to get the first mold half free. Getting the second mold half off the plug will be just as annoying as the first I'm afraid. Don't get impatient with it. You are nearly done so don't screw it up this late in the game. This is what my two mold halves look like when I finally got them free:

Not as pretty as the $80,000 aluminum tooling but it will do the same job. If you do accidentally snap your mold, don't panic (too much). After an appropriate amount of time cursing, kicking your dog and banging your fist against the wall, you can fix it by putting both of the broken pieces of mold back on the plug and applying more putty to the back. If this happens, put an extra thick layer where it broke so it doesn't happen again. That was obviously a point of weakness we missed the first time round.
With epoxy putty, the two broken pieces will stick back together very well. You will still see a faint line in the mold surface where the joint is but it won't be visible in your finished part after you sand it smooth. Cf just doesn't pick up that level of detail (luckily for us). You can also apply a tiny amount of putty over the crack on the mold surface and sand it smooth later, if you are worried about the potential for a trapped air pocket there.
If all went according to plan, congrats, you now have a rigid carbon fiber mold to work with. Give yourself a brief but well deserved pat on the back. The most difficult part is over! Getting the finished cf parts out of the mold won't be nearly as difficult as pulling the mold off the plug, I promise.
Step 13 - finishing the mold surface
Run your fingers over the mold surface to check how smooth it is. It's hard to tell in the pics but mine came out fairly glossy smooth already.
Sand any rough patches using high number sand paper only. Start at 350. You want to make the mold surface as smooth as you can but don't drive yourself crazy over this. You don't want to burn the house down to catch a flee. Free Form Air Epoxy putty sands fairly easily so sanding too much can easily change the shape of your mold in a way that you don't want. Using 350 or higher sand paper should prevent this to some extent.
Sanding too much will create dents in the mold surface that you might not even be able to see on the gray putty but, every defect will be clearly visible on the glossy carbon fiber part. It is the least forgiving material ever.
As a reminder, carbon fiber does not sand well at all. You can sand it smooth but you can't shape it. You can't sand out a dent to make it flat, for example, so make sure the mold surface is in the shape you want and be extra carful. Any flat surfaces should be sanded with a sanding block to keep them flat. Fill any noticeable holes with epoxy putty and sand smooth when it's dry. Use only enough putty to fill the holes. A few tiny holes are ok for the method we are going to use. Carbon fiber doesn't pick up tiny details so a few pin holes won't show on the final product (although they would with every other method).
If you pushed the putty firmly into the plug when making the mold and prepped your plug properly, then you shouldn't have much repair work to do. I had some minor stuff that took all of 5 minutes. Check that your two mold halves fit together easily. You will see a line down the middle but that's ok, as long as it closes up for the most part when you squeeze the mold halves together. These will be clamped shut when used to make the cf part.
To be continued...
