So I see a lot of people posting problems with their Nomad-II compressors. Granted this is my second one, the first had to be sent back and replaced. Here is my maintenance routine. I have 75 fills on this little machine. I add the 3 drops of oil every 5 fills, I purge my moisture valve (the one under the machine) every five fills. And I do the lube maintenance every 25 fills. I just did this the other night and thought I would do this little write up for you guys.
Step one: Do the lube maintenance.
Step two: Remove the male foster fitting, and both of the relief valves.

Step three: remove all 12 of the #2 philips screws from the outer case.

Step four: un-hook the 2 sets of wires for the switches

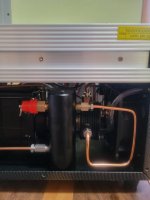
Step five: remove the outer case.

Step six: use a box end wrench 8mm and loosen all 3 of the airline fittings. DO NOT REMOVE YET

Step seven: loosen the moisture bleed screw bung 10mm from the bottom of the machine. DO NOT REMOVE YET

Step eight: remove the airlines from the black filter hosing.
Step nine: remove the moisture bung from the filter housing.

Step ten: take out the filter housing and loosen the upper cap. I use a strap wrench around the body and a large crescent wrench for the cap (didnt have the right size wrench at the cabin)

DONT LOOSE THIS LITTLE GUY

Step eleven: pull out your old filter (i use a set of tweezers stab into it, and squeeze.)
 This is the moisture trap filter after 75 fills.
. Step twelve: Wipe out the filter canister really well, I use Hoppes #9 on a lint free rag.

Step thirteen: Insert a new filter (the ones sent with your compressor)

Step fourteen: reverse all the other steps and put your machine back together. Pay close attention to the brass airlines that attach to the canister, they bend really easy, and the fitting are prone to cross threading. I put the bleed screw bung in the bottom of the filter housing loose just to help secure it while I fiddle with the brass lines. Also look at pic 3 (the ones with the switch wires) ensure that both sets of wires are in this cut out so they are not pinched by the case. When putting your 12 screws back in I have noticed that if I put the top 2 screws in first LOOSE I can maneuver the case around to get the rest started, do not tighten any of the screws till all 12 are started. Replace the filter on your fill hose and you're good to go. Hope this helps some of you folks out keeping your machine running strong. Cheers
Step one: Do the lube maintenance.
Step two: Remove the male foster fitting, and both of the relief valves.
Step three: remove all 12 of the #2 philips screws from the outer case.
Step four: un-hook the 2 sets of wires for the switches
Step five: remove the outer case.
Step six: use a box end wrench 8mm and loosen all 3 of the airline fittings. DO NOT REMOVE YET
Step seven: loosen the moisture bleed screw bung 10mm from the bottom of the machine. DO NOT REMOVE YET
Step eight: remove the airlines from the black filter hosing.
Step nine: remove the moisture bung from the filter housing.
Step ten: take out the filter housing and loosen the upper cap. I use a strap wrench around the body and a large crescent wrench for the cap (didnt have the right size wrench at the cabin)
DONT LOOSE THIS LITTLE GUY
Step eleven: pull out your old filter (i use a set of tweezers stab into it, and squeeze.)
. Step twelve: Wipe out the filter canister really well, I use Hoppes #9 on a lint free rag.
Step thirteen: Insert a new filter (the ones sent with your compressor)
Step fourteen: reverse all the other steps and put your machine back together. Pay close attention to the brass airlines that attach to the canister, they bend really easy, and the fitting are prone to cross threading. I put the bleed screw bung in the bottom of the filter housing loose just to help secure it while I fiddle with the brass lines. Also look at pic 3 (the ones with the switch wires) ensure that both sets of wires are in this cut out so they are not pinched by the case. When putting your 12 screws back in I have noticed that if I put the top 2 screws in first LOOSE I can maneuver the case around to get the rest started, do not tighten any of the screws till all 12 are started. Replace the filter on your fill hose and you're good to go. Hope this helps some of you folks out keeping your machine running strong. Cheers