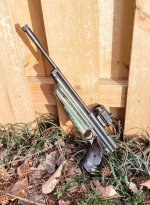
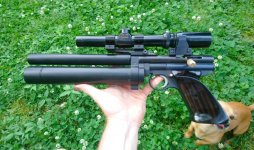
I've added the last couple of parts to my Crosman 1322 (until maybe I feel like upgrading the trigger). I travel for work and I'm happy to have this for a backpack plinker. I have a holster coming from a fellow on Etsy.

All the parts I've added include:

From Pyramid Air, the steel breech.

From Alchemy Airwerks, the stainless bolt with extended probe and stainless cocking handle, a flat top HP valve and brass flat top piston, an aluminum barrel band with front site, a stainless steel safety, and a stronger hammer spring.

From Magnum-Airpower, a magnum hammer and an aluminum trigger cover.

From Alliance Hobby, cherry wood grips and forearm, and the Stainless shoulder bolt.

Edited to add: Almost forgot, also from Pyramid the Crosman LPA MIM rear sight for steel breech. For some reason this part costs more than the stock gun by itself lol!

20230316_103323.jpg
20230316_103508.jpg
20230316_103604.jpg
 
Last edited:
The cherry furniture looks real nice. Did you have any issues dealing with Alliance Hobby?
No, I was a little concerned becausei read all the bad reviews after i placed my order. However he got all the parts I ordered, (including one of his barrel bands that I didn't end up using on this gun) in about 3-4 weeks. He was a little slow perhaps but I definitely got everything.
 
  • Like
Reactions: iAMzehTOASTY1
No, I was a little concerned becausei read all the bad reviews after i placed my order. However he got all the parts I ordered, (including one of his barrel bands that I didn't end up using on this gun) in about 3-4 weeks. He was a little slow perhaps but I definitely got everything.
Thanks, good to hear of a smooth transaction.
 
  • Like
Reactions: MichaelHunt
Thank you! Yes I've been looking at the various trigger and sear options. I'm thinking of getting the low friction trigger with the little wheels on it.
I have one of those in my pumper, and would HIGHLY recommend getting a p-rod trigger instead. I have one in my pcp 1322. Bit more spendy, but easily 5x better trigger. You will either need to epoxy the lower gap in the hammer or get a custom hammer with no gap. The p-rod trigger sear sets once it's behind the hammer, on a normal 13xx hammer, it will set in the recess of the hammer before it is fully cocked. Couple other tips, when installing the trigger frame with the prod trigger, make sure you press the trigger blade so as you dont try to install the trigger group with the sear already set, this can cause the sear to break from undue pressure on it. I had to file down the sear a little in mine to get it to work, maybe because of a thinner or smaller tube it's mounting to?

I've already spent so much on both of mine, I've put off upgrading the trigger in my pumper for quite some time. But I will do it eventually.

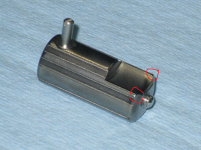
Also including a photo of the hammer I use. And do not recommend. I will probably just epoxy the original hammer on the pumper when I do it again. Though this one has an adjustable striker which is nice, theres no use for that on a pumper. I have no clue why the top is notched. Theres no reason for this. This missing piece causes it to cant some inside the tube upon firing or cocking, and the flutes reduce surface area for the hammer to stay centered as well, and increase friction in very small areas. The raised edges galled grooves into one of my tubes over time. The small raised bits, one you can see circled, one on the opposite side circled but mostly out of view.

Untitled.png274052293_10159692567564034_3234930441305853851_n.jpg98453758_10158215695414034_2233642229556051968_n.jpg
 
Last edited:
I have one of those in my pumper, and would HIGHLY recommend getting a p-rod trigger instead. I have one in my pcp 1322. Bit more spendy, but easily 5x better trigger. You will either need to epoxy the lower gap in the hammer or get a custom hammer with no gap. The p-rod trigger sear sets once it's behind the hammer, on a normal 13xx hammer, it will set in the recess of the hammer before it is fully cocked. Couple other tips, when installing the trigger frame with the prod trigger, make sure you press the trigger blade so as you dont try to install the trigger group with the sear already set, this can cause the sear to break from undue pressure on it. I had to file down the sear a little in mine to get it to work, maybe because of a thinner or smaller tube it's mounting to?

I've already spent so much on both of mine, I've put off upgrading the trigger in my pumper for quite some time. But I will do it eventually.

Also including a photo of the hammer I use. And do not recommend. I will probably just epoxy the original hammer on the pumper when I do it again. Though this one has an adjustable striker which is nice, theres no use for that on a pumper. I have no clue why the top is notched. Theres no reason for this. This missing piece causes it to cant some inside the tube upon firing or cocking, and the flutes reduce surface area for the hammer to stay centered as well, and increase friction in very small areas. The raised edges galled grooves into one of my tubes over time. The small raised bits, one you can see circled, one on the opposite side circled but mostly out of view.

View attachment 342128View attachment 342126View attachment 342129
Interesting, thanks for the tips!. I will look at the p-rod trigger.
Yeah that's the same kind of hammer I installed into my pistol, so I will keep an eye on its performance, maybe I'll put the stock one back in there. It's all a learning experience for me at this point.
You have some very cool modified 1322s!
 
  • Like
Reactions: Long_Gun_Dallas
Indeed. Thanks! Just make sure the tube remains clean and lubed where the hammer is and it should be fine. But personally I would just try and use the factory hammer. Only reason I use it is because it's in the pcp and the adjustable striker is integrated with the tune on it. Makes it very efficient air usage-wise. I chamfered those small raised bits and polished it as well as the tube. Really need to get another tube and hammer. Maybe some day, lol.
 
Last edited:
  • Like
Reactions: MichaelHunt
That is a beauty. i am also thinking trigger is the next upgrade.
i have 2 im working on i want to give 1 to my dad. cherry wood grips from alliance hobby.
i had a pistol scope around, still looking for an alternative to the $60 rear sight.

View attachment 342661

View attachment 342664
Very cool! Those are some nice looking pistols! They look very accurate as well. I haven't been able to sight mine in yet, as it has been raining here lol, but it looks like the weather will be clearing up soon. Yes that rear sight for the steel breech seems oddly expensive. I like the idea of keeping mine open sights, because it fits in my backpack better. I do have a second 1322, I might try putting a pistol scope or red dot sight on it if I get around to modifying it.
 
  • Like
Reactions: CraigWisco
I have one of those in my pumper, and would HIGHLY recommend getting a p-rod trigger instead. I have one in my pcp 1322. Bit more spendy, but easily 5x better trigger. You will either need to epoxy the lower gap in the hammer or get a custom hammer with no gap. The p-rod trigger sear sets once it's behind the hammer, on a normal 13xx hammer, it will set in the recess of the hammer before it is fully cocked. Couple other tips, when installing the trigger frame with the prod trigger, make sure you press the trigger blade so as you dont try to install the trigger group with the sear already set, this can cause the sear to break from undue pressure on it. I had to file down the sear a little in mine to get it to work, maybe because of a thinner or smaller tube it's mounting to?

I've already spent so much on both of mine, I've put off upgrading the trigger in my pumper for quite some time. But I will do it eventually.

Also including a photo of the hammer I use. And do not recommend. I will probably just epoxy the original hammer on the pumper when I do it again. Though this one has an adjustable striker which is nice, theres no use for that on a pumper. I have no clue why the top is notched. Theres no reason for this. This missing piece causes it to cant some inside the tube upon firing or cocking, and the flutes reduce surface area for the hammer to stay centered as well, and increase friction in very small areas. The raised edges galled grooves into one of my tubes over time. The small raised bits, one you can see circled, one on the opposite side circled but mostly out of view.

View attachment 342128View attachment 342126View attachment 342129
the notch in the hammer is to clear the 4-48 breech screw that some breeches use that is under the bolt. makes loading pellets smoother without the screw and counter sink to catch pellets on. Without the notch the hammer hits the screw. that said a 13xx tube would have to be drilled and tapped to use that a breech screw there.
 
I've added the last couple of parts to my Crosman 1322 (until maybe I feel like upgrading the trigger). I travel for work and I'm happy to have this for a backpack plinker. I have a holster coming from a fellow on Etsy.

All the parts I've added include:

From Pyramid Air, the steel breech.

From Alchemy Airwerks, the stainless bolt with extended probe and stainless cocking handle, a flat top HP valve and brass flat top piston, an aluminum barrel band with front site, a stainless steel safety, and a stronger hammer spring.

From Magnum-Airpower, a magnum hammer and an aluminum trigger cover.

From Alliance Hobby, cherry wood grips and forearm, and the Stainless shoulder bolt.

Edited to add: Almost forgot, also from Pyramid the Crosman LPA MIM rear sight for steel breech. For some reason this part costs more than the stock gun by itself lol!

View attachment 341008View attachment 341009View attachment 341010
Perfect!!
 
  • Like
Reactions: MichaelHunt