900 FPS with 38.5 gr .254 NSA slugs (69.26 ft-ibs), I haven't chronied any of the others yet with this tune, however none of them sound like they are breaking the sound barrier, even the 25.4 grainers.
Holy Smokes, the more I read about this pistol the more I fall in love ,.........69 FPE ? :oops::oops::oops::oops:
 
  • Like
Reactions: TeslaToTheMoon
Holy Smokes, the more I read about this pistol the more I fall in love ,.........69 FPE ? :oops::oops::oops::oops:
Here’s a shot string I took note of after I finally got the chrony to reliably read my shots. This is from roughly 330 bar (filled direct from my Yong Heng) down to like 160 bar.

The Yong Heng burst discs seem to blow at around 340 for me, thus the reason I’m only filling to 330. Do the same at your own risk, I’ll probably get a GX CS4 or a CS5 eventually so I won’t be pushing it as hard then.

IMG_9573.jpeg
 
  • Like
Reactions: weevil
900 FPS with 38.5 gr .254 NSA slugs (69.26 ft-ibs), I haven't chronied any of the others yet with this tune, however none of them sound like they are breaking the sound barrier, even the 25.4 grainers.
I figured you would be testing at the hot end! It would be interesting to know if it’s more resistant to dumping with a lower power tune.
 
  • Like
Reactions: TeslaToTheMoon
Here’s a shot string I took note of after I finally got the chrony to reliably read my shots. This is from roughly 330 bar (filled direct from my Yong Heng) down to like 160 bar.

The Yong Heng burst discs seem to blow at around 340 for me, thus the reason I’m only filling to 330. Do the same at your own risk, I’ll probably get a GX CS4 or a CS5 eventually so I won’t be pushing it as hard then.

View attachment 387349
Definitely a cliff! It’s great to see a string though. We haven’t done much of that here on this thread…
 
Here’s a shot string I took note of after I finally got the chrony to reliably read my shots. This is from roughly 330 bar (filled direct from my Yong Heng) down to like 160 bar.

The Yong Heng burst discs seem to blow at around 340 for me, thus the reason I’m only filling to 330. Do the same at your own risk, I’ll probably get a GX CS4 or a CS5 eventually so I won’t be pushing it as hard then.

View attachment 387349
If I ever get one I would be filling to 250 BAR,...still gets 60 FPE and a solid 8 shots, fantastic !!
 
  • Like
Reactions: TeslaToTheMoon

TeslaToTheMoon​

Destructive testing can be very informative, providing it is not involuntary. Your air dump from the Huben piston sounds like a useful test, if it is repeatable. Although I am not sure it is realistic. If you design a vehicle to be crash safe at 100 MPH it may be to heavy to be practical in ordinary use.

That said, it would be interesting to know if the muffler I designed would stand up to such a valve dump. I suspect not. I welcome you to try it after you evaluate it for sound and groups size and shift..

I do not design for such drastic system failures, because everyone wants "light weight". My design approach does consider the average pressure down the barrel to produce the known FPE. I would prefer to know the muzzle pressure, but that actually comes up in an unregulated PCP as the air tank pressure drops, via longer valve duration.

I have attached a screenshot of a spreadsheet that calculates the average bore pressure required to produce a given FPE, with a given caliber and barrel length. I add a factor for pellet friction, that is assumed, rather than measured - in this case. For a Huben pistol to make 80 FPE from its 8" barrel requires an average bore pressure of around 2500 PSI. The muzzle pressure would be perhaps half that if the air tank is at 4500 PSI. When the air tank pressure has dropped to 2500 PSI, the valve would have to stay open until the pellet left the muzzle, or you won't get 80 FPE.

Even though a muffler is an open system, I consider the bulk pressure in the first and perhaps second expansion chambers, based on their volumes. Then I apply that pressure to the casing of the muffler and see if this is below the rated pressure for that material, at that thickness, at at that radius.

You asked about making your muffler stronger. If it seems impossible to make that shape strong enough to not blow up under a valve dump, while maintaining acceptable sound suppression, then design it to be "fail safe". In other words leave a weaker area that will fail first, in a direction that is least likely to cause injury or damage.

I think the large flat sides on your muffler see massive bending stresses that an equivalent round section would not see. I am not about to suggest you abandon your chamfered rectangle design. But adding generous fillets to the inside corners between flats might help make the structure look more round to the air inside.

I often taper the wall thickness of my outer casings, because it is the rear near the barrel muzzle that see the highest air pressure. The rear also sees the greatest bending moment, due to the frontal weight. By thinning out the walls near the front, that material adds less bending stress to the rear. And it should be able to handle reduced air pressure, based on the pressure gradient across the device.

From the locks of it, failure started at the rear of your muffler, in the far lower wall opposite the thread insert. It also looks like the casing failed in tension, front to rear. High speed video would help here.

I think that the degree of foam infill between the back of your muffler and the first air stripper is effectively reducing the instantaneous expansion volume where it is desperately needed. Now, with a valve dump, perhaps any reasonable size expansion volume would fill up, and then the structure see unusually high air pressure, between air tank pressure and whatever pressure reduction occurs due to flow down the baffle bores.

Average barrel pressure for FPE.PNG

F
 
  • Like
Reactions: TeslaToTheMoon

TeslaToTheMoon​

Destructive testing can be very informative, providing it is not involuntary. Your air dump from the Huben piston sounds like a useful test, if it is repeatable. Although I am not sure it is realistic. If you design a vehicle to be crash safe at 100 MPH it may be to heavy to be practical in ordinary use.

That said, it would be interesting to know if the muffler I designed would stand up to such a valve dump. I suspect not. I welcome you to try it after you evaluate it for sound and groups size and shift..

I do not design for such drastic system failures, because everyone wants "light weight". My design approach does consider the average pressure down the barrel to produce the known FPE. I would prefer to know the muzzle pressure, but that actually comes up in an unregulated PCP as the air tank pressure drops, via longer valve duration.

I have attached a screenshot of a spreadsheet that calculates the average bore pressure required to produce a given FPE, with a given caliber and barrel length. I add a factor for pellet friction, that is assumed, rather than measured - in this case. For a Huben pistol to make 80 FPE from its 8" barrel requires an average bore pressure of around 2500 PSI. The muzzle pressure would be perhaps half that if the air tank is at 4500 PSI. When the air tank pressure has dropped to 2500 PSI, the valve would have to stay open until the pellet left the muzzle, or you won't get 80 FPE.

Even though a muffler is an open system, I consider the bulk pressure in the first and perhaps second expansion chambers, based on their volumes. Then I apply that pressure to the casing of the muffler and see if this is below the rated pressure for that material, at that thickness, at at that radius.

You asked about making your muffler stronger. If it seems impossible to make that shape strong enough to not blow up under a valve dump, while maintaining acceptable sound suppression, then design it to be "fail safe". In other words leave a weaker area that will fail first, in a direction that is least likely to cause injury or damage.

I think the large flat sides on your muffler see massive bending stresses that an equivalent round section would not see. I am not about to suggest you abandon your chamfered rectangle design. But adding generous fillets to the inside corners between flats might help make the structure look more round to the air inside.

I often taper the wall thickness of my outer casings, because it is the rear near the barrel muzzle that see the highest air pressure. The rear also sees the greatest bending moment, due to the frontal weight. By thinning out the walls near the front, that material adds less bending stress to the rear. And it should be able to handle reduced air pressure, based on the pressure gradient across the device.

From the locks of it, failure started at the rear of your muffler, in the far lower wall opposite the thread insert. It also looks like the casing failed in tension, front to rear. High speed video would help here.

I think that the degree of foam infill between the back of your muffler and the first air stripper is effectively reducing the instantaneous expansion volume where it is desperately needed. Now, with a valve dump, perhaps any reasonable size expansion volume would fill up, and then the structure see unusually high air pressure, between air tank pressure and whatever pressure reduction occurs due to flow down the baffle bores.

View attachment 387451
F
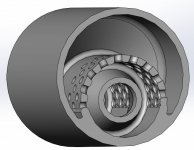
@subscriber just wanted to let you know that I have been unable to print the "Offset Huben .25 LDC 1.5 x 5 inch HALF-20 Thread" file. Seems to have some floating internal components.

The "AGN subscriber 0.5_ X 20 Offset Airgun Suppressor Enlarged Threads For Printability" file prints perfectly but threads are a little loose. By reducing X and Y by 1% it still prints perfectly and the threads are tighter. This is the one I am using.

Again thank you so much for your design and making it available. It is the best moderator I have tested for sound reduction.

Thanks,

Jim K.
 
So, Jim, I could not find a reason for the STL failure when resaving the STL. Sometimes Solidworks asks if I want to save "all bodies" when I believe there is only one; but not this time.

Anyway, if you liked the 5" long muffler I designed, I have stretched that to 8.5" on request from the same forum member who asked for the 5" version. It would be interesting to see if the longer version performs any better for you. I am attaching the STL inside a zip file to this post.

View attachment STL for Offset Huben .25 LDC 1.5 x 8.5 inch HALF-20 Thread.zip


Offset Huben LDC 1.5 x 8.5 inch HALF - 20 Thread 2.JPG


Offset Huben LDC 1.5 x 8.5 inch HALF - 20 Thread 1.JPG


Offset Huben LDC 1.5 x 8.5 inch HALF - 20 Thread.PNG
 

Attachments

  • Offset Huben LDC 1.5 x 8.5 inch HALF - 20 Thread 4.JPG
    Offset Huben LDC 1.5 x 8.5 inch HALF - 20 Thread 4.JPG
    51.9 KB · Views: 9
@subscriber just wanted to let you know that I have been unable to print the "Offset Huben .25 LDC 1.5 x 5 inch HALF-20 Thread" file. Seems to have some floating internal components.

The "AGN subscriber 0.5_ X 20 Offset Airgun Suppressor Enlarged Threads For Printability" file prints perfectly but threads are a little loose. By reducing X and Y by 1% it still prints perfectly and the threads are tighter. This is the one I am using.

Again thank you so much for your design and making it available. It is the best moderator I have tested for sound reduction.

Thanks,

Jim K.
Have you tried rotating the model by 180 degrees? The orientation of the original file is not in the proper orientation for printing unless you rotate it 180 degrees, which I did when enlarging the threads. Apologies if you did, this is just the most obvious reason that I can think of for why it might not be working for you.
 
That is a good point, TeslaToTheMoon.

My STL files are notorious for needing to be oriented deliberately before slicing. I should get into the habit of flipping the parts end over end, when I am finished designing them.

I have developed preferences for how I design these mufflers, and by luck of the draw, the "top" when standing on end is not the correct way round for printing - not until you flip the part over. What happens if you try to print up side down, is all the conical baffles hang in space, without support - except they can't do that. If you managed to get the printer to run, the part would be worthless, with junk lying at the bottom of the outer tube.

Now, in the post where I attached the STL, I did explain that the threads must be uppermost on the printer platen.

Anyway, I am very interested in how the thing performs for other people.
 
  • Like
Reactions: M0ist0ne
That is a good point, TeslaToTheMoon.

My STL files are notorious for needing to be oriented deliberately before slicing. I should get into the habit of flipping the parts end over end, when I am finished designing them.

I have developed preferences for how I design these mufflers, and by luck of the draw, the "top" when standing on end is not the correct way round for printing - not until you flip the part over. What happens if you try to print up side down, is all the conical baffles hang in space, without support - except they can't do that. If you managed to get the printer to run, the part would be worthless, with junk lying at the bottom of the outer tube.

Now, in the post where I attached the STL, I did explain that the threads must be uppermost on the printer platen.

Anyway, I am very interested in how the thing performs for other people.
I did not turn it over. And what I got was pretty much what you described. If I had looked at your internal drawings would have realized that it could not print that way. Will turn it over and try again. Then will try the longer one.

Thanks,

Jim K.
 
Here's my rough draft of a loading gate.

Forgot to make one additional adjustment so had to use a longer screw to test fit. Probably just going to ditch the magnet-on-screw approach and go with just a pair near the bottom. Need to make a few small adjustments and reprint. Going to run one of subscriber's mods this afternoon.

Afterthought: may lengthen it by a few mm too--l think I can get access to 3 of the mag cylinders vs the 2.

InCollage_20230909_132813721.jpg
 
Once more,....what is so bad about the stock loading gate ?
I may be dating myself but I do remember making phone calls in a coin operated phone booth. Loading this awesome pistol feels like making a long distance call and all you have is a bag full of dimes. The loading gate is very easy to load and it functions just fine BUT it requires a lot of patience and repetition. I took off the factory gate and now I can load 5 at a time. I have an aluminum gate with magnets that fits over the exposed pellets. Works great and makes this pistol Mo Better.
 
  • Like
Reactions: Coolhand
I may be dating myself but I do remember making phone calls in a coin operated phone booth. Loading this awesome pistol feels like making a long distance call and all you have is a bag full of dimes. The loading gate is very easy to load and it functions just fine BUT it requires a lot of patience and repetition. I took off the factory gate and now I can load 5 at a time. I have an aluminum gate with magnets that fits over the exposed pellets. Works great and makes this pistol Mo Better.
ahhh I see, I'm a patient person, not in a hurry and also don't target shoot nor plink so I guess for me the Stock one is just fine then.
 
  • Like
Reactions: Coolhand
Got a question for those with moderator adapters. I got my first adapter today. When unscrewing the stock muzzle nut I saw how the front piece which covers the barrel comes loose. After installing the adapter it appears the front piece still has some wiggle in it. It moves from side to side a bit as I tighten or remove a moderator. Is anyone else seeing this? This is one of the custom ones from Kelly.
 
Got a question for those with moderator adapters. I got my first adapter today. When unscrewing the stock muzzle nut I saw how the front piece which covers the barrel comes loose. After installing the adapter it appears the front piece still has some wiggle in it. It moves from side to side a bit as I tighten or remove a moderator. Is anyone else seeing this? This is one of the custom ones from Kelly.
Yes, there is some wiggle within the tolerance between the pin and the slot it goes in at the back until you tighten it down all the way. If you’re doing this regularly you will probably see a POI shift from the variance of the front sight post. It’s probably not much though.
 
  • Like
Reactions: Genob