You are using an out of date browser. It may not display this or other websites correctly.
You should upgrade or use an alternative browser.
You should upgrade or use an alternative browser.
Has Anyone Re-Wrapped a DonnyFL FX Moderator to make it Quieter?
- Thread starter MikeAllen
- Start date
- Status
- Not open for further replies.
Have there been any recent up dates to this idea? I am intrigued by this idea, and would love to have a set made for 3 of my DFL.
Upvote 0
I like to see individuals experimenting with moderators designs. It shows interest, but I also see folks are reinventing the wheel. First, using a Db meter is fraught with repeatability issues, all to the point of being unreliable and essentially useless.. Next, packing material does not limit sound volume. It only changes the sound signature. Central tube designs perform poorly. They are the most common designs because they are easier to make, There are 3 things that work best to reduce noise, volume, and propellent air turbulence (behind the pellet) and a light wrap on the outside of the moderator because it rings, especially if it's metal. Those things all attenuate the charge energy and therefore the sound level of the report. These are the things that have worked best for me and I've been making my own for 40 years. My suggestion to all you experimenters is to watch slow motion videos of guns firing projectiles and watch the propellent gasses at barrel exit time. This is what you have to deal with in a mod design. Good luck.
Upvote 0
You can record your shooting session with a camera which uses the .MOV format. You can extract that audio using something like VLC. I usually extract it to a .WAV file and then import that into Audacity, which is a sound editing tool. At that point you will have a relatively high quality stereo recording of the shot(s) and can analyze it to your hearts content... and YES it IS repeatable and very useful.I like to see individuals experimenting with moderators designs. It shows interest, but I also see folks are reinventing the wheel. First, using a Db meter is fraught with repeatability issues, all to the point of being unreliable and essentially useless.
Audio of a Condor shooting 70fpe first BARE, then with a Tatsu and then with an Ember.
Analysis of a sample similar to the above but of a Spooky 22 compared to a Tatsu 25,

Um no, I don't think that is true. "Packing material" can and does absorb some sound. Take a Huggett or Weirauch apart and remove the felt packing material. Compare. You will see for yourself.. Next, packing material does not limit sound volume.
*Anyone* can make a pretty good moderator with an empty tube and a couple of end caps. Improving that basic design beyond about 3 additional decibels is difficult. Improving that design AND keeping the cost of production down is exceptionally difficult, but it can be done and I will again submit Huggett and Weirauch for your consideration. Improving that design, keeping the cost of production down and making it smaller, now THAT is an interesting problem.
Those simple "resonant" chamber hair curler designs with a fender washer are brilliant and if you look into the designer of those units you'll see that he really has been designing them for a very long time. He doesn't "wrap" the outside of his designs. His designs depend upon "capturing" the shot signature via resonant chambers and then dampening it with some felt wrapped around hair curlers. Devilishly simple and deceptively brilliant.
Last edited:
Upvote 0
Knowing how good the hair curler approach worked (and how hard they were to beat) I thought about how I'd come up with a better hair curler.
One of my more promising ideas is what @subscriber called "digital foam". I wanted a mesh that air could flow through, but not straight through... and unlike hair curlers, I wanted them sized to my specific specifications. I also thought I might be able to do something about the fender washers too.
Oh, and I'm nowhere near as talented with CAD as Subscriber, so I was also working within those constraints.
I made a simple stacking baffle design, sized to fit inside a carbon fiber tube that I was using as a shroud. What makes this design different happens when you slice it. By turning off the walls and using gyroid infill... I was able to create a mesh to spec. Between 15-35% seemed to work best. It makes a very convoluted mesh that has proven to be very durable.

This was a significant improvement on solid 3d printed baffles. Encouraged I made more designs that were a few mm smaller in diameter than my shroud and wrapped them with felt. I found getting them installed with the felt was a bit of a pain in the ass... so during one round of testing I decided to try without the felt. I was surprised to find that my ears couldn't tell the difference. My hypothesis is that the mesh is performing a similar role as the felt.
But... along the way, I noticed that designs printed in PETG seemed to be a little better than ones printed in PLA. That led to my next idea...
One of my more promising ideas is what @subscriber called "digital foam". I wanted a mesh that air could flow through, but not straight through... and unlike hair curlers, I wanted them sized to my specific specifications. I also thought I might be able to do something about the fender washers too.
Oh, and I'm nowhere near as talented with CAD as Subscriber, so I was also working within those constraints.
I made a simple stacking baffle design, sized to fit inside a carbon fiber tube that I was using as a shroud. What makes this design different happens when you slice it. By turning off the walls and using gyroid infill... I was able to create a mesh to spec. Between 15-35% seemed to work best. It makes a very convoluted mesh that has proven to be very durable.
This was a significant improvement on solid 3d printed baffles. Encouraged I made more designs that were a few mm smaller in diameter than my shroud and wrapped them with felt. I found getting them installed with the felt was a bit of a pain in the ass... so during one round of testing I decided to try without the felt. I was surprised to find that my ears couldn't tell the difference. My hypothesis is that the mesh is performing a similar role as the felt.
But... along the way, I noticed that designs printed in PETG seemed to be a little better than ones printed in PLA. That led to my next idea...
Upvote 0
so ... i you combine your "felt" with baffle's inside ?????Knowing how good the hair curler approach worked (and how hard they were to beat) I thought about how I'd come up with a better hair curler.
One of my more promising ideas is what @subscriber called "digital foam". I wanted a mesh that air could flow through, but not straight through... and unlike hair curlers, I wanted them sized to my specific specifications. I also thought I might be able to do something about the fender washers too.
Oh, and I'm nowhere near as talented with CAD as Subscriber, so I was also working within those constraints.
I made a simple stacking baffle design, sized to fit inside a carbon fiber tube that I was using as a shroud. What makes this design different happens when you slice it. By turning off the walls and using gyroid infill... I was able to create a mesh to spec. Between 15-35% seemed to work best. It makes a very convoluted mesh that has proven to be very durable.
View attachment 413934
This was a significant improvement on solid 3d printed baffles. Encouraged I made more designs that were a few mm smaller in diameter than my shroud and wrapped them with felt. I found getting them installed with the felt was a bit of a pain in the ass... so during one round of testing I decided to try without the felt. I was surprised to find that my ears couldn't tell the difference. My hypothesis is that the mesh is performing a similar role as the felt.
But... along the way, I noticed that designs printed in PETG seemed to be a little better than ones printed in PLA. That led to my next idea...
Upvote 0
Oh, heh, guess I should have completed the reading of your post. Great minds think alikeKnowing how good the hair curler approach worked (and how hard they were to beat) I thought about how I'd come up with a better hair curler.
One of my more promising ideas is what @subscriber called "digital foam". I wanted a mesh that air could flow through, but not straight through... and unlike hair curlers, I wanted them sized to my specific specifications. I also thought I might be able to do something about the fender washers too.
Oh, and I'm nowhere near as talented with CAD as Subscriber, so I was also working within those constraints.
I made a simple stacking baffle design, sized to fit inside a carbon fiber tube that I was using as a shroud. What makes this design different happens when you slice it. By turning off the walls and using gyroid infill... I was able to create a mesh to spec. Between 15-35% seemed to work best. It makes a very convoluted mesh that has proven to be very durable.
View attachment 413934
This was a significant improvement on solid 3d printed baffles. Encouraged I made more designs that were a few mm smaller in diameter than my shroud and wrapped them with felt. I found getting them installed with the felt was a bit of a pain in the ass... so during one round of testing I decided to try without the felt. I was surprised to find that my ears couldn't tell the difference. My hypothesis is that the mesh is performing a similar role as the felt.
But... along the way, I noticed that designs printed in PETG seemed to be a little better than ones printed in PLA. That led to my next idea...
You can actually draw up a baffle and then print it with no walls. Only the infill will print. You can then set the density of your infill to whatever you want. Here are a couple of "K"-baffles drawn that way.
30% density
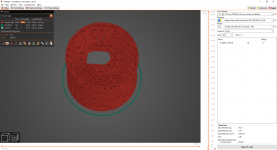
20% density
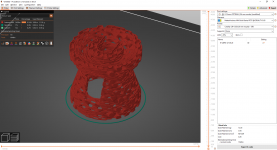
So clearly you could print a complete moderator using that design. It would be a porous moderator. The one below is one of my designs sliced with out walls at 20% density.
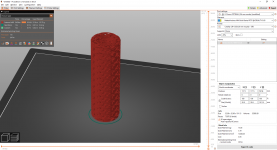
Same design printed at 70% density.
The insert would probably just screw right into that with that density. It would still be plenty porous and might be an interesting thing to test.
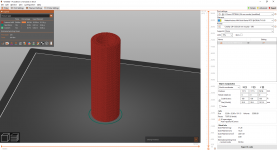
Might as well have a look at 95% density since I have it in the slicer.
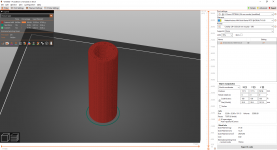
Can clearly see the thread pattern of the M14 x 1.25 EZ Tap insert. Even the "Airgun Only" logo is visible if you look for it.
You could then use a 0.6 or 0.8 nozzle to make the mesh stronger. I have a .6 on my printer right now. Might run one tonight. I have put it up in a different thread so as to not hijack this one further.
Last edited:
Upvote 0
My Leshiy Classic proved the opposite. Original (exccentric) moderator worked poorly.Central tube designs perform poorly. They are the most common designs because they are easier to make,
Upvote 0
*Effective 3/27/2024 - The discussion of the creation, fabrication, or modification of airgun moderators is prohibited. The discussion of any "adapters" used to convert an airgun moderator to a firearm silencer will result in immediate termination of the account.*
Upvote 0
- Status
- Not open for further replies.