First time pcp (Notos)

After about 2 months of waiting, my first foray into pcp is underway via the Umarex Notos CRK.
Goal was a backyard friendly and cheaper than powder burning fun experience.
After about 100 rounds of 15.89 Hades and figuring out the West Hunter scope, I am getting a feel for the Notos.

The concrete slab behind the target is the loudest sound. The West Hunter optics and mount work well. The 3D printed insert is excellent.

And this gun is more accurate than I am at the moment.

31 yard 5 shot grouping - there was a good gust of right to left wind, but that shot to the left was most likely me.
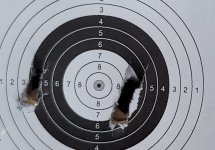
20230604_203003.jpg

I hope to pop this Notos open and adjust the trigger to be lighter. Carm mags and a gauge block were ordered because, why not!

Appreciate everyone sharing their experiences here. Allowed me to make an informed decision, a happy purchase, and happy 3D print. Goals met.

Shooting from this platform that is very old, but does the trick.
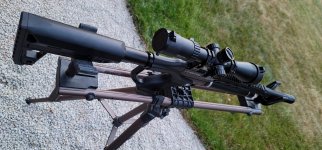
20230604_201939.jpg
 
Quick write-up on what worked for me when modifying the Notos Trigger to achieve shorter travel and lighter weight:

The Notos comes with an adjustable stock which you must attach (unless you want to use it like a pistol). To access the trigger, the adjustable stock needs to be removed/unattached to expose the 4 screws that allow access to the trigger area. Adjusting the trigger can be done without accessing the trigger area - it is in the manual and mentioned later here.

After removing the 4 screws, the one piece metal comes out fairly easily to expose the trigger area.

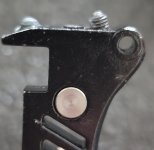
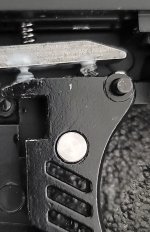
The trigger itself has 3 grub screws. One on the left, one in the middle, and one of the right (see the pictures below for the left, middle, right references - the left and right screws are easily seen with the middle screw nearly flush with the trigger)

As it comes stock, the left grub screw does not appear to have any function that I understand (I'm not an expert). Stock, the flat-ish top faces down and is flush with the trigger. I removed this screw, flipped it around, and sanded it smooth. This screw is now out/up and not flush and is used as what I will describe as a feel for the 2nd stage.

The middle grub screw is used to loosen and tighten the ball bearing on the safety switch. If you loosen it enough, the safety and ball will fall out. You can loosen, tighten, and/or lube these to meet your preferences for the safety.

The right screw is the adjustable screw which greatly influences the trigger. This screw can be loosened/tightened/moved directly through the trigger; no access to the trigger area is required. The Notos manual provides instructions on this adjustment.

Based on my trigger and preferences, getting direct access to this grub screw was needed - adjustment via the manual would work, but not as well in my opinion. The screw had a point to it sharper than a self-tapping sheet metal screw. The screw was completely removed from the trigger. Then, this point was sanded down with some sandpaper and the top of the screw was rounded via the sandpaper as well. The screw was then put back in and adjusted to where the trigger was so light and had such a short travel that it would fire regardless of the safety position (not desired). After some more adjustment of the left and right screws, this is where things ended up for me to ensure the safety works.
trigermod.jpg

In the gun:
triggerin.jpg

The safety works as designed at this position - trigger won't break with safety on. The 1st stage travel is short as I preferred (quite short). The left screw touch is felt well for that aforementioned 2nd stage feel. A light pull beyond that touch initiates the break. The screw area was hit was some TW25B mil-comm lubricant protectant that I've used with powder burners for years (white substance in the pictures). Hopefully that has no issues in the pcp world.

Total effort was about 10 minutes. Took longer to write this post and crop images.

Any tips, corrections, or warnings are appreciated.
 
On another note - counted strokes this time to go from fully empty to full filled on the Notos (last green line on the Notos gauge). Actual strokes that were meant to fill the Notos were 117 strokes - will try to explain that below.

This was the pattern, which as a new person to PCP, not sure if it is correct. Constructive Criticism appreciated!

Took the 4 uncles pump and attached the fill probe from the Notos. Closed the valve screw on the pump. Did a little more than 10 strokes in a controlled slow fashion. "Priming" the pump - I think. (not counting these 10 strokes in the 117)

Session 1:
Attached the fill probe to the Notos. Did 30 strokes in what I feel is a smooth, steady, and slow fashion with a pause at the bottom of each stroke.
Then untwisted the valve screw on the pump to release all the pressure quickly. Did one pump with the screw open. Then closed the screw. Fill probe stayed as is in the Notos. Felt the top of the pump every now and then. It never gets hot, but is warm around 25-30 strokes.

Session 2:
Waited about 5 minutes. Repeated 30 strokes and feels of the pump's heat. Released air as before in pump. Did one stroke. Closed the screw. Probe in Notos stays as is.

Session 3:
Waited another 5 minutes and did 30 strokes. Same pattern as before with pump, screw, and probe.

Session4:
Got sidetracked and came about about 15 minutes later. Did 27 more strokes. Release pressure in pump and Notos is full. Put cap back on pump hose and closed pump screw.

Each time a new session began, the hose and pump would need to be re-pressurized since everything was released. Those strokes that are "re-pressurizing" are included in the 117. The "re-pressurizing" seems to take at least 5-10 strokes (more strokes in each progressing session) to be equal or greater than the what is in the Notos and begin forcing the air in to the Notos... so around 20 or more of the 117 strokes may actually be pressurizing the pump and hose vs the Notos.

Next time I go from the lowest mark in the green on the Notos to the highest mark in the green on the Notos, I will try to remember to count strokes. I feel like it is somewhere around 50-60 strokes as I've done this multiple times now and am done in only 2 sessions.
 
  • Like
Reactions: KatoKevin454
Quick write-up on what worked for me when modifying the Notos Trigger to achieve shorter travel and lighter weight:

The Notos comes with an adjustable stock which you must attach (unless you want to use it like a pistol). To access the trigger, the adjustable stock needs to be removed/unattached to expose the 4 screws that allow access to the trigger area. Adjusting the trigger can be done without accessing the trigger area - it is in the manual and mentioned later here.

After removing the 4 screws, the one piece metal comes out fairly easily to expose the trigger area.

The trigger itself has 3 grub screws. One on the left, one in the middle, and one of the right (see the pictures below for the left, middle, right references - the left and right screws are easily seen with the middle screw nearly flush with the trigger)

As it comes stock, the left grub screw does not appear to have any function that I understand (I'm not an expert). Stock, the flat-ish top faces down and is flush with the trigger. I removed this screw, flipped it around, and sanded it smooth. This screw is now out/up and not flush and is used as what I will describe as a feel for the 2nd stage.

The middle grub screw is used to loosen and tighten the ball bearing on the safety switch. If you loosen it enough, the safety and ball will fall out. You can loosen, tighten, and/or lube these to meet your preferences for the safety.

The right screw is the adjustable screw which greatly influences the trigger. This screw can be loosened/tightened/moved directly through the trigger; no access to the trigger area is required. The Notos manual provides instructions on this adjustment.

Based on my trigger and preferences, getting direct access to this grub screw was needed - adjustment via the manual would work, but not as well in my opinion. The screw had a point to it sharper than a self-tapping sheet metal screw. The screw was completely removed from the trigger. Then, this point was sanded down with some sandpaper and the top of the screw was rounded via the sandpaper as well. The screw was then put back in and adjusted to where the trigger was so light and had such a short travel that it would fire regardless of the safety position (not desired). After some more adjustment of the left and right screws, this is where things ended up for me to ensure the safety works.
View attachment 362683

In the gun:
View attachment 362684

The safety works as designed at this position - trigger won't break with safety on. The 1st stage travel is short as I preferred (quite short). The left screw touch is felt well for that aforementioned 2nd stage feel. A light pull beyond that touch initiates the break. The screw area was hit was some TW25B mil-comm lubricant protectant that I've used with powder burners for years (white substance in the pictures). Hopefully that has no issues in the pcp world.

Total effort was about 10 minutes. Took longer to write this post and crop images.

Any tips, corrections, or warnings are appreciated.
Can the main screw be removed, sanded and lubed without taking everything apart? This is the set screw that’s visible/adjustable when you flip the gun upside down? Just making sure .. ty
What does rounding of the screw actually do?