Whoops, became a bit longer than planned

But still: That's all I got to say by now
Disclaimer First of all: This is not a tutorial or an instruction. It’s simply a presentation how I did it. So I am not recommending converting a gun or anything else. What you do and don’t is your own responsibility. Only thing I recommend: Be careful when handling pressured objects, they can get pretty dangerous and hurt you.
1. Basics
Base: The gun As base I used a Gamo PR-776 Co2 Revolver in .177 (it’s quite a standard revolver, you can find under many labels and names). It`s one of the „typical“ 100-bucks-Revolvers, so nothing too great, but it has a rifled barrel.
The heart of the project: The “co2 to hpa converter”
View attachment 423573 You can find these all over the internet and purchase them for 15 – 20 bucks. I assume they all come from the same one or two factorys in China, as I ordered several and didn’t find any differences. What you get is a pretty well made metal cylinder (empty on the inside) and a filling-adapter with a thread. The thread wont go into the adapter (pictures are a bit misleading there), only the tip goes into the cylinder (there’s a sealing ring on the inside).
View attachment 423575 Cylinder. First thing you notice: The cylinder is a look-alike of a co2-cartridge – as long as you try to put it in your gun. Then you will see, that there’s a small but important difference. The co2-cartdridge is rounded, while the lower end of the cylinder isn’t. It ends in a “corner”. So it can be difficult to fit it in the magazine of some airguns. In my case it was necessary to adjust it. I saw a picture of somebody, starting to adjust the magazine and take of material of the backend of the adapter. Not a good idea, because it’s way more simple to adjust the “bottleneck”, so the upper end, of the adapter. I just took some sandingpaper and filed away maybe 1mm. Then the adapter fitted into the magazine. It still need’s a little bit of room, so it can be pressed against the valve. It is made of aluminum, so it is quite easy and there’s plenty of material. In my project it was necessary to put on an additional o-ring on the top of my adapter, so it connected to the valve without pressure loss sideways. Here’s a picture of the cylinder next to the magazine of a Umarex P08 and fitted in (gonna be my next conversion I think, as I want to try converting a BB gun as well).
Filling adapter. There are two different threads that can be ordered. A smaller one ¼-20 and a wider one m12*1. A lot of airguns have one type or the other. It’s initially used for a screw, that presses your co2-cartridge against the valve, to open it and power your gun. This screw has to be removed (should be easy, as it’s a part for maintance and can be replaced) and replaced by the filling adapter. If none of this two is fitting, I personally would order the smaller ¼-20 and a screw tap. But I never tried this actually.
I then used a pipe wrench to screw in the filling adapter into the cylinder using very little force. I just screwed it in by hand and then used the pipe wrench for another 1/4 to 1/3 turn.
View attachment 423576 After that, I adjusted the grips of the revolver by drilling a 15mm hole in them for the adapter. That's it
2. Adjusting Pressure
Here comes the power – how much psi can my airgun safely take? I bought an ordinary paintball hpa tank with a regulator set to 850 psi. Why 850 psi? Because that’s the number you usually find about the pressure in a co2-cartride. I plugged it in, turned up the pressure and fired a shot through my chrony. 60m/s = 195 fps. Uff. Disappointing. Quite low. I tried shooting it, worked ok on 5-6 yards. But with longer distances, the shots dropped an the holes in the target where becoming worse. I was a bit confused, to be honest. 850 psi are 850 psi, doesn’t matter if they come from co2 or pressured air? Right? Nonpe. Because: Not only the pressure itself matters, also the time it is applied. How long the 850 psi are accelerating your pellet to fire it out of your barrel. And here is a big difference between co2 and pressured air. If you compare it to the weather:
Pressured air is like a lighting, like a flash. It’s BAM, there and gone the same second. So there is a very very limited amount of time, it can accelerate your pellet.
Co2 is more like thunder, its building up, like VROOOOM. It’s a liquid in the co2-cartridge and becoming a gas when expanding and therefor applying pressure to your pellet. This process needs time, time for your pellet to reach speed.
So I thought: Ok, there are two ways to cope with this. Either increase the amount of time, the valve is opened and the pressured air can apply pressure. Changing hammer and valve spring and stuff like that. But Co2-Pistols normally already got a pretty stiff hammer spring. I gave it a bit of more compression, but it didn’t make any difference.
So I decided to apply more pressure. But isn’t it very dangerous, applying more pressure than the 850 psi? Won’t more pressure turn your gun into a shrapnel? Well yes, pressure is dangerous. Especially high pressure can cause enormous damage, because a lot of air is exhausting in a single moment. And again: I am not recommending doing anything with your gun, converting, modding, and so on. But I felt pretty safe (although being the nervous type) turning up the pressure a bit, because of two reasons:
First one: Pressure is dangerous because a lot of air is saving a lot of energy. Inside your co2 gun you have nearly no volume or capacity for storing air. The pressured air is in the HPA tank. If the tank explodes: Yes, things get very naughty. But inside your gun there is nearly no volume. Nearly no volume means very little of air. And very little of air means very little of energy, even though it is highly pressured.
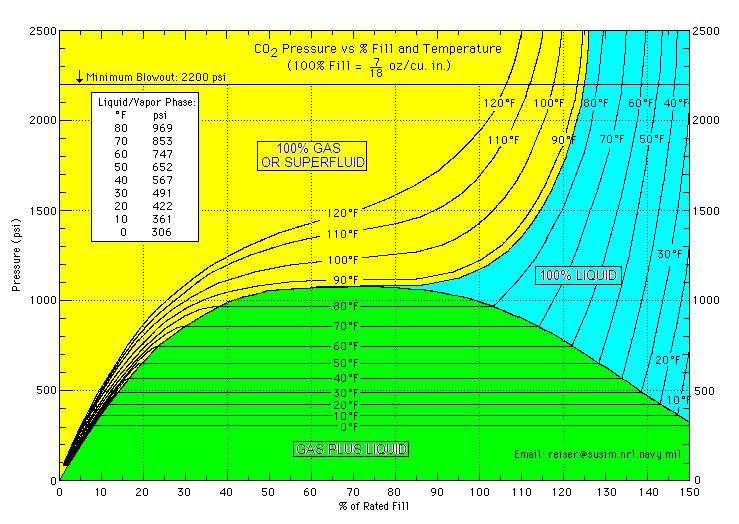
Second one: I think my gun can easily take the applied pressure, because generally we are mischarging the 850 psi in the co2-cartridges. Because it isn’t 850 psi all the time. It depends on the temperature. If u shoot your co2 gun on a hot day (and I did that, not knowing it), lets say 90F (or 32 Celsius), the pressure is on 1400 PSI. The manual of the gamo revolver I was using says: Don’t operate the gun beyond 50 Grad Celsius (122 Fahrenheit). On 122 F a full Co2-Cartride got 1800 PSI… I have seen a video, someone using a “rechargeable Co2-Cartride”, that should be powered up with a high-pressure pump. He pumped it up to 3000 (!) PSI and packed it into his gun. Nothing happened. Really “nothing”. It didn’t shoot, because the hammer spring wasn’t strong enough to open the valve against the 3000 PSI. Then he packed it into a cheaper airgun and it did fire quite normally…
So I used my yong heng compressors gauge to check the pressure I need. This way I found out, that the gun will do 90ms / 295 fps on 1050PSI. The same pressure a Co2-Cartride got reaching 85 F or (29 Celsius). Think about a cosy 75 F day in the garden and the sun is shining on your black Co2-Airgun and the black polymer grips. It reaches 85F within minutes. Btw: I tested 1350 PSI as well. Result: Gun didn’t fire (hammer spring wasn’t strong enough to open the valve?) A bit of pressure evaded sideways. Nothing else happened.
That of course doesn’t mean it’s absolutely safe. But in my opinion: If there’s a critical failure, I know from my other PCP-guns, it will hit the weakest part. And that means the valve or bust out an o-ring (it did while testing higher pressures). So normally, the gun will just lose air trough the barrel till empty. Still I was very careful and especially wore eye protection.
I adjusted the shims in the hpa-tank regulator to 1050 PSI, reaching the desired speed. That results in pretty consistent 295 fps with a variety of just +- 8fps.
Now for a kind of summary:
3. Summary – the cros and the cons Let´s start with the downsides. There certainly are some (as far as I see from my limited experience): *A bit loss of power. Gun fires approx. 20 % weaker. For plinking on cans and stuff like that, that’s a setback.
*Your gun gets a bit heavier. Not much, but its noticeable, especially because of the weight of the pressure hoses.
*Louder. The gun is firing louder than on co2. Could be an issue in an apartment with neighbors, family, …
*Money. Converting a single gun costs 15 – 20 bucks. A standard hose normally used for paintball approx. another 20 bucks. I made a mistake in the first place, not ordering one with a slide check. So I have to get the pressure out of the hose before I can disconnect the gun (initially, I thought this is gonna take 4 or 5 “empty” shots when the hpa tank is closed. Nope. It takes like 40 or 50). The hpa tank itself with the 850 PSI regulator was 50 bucks. Then I counted in another 5 bucks for stuff (o-rings, the washers/sims to adjust the hpa regulator, silicon spray, stuff like that). I needed another pressure hose, the spring supported type as strain relief. Otherwise the flexible hose will pull your gun to the side a bit. I also needed a backpack, because I don’t want to carry the tank in hand of course. I ordered a bottle holder (normally for cyclists), that I will attach to my belt, another 5 bucks.
The bigger issue is getting the pressured air into your home. I already own a compressor and a big 610 cui compressed air cylinder, so it’s not that much of a problem. This is my yong heng setup I use for my other pcp guns. If somebody lives near a diving shop, firefighters, paintball area, it’s also easy to get pressured air.
View attachment 423579 *The system limits you to one magazine. So changing to a new magazine after firing out the first one is impossible – doesn’t matter for revolvers or other models, where co2 tanks and magazine are separated of course.
*No ”quickdraw”-drills or fancy dynamic stuff. The hose is in the way, so its not possible to do draw and quickfire drills or stuff like that.
Now the sunny side up: *Consistency and accuracy. The regulator on the hpa tank is working much more exactly than the gun itself. The gun gains consistency in the shots and therefore accuracy (especially in the x-axis, so the up and down).
*Flexibility. I found it annoying using co2, that you have to fire out the cartridge. Or sometimes you’re in doubt, if u want another cartridge in, so you have to go “all the way”, even though your maybe just in the mood for another 20 shots. Now I can just connect or disconnect whenever I like.
*Money and efficiency. Depending on how many co2-cartridges / year shot and the investments necessary, it can pay off quite fast. If you count 60 shots on a co2-cartridge that cost’s 30 cents, your on 0,5 cent a shot for the energy.
I didn’t test it out, but according to the gauge on the hpa tank, I am using very little gas for shooting. So the 26 cui tank filled up to 3000 psi should be enough for approx. 1000+ shots (I think its way more, but I don’t want to get too optimistic). I could refill this with my compressor or, for better comparability, out of my big 610 cui compressed air cylinder 25 times. That’s 25.000 shots. Refilling the big cylinder in a diving shop nearby normally costs me 5 bucks as a tip. So let’s say 500 cents for 25.000 shots. That would be 0,02 Cent a shot. If I fill it up with my compressor myself it should be even cheaper.
*No cooldown effect. Fire at will.
*Can be dismounted – converting back to co2 is done within minutes.
As a final verdict I guess: As I am already a pcp shooter and got all the stuff needed anyway, it was just a matter of 50 bucks and a bit of time. Still it only made sense, because I am having fun in doing stuff like this and I know, it gonna pay off quite soon. Next try is converting a bb blowback umarex p08, the cylinder should arrive within the next days. Maybe the blowback system changes things? Or the lighter bbs need less psi? We will see
 View attachment 423577