Daisy Daisy 790 (S&W 79g copy) Reseal

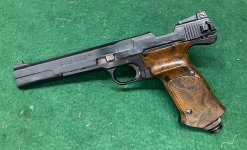
I recently picked up a Daisy 790 in pieces and decided to put it back together this afternoon. A previous owner had replaced some of the seals, but left the original exhaust valve and small o-ring in the piercing assembly. Once everything was cleaned, lubricated and all new seals and valve installed, it works just fine. Results from a string across my chrono showed 446 fps average for five shots, with an SD of 2. This muzzle velocity was measured while the pistol was on the lowest adjustable setting, and matches the figures put out by Daisy.
IMG_6266.jpg

This pistol was made mid 1981. so it's still more S&W than Daisy. That said, there are some Daisy differences I thought I'd point out for others working on these pistols.

IMG_6259.jpg

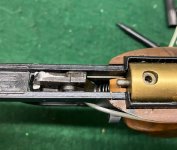
Daisy changed out the trigger spring and added a plastic seat (visible under the tip of the exhaust valve. This isn't the drop safe trigger they would eventually changed to, but it does increase pull weight to about 5 lbs.
IMG_6261.jpg

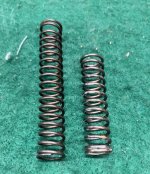
The hammer spring is quite a bit longer than a typical 78g spring. No doubt this it the main reason for the increase in velocity over a standard 79g. The factory service manual advises that original springs in Smith and earlier daisy pistols should have their hammer spring replaced to the new longer one.
IMG_6268.jpg

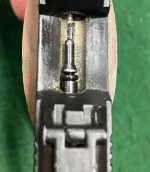
Every 1981 780 and 790 made after the first batch (which were just rebranded Smith pistols) has a loading trough that was reamed oversized. This results in more slop in the bolt which requires more attention while loading than on Smith pistols.
 
Did you pick up that one that just ended a few hours ago?

There was a progression of serial numbers starting with pistols that just kept the ones S&W had already stamped into their parts. The final ones followed traditional lot numbers that were either L1 or M1 standing for November and December 1981. The Q series are mostly Q81, but the one in the pics here is the first Q91 I've come across. I'm thinking they were made in either August (Q81) or September (Q91) of 1981.

Expect the internals to look like the pictures above. Daisy used color coded seals, so if they are original you will see them in all colors but black. A standard 79g reseal kit will work.
 
  • Like
Reactions: JimBentley
The 79g was added to the pellet pistol line in the second year of production - serial 11000 and up - and had adjustable triggers up until around pistol 44000. During this time The Q81 790 will be a little sloppier to load due to the feeding trough, but will give you more velocity in factory form. Daisy upgraded their specs to 447 fps on low up to 480 fps on highest setting.
 
The 79g was added to the pellet pistol line in the second year of production - serial 11000 and up - and had adjustable triggers up until around pistol 44000. During this time The Q81 790 will be a little sloppier to load due to the feeding trough, but will give you more velocity in factory form. Daisy upgraded their specs to 447 fps on low up to 480 fps on highest setting.
So the feeding trough was opened up on all Daisy 790's? So besides the longer hammer spring and the plastic seat on the trigger spring we're there other differences?
 
So the feeding trough was opened up on all Daisy 790's? So besides the longer hammer spring and the plastic seat on the trigger spring we're there other differences?

The trough machining appears on Q, L, and M pistols for both 780s and 790s. Earlier 1981 pistols are basically rebranded 79gs, and I haven't run across this in any of them yet. IN 1982, Daisy switched to a Phase 2 version of the pistol which features a new upper frame/ slide and a standard feeding trough.

The trigger spring is also stronger on the 790. All other parts besides those mentioned are identical to Smith, and all Smith parts will interchange on these early "Phase 1" pistols. Later 790s have plastic rear sights, bolts, and power adjustment assembly, so less parts are interchangeable. By June of 1982 they also modified the hammer to have a disconnector so they would be "drop safe". Daisy managed to change more in the design in 18 months than Smith & Wesson did throughout the entire run of 78g/89gs!
Interesting, I love learning about these pistols. The 78 needs seals and I'm guessing the 790 also. I've never had one of these apart and am toying with trying it myself. Is there one kit that's better than another? Is the longer exhaust stem worthwhile? Also see urethane vs Vinton, is one better than the other. Sorry about all the questions, trying to learn.
 
If you like learning about the line, I've been working on content for a website that will give you far more info than you ever wanted to know about them! I hope to get it up and running later this summer.

Your 790 would be a good starting point for a try at a rebuild. The steps are the same for your 78g, but a few parts are slightly different. As for a rebuild kit, check out eBay and look for Henry Ford, aka crosman600repair. His kits include a new exhaust valve and a small bottle of oil. The seals are all standard except for the large CO2 piercing assembly o-ring which is urethane. Some kits are all urethane, but they are a pain to install and it doesn't seem like they are all necessary!
 
  • Like
Reactions: Modski66
If you like learning about the line, I've been working on content for a website that will give you far more info than you ever wanted to know about them! I hope to get it up and running later this summer.

Your 790 would be a good starting point for a try at a rebuild. The steps are the same for your 78g, but a few parts are slightly different. As for a rebuild kit, check out eBay and look for Henry Ford, aka crosman600repair. His kits include a new exhaust valve and a small bottle of oil. The seals are all standard except for the large CO2 piercing assembly o-ring which is urethane. Some kits are all urethane, but they are a pain to install and it doesn't seem like they are all necessary!
That sounds awesome, let me know when the website is up and running.
 
the valves stem needs to be redone normally and with new urethane installed
they are mad in two piece where the stem is pressed into the cup
i have in the past just used a vise to press the stem out one mine not hard until
i told a member i would do it for him but they would not come apart i did reseal them but not the way they would have been done at the factory so that became a never again for me

all Oring SHOULD BE URETHANE not BUNA
the main valve seal is a 012


The O-ring sizes for a Smith & Wesson 78G are generally listed using the AS568A standard, with the piercing cap's large outer O-ring being a -113, the piercing pin's inner O-ring a -006, the main valve's main seal a -12, and the two smaller transfer seals also being -006. The bolt probe O-ring for the 78G is a -005, while the smaller -006 size is for the 79G.
Here's a breakdown of the S&W 78G O-ring sizes:

  • Piercing Cap (Large outer):AS568A -113 (9/16″ ID, 3/4″ OD, 3/32″ C/S)
  • Piercing Cap (Small inner):AS568A -006 (1/8″ ID, 1/4″ OD, 1/16″ C/S)
  • Main Valve (Large seal):AS568A -12 (3/8″ ID, 1/2″ OD, 1/16″ C/S)
  • Valve Connector/Transfer (Two small seals):AS568A -006 (1/8″ ID, 1/4″ OD, 1/16″ C/S)
  • Bolt Probe (78G):AS568A -005 (3/32″ ID, 7/32″ OD, 1/16″ C/S)
Notes:
Thank you! I'll be disassembling the pistol fairly soon. If I still have an issue, I hope you don't mind if I reach out to you! Thanks, Gary
 
not at all Gary i am here if you need help
just a hint the valve screw are both odd as they are round bottom and they are soft as hell and seeing that you can see them don't damage
also there is a tube in the front of the pistol and that holds the top and bottom half together and you will need an EZ out or a drill bit to reach in and grab the tube to pull it out
Thanks for the EZ out tip! Having turned wrenchs on CAT marine engines for over 50 years, I've got plenty of those!