HW90 potential

I just had the most remarkable experience with my .22 HW90. I have been experimenting with power levels and different barrels. A couple of days ago I got around to installing a Vortek 30mm Vacuseal piston seal, and tried some shot strings with different pellets and gas ram bar levels. Here's a very rough table, I tried only a couple of pellets of each type. The power levels are ludicrous. Crosman Premieres now breeze through 3/4" hardwood plywood. At first I thought it must be dieseling, but later ran about 100 pellets through the gun and am getting the same general results. Also I used very little lube with the new seal.


Power is about the same as the stock seal, up to 19 bar. Above that the Vacuseal provides an increase.

The HW90 is a mystery. It's a big, super strong gun. It has huge piston swept area, and can provide tremendous piston pressure. It has a long barrel with robust linkage. So why are the power levels less than other magnums? Why does the power curve peak at 21FPE @ 19 bar? It can't be friction, the piston design is straightforward and conventional.

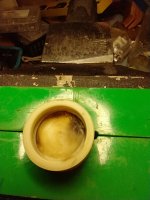
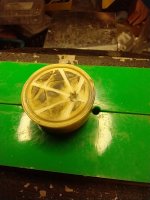
My best guess is that ram pressure above 19 bar distorts the stock seal. This could allow gas to blow past it, lowering power. Alternatively it could cause the seal to bind against the cylinder wall, increasing friction, and again lowering power. I checked the stock seal for damage and wear. The face has the typical star pattern discoloration, but seems sound. The rim of the stock seal doesn't show any frictional wear. So I opt for the blow-by explanation. The HW90 simply overpowers the stock seal. Variation in seals might also explain why some reviews put the RX2 at 24 FPE, while others put the HW90 at 21 FPE. Beeman might have specified a different seal. 

It's nice to know that a HW90 can put out 36 foot-lbs, but the real issue is the cocking effort. My zone of comfort is at 19 bar. For general use I set the gun back to 19 bar, where it get a consistent and accurate 800 FPS and 21 FPE. Also the muzzle crack at 26 bar is ridiculous, approaching a 22 rimfire. 

Future projects include running some shot strings with my .25 barrel. I just ordered a carbine barrel (410mm long) in .22 from AoA and a couple more Vortek 30 seals. I want to see if the shorter barrel affects power. Yes, I know it's going to be a real bear to cock at 26 bar. Oh well, It's for the science. LOL. My goal is to get the lightest, most powerful HW90. I'll post more after the new barrel arrives.
 
That's pretty wild. I can only imagine what the cocking force, and shooting characteristics/sound is like at those higher pressures.

You kidding me. I took a HW90 .25 with factory settings into the woods at my buddies looking for tree rats. Almost needed a paramedic and a rescue team to get me out, One of my first rifles I bought. Never really shot it since. Crow 

I have a gauge and pump which I’ve never used but hope to soon.
 
  • Like
Reactions: Deerstalker
From what I have gathered so far, if the other seals you are using are the parachute style then more power just increases the expansion of the skirt and at some point essentially no additional velocity is achieved. The Vac seal benefits in two ways, first it has no parachute skirt and secondly it is self lubricating. They are often the best seal for med to high power springers. The parachute seals really shine with getting the most from lower power guns and/or those with imperfect compression tubes.


@crowski

Yep, the cocking effort is up there, and I promptly dropped the ram pressure back to 19 Bar. That's why I only did about three shots of each pellet. 800 fps and 21 fpe are plenty for me!

The main thing is that the HW90 has more potential. It's the only magnum "springer" that lets you play with power levels, various calibers and barrel lengths. 


  • Like
Reactions: scax
I would wonder how long that barrel will last as far as bending under that extreme cocking force ?? I have saw over the years the number of cheaper nitro piston barrels bending from high cocking forces. If you need more than 21-22 fpe then time to move into pcp. Why over stress a spring/nitro piston gun?? I know...cause we can.....
 
  • Like
Reactions: Hopper
As you say, the barrel may be a weak point. It's shared with the lighter HW95 and HW80. But during this process, I discovered my HW90 .22 barrel was slightly bent from the factory. It had a sideways curve of about 1/16". I bought a small 1 ton arbor press from Amazon and straightened it myself. Let me tell you, that barrel is extremely rigid. I had to put a 36" extension on the arbor press handle to get enough force.

The HW90 is very stout. It weighs 9+ lbs. Most of that weight is in the receiver and piston assembly, I think they can handle 26 bar. And Weihrauch does certify the HW90 for 26 bar.

I would think the weak link is that skinny little cocking rivet. There's a youtube channel called Project Farm. He's got a video on side/wire cutters. https://www.youtube.com/watch?v=6bnqFwAf7HM. What it shows is that even the small rivets holding the wire cutters together can handle some significant shear loads. I don't think the HW90 cocking rivet experiences anything near what he puts the side cutters through.

Interesting stuff.
 
@lewis

Thanks for that very insightful response. Looking at the two seals, I notice the differences you mention.

The stock seal is flat topped, with a deep groove around the top. That groove creates a ring or skirt, which conforms to the cylinder wall. That design must be what you mean by "parachute seal'. More cylinder pressure means more skirt to wall pressure and more friction. At a certain point, additional friction is greater than piston force and gun power goes down. That would explain why the HW90 peaks at 21 foot-lbs, no matter how high you charge the ram.

The Vac seal doesn't have that groove, the top is solid. There is no parachute skirt. More pressure will not increase friction. The Vac seal also has embedded lubrication.

That's certainly a vote for Vortek.


JayJay,

Thanks for sharing your experiences with the HW90.

After experimenting a bit with the ram pressure in my .177 HW90, I have decided to switch to a .22 barrel.

I have the barrel ordered, but have no experience swapping barrels. It seems straight forward enough, but I am hoping you would share your method for changing barrels on the HW90.


Are there any tips or tricks?

Do you just punch out the cocking lever rivet like any other pin?


Do you reuse the cocking lever rivet, and if so do you have to flare the ends again somehow?

Short of bending the barrel, there any adjustments that could reduce barrel “droop” if I encounter that situation with the new barrel? There is significant “droop” with the factory installed .177 barrel.


Thank you for any information about this barrel swapping procedure you care to share.

Regards,

Airman


@Airman-of-the-Board

Very good questions. I hope you don't mind my long winded reply.

Barrel swapping is fairly straightforward. I usually start by discharging the ram. I remove the trigger guard screws, the stock forearm screws, and the stock. I break the barrel slightly open to remove tension from the joint. I loosen and remove the barrel hinge bolt nut (right side). I loosen and pull out the barrel hinge bolt (left side). I pull the barrel block out of the receiver yoke, taking care to not bend the two large flat shims. At that point you pull the linkage and cocking shoe forward out of the receiver. Don't lose the cocking linkage plastic slider. 

Transfer the cocking assembly to the new barrel. Install the cocking rivet. I actually bought a 2nd cocking assembly from AoA so I don't have to swap it back and forth.

The cocking rivet is a straight sided 5mm rivet. Weihrauch peens them over on both ends. I use my arbor press to push them out. They'll come out either end. I have also used a hammer and punch. I re-use them. I don't re-peen, instead I use loctite red. I usually push the rivet most of the way through, then apply a drop of loctite to each side, to keep it from getting in the greased joint. It seems to hold up ok. For long term use I would probably buy a new rivet from AoA and peen it over. Shane at AoA says they have lots of them and they're cheap. You could buy precision ground 5mm drill rod and make your own rivet. Another good tip I heard recently is to drill and tap the barrel yoke and secure the rivet with a small set screw. 

Reassembly is the reverse. When installing the barrel, I tighten the barrel hinge bolt (left side) so that the barrel almost drops under its own weight. Then I tighten the nut (right side). I don't have a torque value, but make it fairly snug.

At this point I usually charge the ram slightly, enough to move the piston to the front of the receiver. You can hear it thunk slightly when it shifts. I do this to get the piston out of the way, in discharged position, when putting the trigger guard on. You also want it slightly charged so you can test the cocking action later on.

Put the stock on, and LOOSELY install one of the forearm screws. Then I flip the gun trigger side up, take a small screwdriver and use it to cock the safety lever that sticks out the bottom of the trigger assembly. That gets the safety out of the way so you can put the trigger guard on.

Putting the guard on is a rather fussy operation. Holding the safety button down, put the guard into position over the trigger. You will have to wiggle the safety and maybe pull the trigger back slightly, to get the guard to drop into position. Then install and LIGHTLY tighten the screws. I leave the tiny lock screw till later. Press the trigger and safety to release the action. Now try cycling the action. I have run into two problems. Sometimes the barrel won't come all the way back, or it won't cock. This usually means the trigger guard is not properly seated. In that case I pull the guard off, re-cock the safety, and try again. It usually works on the 2nd try. Tighten the main trigger screw until one of its tiny scallops is lined up with the locking screw hole. Install the lock screw. Install and tighten the other screws. Try cycling the action again. Once it works, charge the ram.

Disclaimer: I'm a newbie with HW90's so if there's somebody out there who has a better description please correct me.

Regarding barrel droop. I bought a HW90 from AoA about 3 months ago. I noticed droop, and this launched me on a big investigation. Here's what I found.

  • Barrels themselves don't have droop. All three of my barrels were perfectly straight and essentially identical. The barrel blocks measure within 0.002 inches of each other in thickness width, etc. and also the hole locations.
  • My digital angle gauge LINK showed two droop locations.
    • The barrel to receiver joint is about 0.4 degrees out of line.
    • The receiver itself has a 0.3 degree kink just forward of the trigger assembly.
  • The total droop from muzzle tip to aft end of receiver is about 0.7 degrees. In minutes it's 7/10 * 60 minutes/degree or 42 minutes of angle (MOA). That's right at the limit of what most scopes can handle. It's definitely noticeable.
  • I ordered a new cylinder from Krale, about $160. It arrived in just a few days. I installed a barrel and found the same exact droop configuration.
  • Then I ordered a second new HW90 from AoA, which also had the same droop configuration. (Thank God I'm retired and can afford it!) 
  • All three cases are dimensionally identical. The overall workmanship is excellent. I don't see obvious mechanical error, bending or fitting problems.
  • I suspect Weihrauch intentionally does it to make it easier to use the iron sights. I have read that the classic HW35s were done that way. It seems to be common with German guns. (Does anyone have friends at Weihrauch who could ask?)
  • Droop is a cosmetic issue, it doesn't affect accuracy or performance. Droop can be beneficial to compensate for wear.
  • Being a perfectionist, I looked into correcting droop.There are several possibilities as follows.
    • The UTG drooper mount compensates for 10 inches at 30 yards. In degrees that's arcsin(10/(30*36) = 0.53 degrees, or about 30 minutes of angle (MOA). I bought one. It works great but adds weight and height. 
    • Shim your scope mount. 
    • Use a scope with lots of vertical compensation range.
    • Use a red-dot and mount it towards the middle of the barrel, where there's only 0.4 degrees droop. I use a Primary Arms md20 red dot which has enough MOA compensation. It's very rugged and weighs only 3.9 ounces. Of course the red dot is mainly a replacement for iron sights and can't substitute for a real scope.
    • Bend the barrel.
      • First decide if we're correcting for just the 0.4 degree barrel-to-receiver droop, or the full 0.7 degree droop.
      • Determine how much the tip of the muzzle should be deflected. It's good to have a reference surface to check flatness and curvature. An iron wing on a table saw works really well.
        • The barrel is 18" long. Assume we want to correct for the full 0.7 degrees droop. Droop at the muzzle tip is d = r * sin theta, where d is the droop, r is the barrel length, and theta is 0.7 degrees. So droop equals 18*sin(0.7) = 0.21 inches.
        • For 0.4 degree droop, it amounts to 18*sin(0.4) = 0.126" or 1/8 inch.
        • You don't want to bend the barrel so much that you can see the curve. 1/8 inch is not bad.
      • Decide how to bend it. I have previously straightened a barrel with a small 1 ton arbor press (about $90 at Amazon). I put the barrel on two wood blocks and press on the middle, so it creates a gradual curve. There's a video of a guy using C clamps and a 2x4. Some people clamp the barrel block in a stout vise then put some tube over the barrel and pull. That would create a more radical kink near the base.
    • Skim material from the barrel lockup contact point.
      • On the bottom of the barrel block there's a little flat that hits the top of the wedge inside the receiver yoke. That's what stops the barrel from swinging through the yoke.
      • Removing material from either the barrel flat or the wedge lets the barrel rotate further, eliminating droop.
      • This only compensates for the barrel to receiver droop. In this case we're talking 0.4 degrees. The receiver kink at the trigger block cannot be corrected. The receiver is extremely rigid, I would not want to try straightening it with a 20 ton press. 
      • The distance from the barrel pivot to the flats is about 1.375". Using basic trig, the amount to remove is h=r * sin theta where h is the height, r is the distance from the barrel pivot to the lockup point, and theta is 0.4 degrees. So h=1.375*sin(0.4) = 0.0096"
      • How to remove 10 thou? I bought a dremel carbide cutting bit LINK and practiced on an old screwdriver bit. It's easy to skim 10 thou from a small, flat hardened steel surface. Later you can test for high spots by putting some black marker on the surface and press the two flats together. Then grind the high spots down. 
      • Which flat do you cut? The barrel block or the receiver wedge?
        • It's really hard to get that dremel tip in between the receiver yokes. 
        • There's no easy way to measure how material you remove from the receiver wedge.
        • I would probably leave the receiver alone and just skim the barrel block. 
      • Concerns...
        • Don't drink coffee before proceeding. You'll need a steady hand!
        • Leave some material to compensate for future wear. Maybe 0.002"
        • This may affect lockup. Test first on a throwaway barrel.
      • Note that I don't recommend anyone try this. I have not done this yet. I have an old barrel and receiver. I may get to it later.

I hope that helps!
 
JayJay


That does help, a lot! Thank you for such a thorough and thoughtful response. I appreciate you taking the time to document that information and share your expertise. I have saved the information to give it the study it deserves.


On my .177 barreled HW90 with significant droop I ended up using the UTG droop compensating mount you mentioned, in conjunction with Burris signature rings (which utilize offset inserts allowing the scope to be angled).


Does your second barrel / cocking linkage assembly have a dedicated plastic slide, or is that a part you switch over between the two barrel assemblies? I assume you use the same cocking shoe? 


I understand from your post that you have not used this technique, but are you able to tell me any more about where the set screw can be installed to retain the rivet? A picture might be helpful, if I am not asking for too much.


Sounds like you have been really putting your HW90 through its paces in the short time you have owned it.


I have never been able to get mine to perform as I had hoped, thus the interest in a new caliber / barrel. I do find it interesting that rather than just using the other better performing airguns I have, that I keep putting more time and money into the HW90 trying to improve it. Go figure.


Thanks again for your help and I look forward to seeing any reports you make about your experience with the new short barrel you ordered.


Regards,

Airman
 
@Airman Thanks! It's fun collecting my thoughts and hopefully they're useful for others. 

I believe the tip about tapping and threading the barrel block to retain the cocking link came from Thumper. I'd have to go back and look. He didn't specify a location to drill. 

I move the same plastic slide to whichever linkage I'm working on at the time. I broke one by accident and bought a couple of spares from AoA. They're fairly cheap. 

Good luck with your 90. I'll post more when I get the carbine barrel.


Greetings JayJay and all! My first post since joining here. I bought a new HW90 in .22 via Krale who had the best pricing and got the gun in two days here in Kansas. Here are a few points which I hope be of interest:
1. I really do like my HW90 and think it will be a keeper, despite teething pains. It strikes me as just being a wonderful piece of engineering in a very pleasing package.
2. I agree with JayJay and others that this is a gun for tinkerers, not those who just want to load pellets and do nothing more. But tuning and such is part of the fun and challenge to many airgunners.
3. Been away from the hobby for 10 years, so why the HW90? My first real airgun was the .177 Diana 45 back in the 80s and so many great memories of good times with others and incredible shots using just the supplied iron sights. The breakbarrel design was a delight to use. Then upgraded to the recoil-less Diana 54 in .177 which I modded and tuned and which once shot a true 4-shot string at 50 yards, bench rested that measured 0.098 inches c-t-c. I still have that target pic somewhere in my pc! But getting back into airgunning, I wanted to reconnect with my breakbarrel days and settled on the HW90, but go with .22 and the air ram concept which intrigues me.
4. Had to replace the stock parachute seal with a Vortek as the stock seal was clearly not working right after only about 200 rounds -- see below pic showing the stock seal, burned and melted. It even had burn marks on the back of the seal, showing it was likely cooking the stock grease which was liberally applied to the outer piston. Early testing on the Vortek shows nice power and no dieseling with velocity spreads at <1 percent. I totally stripped everything of factory grease and applied an extremely light and buffed coating of my longtime favorite grease which cannot diesel -- Krytox. This time, GPL-203 to which I attribute the excellent, low velocity spreads.
5. I had to replace the stock schrader valve core which was slowly leaking air. It didn't appear to be loose, so I replaced it with a sure fix: a US-made Dill model 302-DN core, rated at up to 2000 PSI and doesn't even open until you reach 80 PSI. Problem solved at less than $10. and I now have 9 spares should anyone where want one, I would only charge you shipping as I only want to keep one spare, haha! New valve doesn't leak!
6. Within 50 shots I was very surprised to note that every screw on the gun had vibrated loose, except the screw with o-ring that seals the air charging port. I tried tightening -- no luck. I tried Loctite blue -- no luck. I eventually used Loctite red 271 on the two 5mm screws holding the front to the stock, the tiny trigger guard locking screw, the rear trigger guard screw and blue 242 on the main trigger guard screw -- that holds but since the screws with red 271 are small, they can still be removed with handtools and maybe a little heat.
7. Due to vibration causing all screws to loosen and generally wanting to improve accuracy, I glass bedded the action as per the HW90 glass bedding youtube video easily found. I did it in three steps: a) the receiver body and rear, but not the two front tabs which screw to the stock. b) the trigger guard and then c) the front steel tabs -- I used stainless 5mmIDx7mmOD sleeve bearings to pillar bed the two 5mm screws and it came out great. Now the action is very solidly mounted in the stock which reduced felt recoil dramatically!, as hoped, and should reduce stress on all mount screws so I never expect them to vibrate loose again. As just completed, I now need to do some accuracy testing!
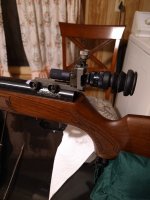
8. I'm now too old to use the stock iron sights, so I removed them, but wanted to not go with a scope, unless really needed. So, I bought a used Anschutz micrometer target peep sight with adjustable iris on ebay and replaced the front globe sight with a $10. Truglo globe which is so easy to see and looks great, too. Had to attach with Loctite red, but all good now. I have to say, I really love the rear Anschutz sight, as well, especially its adjustable iris which allows me to "tune in" based on current light conditions for best clarity. The smallest setting is 0.5mm -- pretty tiny, but in good light it gives you such a clear and in-focus view of everything! And in low light, just open it to get a brighter view, but less in focus. I did try the military-type rear peeps available, but there was no comparison in quality to the old 60's vintage Anschutz. See Pic.
9. And yes, I agree with all others, you really do need to get the pump and a way to know your ram pressure with this gun to tune it to your needs and wants. I got the cheap Rockshox 600 psi pump on ebay, the needed adapter hose which fits the HW90's pressure port from Bestfittings in the UK and a couple cheap adapter fittings to get me from the pump's schrader female valve to the UK 1/8" thread on the adapter hose -- total cost about $90 and the pump includes a pressure gauge. Just release air to lower pressure by lightly tapping the HW-90's schrader core and then pump to the pressure you want to try next with the Rockshox -- works well with no leaks once I put teflon tape everywhere air could leak! lol.
10. Initial testing ongoing as this bedding project JUST completed. Initial power now looks good. I'm unsure of exact bar pressure in my ram (the pump gauge isn't precision), but based on cocking effort I would say it is surely less than 26 bar and I got 24 ft lbs with 15 grain .22 pellets at 860 fps.
11. Enough now -- don't want to push a wrong button and lose all this before it posts!
IMG_20220919_205216422.jpg
IMG_20220919_205216422.jpgIMG_20221006_140241398.jpgIMG_20221006_140234940.jpg
IMG_20221006_140234940.jpg
 
Nothing! It is allowed to rotate quite freely. In the pic of my factory seal, you will notice burn holes at both the proper location and at 180 degrees away as well as other melt lines. My gun likely came charged to 26 bar pressure as it was a bear to cock. Now, much more pleasant. Somehow, I think the factory grease that was found all over the outside of the piston (including about 1/16" on the trigger sear engagement!) got in front of that big piston and dieseling melted it. I could make a bunch of cheap to implement suggestions, but who at the factory would listen? Even though I was an engineering program manager for GE Wind, working in their warranty dept. Charles
 
Oh, and the HW90 comes with an apparent marketing anachronism from earlier Beeman/Theoben years in the form of something known as an inertia weight. One thing working with PhD engineers has taught me is to trust my own judgement while respecting others. Now, if anyone can tell me precisely how this 1.5oz sliding weight does any good, I'm all ears and await to be amused. As I see it, this inertia weight almost certainly does more harm than good, causing at the very least, variable impact vibrations shot to shot, leading to shot to shot inaccuracy. It also reduces the available air volume which can be compressed in the compression chamber. And depending on its pre-shot position in the compression chamber, it can serve to either retard or advance the speed of the piston compared with the last shot, also leading to variations in piston speed and thus, pellet speed. I was getting a higher pellet speed variation with it and less than 1% variation without it. I admit I did not make a proper study in this regard as I had no plans to share my results, initially, but then discovered this good forum. Hoping someone takes a serious engineering shot at explaining precisely how the inertia weight does any good and no evil. Mine is out. I have no plans to ever put it back in. Cheers gents!