Vortek kit in a Diana Airking not even close to 12 ftlbs !!!!

Well tryed the spacer thick and thin but when I pull the cocking lever back I can't release the anti beartrap and put the gun in battery.. Have to uncock the gun by pulling the cocking arm back taking off the safty, pulling the trigger and lowering the anti beartrap easing the cocking lever forward.. Hopefully someone has a answer for me.. Seems like a trigger adjustment issue.. Might just sell the vortek kit and go back to full power...
 
I'm beleive I'm done with this.. Unless the man I bought it from put a different piston in it.. And I don't know if that is possiable... I made a thin shim from hard plastic.. Latched but only 650 fps with a AA 10.3gr. Only good that has come out of the I built a spring compressor and can take the spring out and reassemble it in 10 minutes !!
 
Since you have it apart. drop the tophat and spring guide in the piston with the spacers but no spring. If the trigger mechanism is similar to others I've had apart you should be able to slip it on the catch and check operation. If it is not catching you need to shorten the spring guide by the thickness of your spacers. The kit for my TX200 was shipped with a spring guide that was to be cut to fit and checked with this method.
 
Well after calling and emailing Tom at vortek he is stumped.. Nice guy !! After posting on many forums I have found that the original T01 piston has different dimensions then the rest of the newer ones ,T05 , T06.. I contacted the nice man that I purchased it from and when he installed it he had the same problem !! He took some off the tophat to make it work.. I thinking the vortek kit is not for me.. 
 
Thanks to my friends .. I have my 54 at 12.87 ftlbs !!! I took the factory spring and cut 1 1/2 coils , heated and closed the end , ground the end flat on a grinder, quenched and rounded the end with a dremel.. Polished the spring end with some 600 grit wet dry ( that is what I had on hand ) in water.. Then made a piston liner out of some flexiable cutting board ( also on hand ).. Wiped everything down and gave it a light dusting of dry moly since it had a lot of lube on everything..
Assembly was slightly harder for some reason (retaining pins and dummy pins) .. Fired 10 shots and then ran it through my Combro and lo and behold , 750 fps average with AA 10.3 gr. pellets for 12.87 ftlbs.!
 
Well a little more done.. Don't laugh !!! The most sophiticated tools I have is a old harbor freight drill press, dremel and a bench grinder...
Made up a scrap spring compressor from compressed partical shelving for base, 2x8, steering wheeler puller and a cut up bed frame.. Also made a dremel jig to cut the tubes.. 
Front sight and barrel sleeve removed ( pita ! ) and carbon fiber tubes cut and installed.. 
Tubes are 15mm ID X19mm OD (sanded inside for a slip fit over bare barrel ..) and 19 ID mm X 21mm OD ... Sanded the ID of both tubes and OD of the inner tube.. Cleaned with acetone, and attatched the inner sleeve to barrel with green loctite 638 used for fitting bearings .. Finishing epoxy to attatch the 15mm ID X19mm OD into the 19mm ID X21mm OD.. Front of tubes were placed in a pool of epoxy on glass.. 
Then attatched to barrel...
So from 4.5 to 21 mm =16.5 wall !!! Definite overkill but looks good..Pics don't do it justice..
Front tube cover modified and fitted ( still some more I want to do to it..)
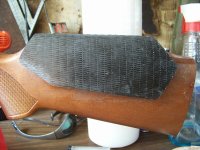
Stock is next !!! 
Till next update ,
Ray
DAMMMN !!!!! I still have all my fingers !! Remarkable !!
PS.. Tom at Vortek is changing the spring on my kit to a stronger one !! He said it will be a bit over 12ftlbs but doesn't know how much !!
modify_inline.gif

 11.JPG (189.76 kB, 1024x633 - viewed 0 times.)

 22.JPG (161.99 kB, 1024x475 - viewed 0 times.)

 44.JPG (182.36 kB, 1024x582 - viewed 0 times.)

 55.JPG (143.54 kB, 768x1114 - viewed 0 times.)

 66.JPG (176.57 kB, 1024x571 - viewed 0 times.)

 88.JPG (98.38 kB, 1024x768 - viewed 0 times.)
 
Here you go Pete..
tubes..
http://www.ebay.com/itm/22mm-ODx-19mm-ID-Carbon-Fiber-Tube-3k-500MM-Long-Roll-Wrapped-carbon-pipe-22-19/141512844851?ssPageName=STRK%3AMEBIDX%3AIT&_trksid=p2060353.m2749.l2649

http://www.ebay.com/itm/19mm-OD-15mm-ID-Carbon-Fiber-Tube-3k-500MM-Long-Roll-Wrapped-carbon-pipe-19-15/141838023287?ssPageName=STRK%3AMEBIDX%3AIT&_trksid=p2060353.m2749.l2649

http://www.ebay.com/itm/Epoxy-Resin-System-for-Carbon-Fiber-kevlar-Fiberglass-6-oz-/282625872625?hash=item41cdd092f1:g:eKkAAOSwcLxYEkP

loctite 638

I first removed the front sight and barrel sleeve and filed down the raised part of the dovetail from the manufacturing process of cutting the dovetail..
Sanded the barrel with 100 grit and cleaned with acetone..
Then sanded the 15x19mm sleeve inside until a nice easy slip fit over the barrel ( VERY IMPORTANT !!!! ) and roughed up the outside.. Cleaned with acetone..
Sand the inside to rough up the 19x21mm and clean..
Mixed up some finishing epoxy (use a scale to do that .. IMPORTANT ! ) and epoxied the 15x19mm into the 19x20mm..
After setting up for 24 hours cut to lenght with dremel, tile saw or something with a diamond or fine tooth blade.. WEAR DUST MASK!!!
Stand the end you want to be the barrel end in a thin pool of epoxy on a sheet of glass and let dry till hard.. Take a blade and get under it and pry it off the glass.. Trim excess off..
Plug the barrel and then smear a thin layer of loctite 638 on it and also a bit inside the carbon sleeve.. Slide it on and let it sit somewhere warm.. Try for 120 degrees.. I laid it on a black tote out in the sun for a few days.. A roof will also work.. The reason for the loctite 638 is it will cure and affix the carbon fiber sleeve to the steel barrel better than the epoxy will, as it is made for close tolerance bearing installations..
Hope that helps some.. Any more info just ask !!!
 
Well I installed the vortek but it didn't do it.. 650 fps and 675 spacered to max.. I reinstalled the OEM that I cut and took the Oring down a bit.. Now perfect around 15 ftlbs.. Mid weight are 800+, 7.5-8.5 900 fps.. Made a little more progress on the stock.. Made up a carbon fiber cheek peice and thinking on the hardware to attatch it..
0062881e28aedd1236fad372e9caa9a6.jpg
0a3a8cb79bddf622f1904dc9951d8d27.jpg
ddf16ce7a06bf5812bb3c0d496fd193c.jpg
6b48fc52f2994f7a4dd9fa1669487901.jpg
 

Attachments

  • 6b48fc52f2994f7a4dd9fa1669487901.jpg
    6b48fc52f2994f7a4dd9fa1669487901.jpg
    219.5 KB · Views: 11