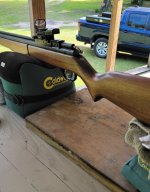
My Benjamin 392 rebuild

Bought a Mac1 Steroid 392 in 2006 and it has been a great gun. However, my old eyes are not so good on iron sights anymore. Decided on a Baker Airguns one piece mount and a UTG Bug Buster scope. While waiting for the parts, got bored and decided to change the stock and work on the trigger. Not finding anything available for a custom stock cheap, decided to buy a new 392 and use that stock as it is larger and more material to work with.
( Put my old stock on the new gun and gave it to one of my buddy's, 30 years old and never shot a pellet gun or BB gun??? California kid, go figure.)

Cut the fore end and carved up the back of the stock making it narrower and thinner at the pistol grip, plugged the holes in the fore end and refinished it. After modifying the trigger with a preload and trigger stop, I mounted the scope and dialed it in. 5 shot group at 25 yards @ .33 . Yea!

Really appreciate all the information here and at the Crosman Forums, make life easier on projects like this. 


Thanks guys
Have some time tonight, so I will share some on the work I did. I read many threads on the trigger on the 392 and the different fixes, but decided to try my own way. I have done action work on my target revolvers and other guns for many years, so why not give it a shot. Timmy Mac had done some work on the sear when I bought the gun from him and it has a good break, but still way too much creep and over travel.

First thing I addressed was the big fat trigger. All my guns have a narrow, polished trigger, just my personal preference. Also the trigger looks so fat at the top, so I cut it down and polished it to my liking. Then cut the sides to make it perfectly flat, cutting .004 off the right and .010 off the left to ensure the pin area was square.


Found that some of the sloppiness in the trigger was the pins for the trigger and sear were loose in the casing. I squared them up in the left side case halve and secured them with JB Weld. I cut a stainless washer down to .018 and mounted it on the trigger pin to make up for what I cut off the sides of the trigger and remove most of the side to side play.


To fix the over travel, I used a method that I learned from Frank Glenn , a world class S&W revolver gunsmith. A simple pin inserted in the rebound assembly will limit the OT. To apply this here, I found a brass stand off and cut it to fit. Cut it long and file it to the right size. Took two tries to get it right:)


I did end up putting a lighter spring on it after the pictures.
For the creep or take up, I cut a piece of nylon rod into a button and fitted it behind the top tab on the trigger. It fits snug, but you can remove it by hand. This took some trial and error to get the thickness right, but settled on about an 1/8" travel before release. ( Didn't measure the thickness of the button, I will next time I pull it down.)


Trigger feels MUCH better with a good break at about 2.2 pounds. I also didn't like the casting marks, square edges and Fire/Safe on the case halves so I sanded and contoured it before priming and refinishing it with SEM Trim Black. ( BTW, matches the factory finish very well for touch up.)


Finished product.


I should mention that I ordered a Super Sear, not real happy with that. While the break seemed a tiny bit crisper, not enough to warrant the cost over the Mac1 modified sear I have. The other issue was that unlike the picture AOA has, it is soft aluminum with a roll pin drilled into place at the release face. Just testing it in the gun for 10-12 times started marring the surface of the sear. It's crap IMHO and a waste of $40.00. I assume the original steel ones were better.


Correct, It only serves to remove the slack/ creep / take up or whatever is used to define movement in the trigger prior to reaching the tension point where the sear releases. If you fit it to leave a small amount of movement prior to that point, It has no effect on the safety operation, trigger break or pull weight. Just removes unnecessary movement in the trigger . It's kinda crude with no adjustment, but works for me.
 
Quoting Arthur C. Clarke, "Any sufficiently advanced technology is indistinguishable from magic."

You, @wgusler, are a magician. I can see the results of your mysterious rituals and read the words of your incantations (captions) but in the end it is all hocus pocus to me. Just give me Excalibur and send me on my way to slay dragons, vanquish wicked knights, and punch paper. By the way, Excalibur seems like a really good name for the product of your genius here.
 
Bought a Mac1 Steroid 392 in 2006 and it has been a great gun. However, my old eyes are not so good on iron sights anymore. Decided on a Baker Airguns one piece mount and a UTG Bug Buster scope. While waiting for the parts, got bored and decided to change the stock and work on the trigger. Not finding anything available for a custom stock cheap, decided to buy a new 392 and use that stock as it is larger and more material to work with.
( Put my old stock on the new gun and gave it to one of my buddy's, 30 years old and never shot a pellet gun or BB gun??? California kid, go figure.)

Cut the fore end and carved up the back of the stock making it narrower and thinner at the pistol grip, plugged the holes in the fore end and refinished it. After modifying the trigger with a preload and trigger stop, I mounted the scope and dialed it in. 5 shot group at 25 yards @ .33 . Yea!

Really appreciate all the information here and at the Crosman Forums, make life easier on projects like this.

Really nice work!
I wanted to do something like that to mine. I bought that scpe mount and test fired it and couldnt get grouping so I shelved the project.
I was getting three or four inch groups at 28 yards. Sooner or later I'll revisit that project.

Screenshot_20231111_070936_Gallery.jpg