• The AGN App is ready! Search "Airgun Nation" in your App store. To compliment this new tech we've assigned the "Threads" Feed & "Dark" Mode. To revert back click HERE.

Marauder Stock Ugly

Thanks Zebra for the detailed post. Unfortunately I still don't see how you do it, esp joining the mold halves while the CF in each half is not cured and trimmed flush with the parting line. I picture the CF sticking up at random heights above the mold edges of both halves. trimming them flush while still not cured would be next to impossible. Then, reaching inside the rear of the stock to add reinforcement?..like building a ship in a bottle, but sticky/gooey as well.
I have some background working fiberglass, but CF is ten times stiffer and harder. I had a CF Shelby cobra body made by a sailboat company off a Factory-5 six-section mold. it is full of bubbles, pin holes and really big air pockets that did not stick to the mold. the doors and sides of the fenders are concave where they should be flat; looks like crap and the biggest reason I never finished the car. I wish there was someone like you nearby that I could apprentice with.
 
"steeve"Thanks Zebra for the detailed post. Unfortunately I still don't see how you do it, esp joining the mold halves while the CF in each half is not cured and trimmed flush with the parting line. I picture the CF sticking up at random heights above the mold edges of both halves. trimming them flush while still not cured would be next to impossible. Then, reaching inside the rear of the stock to add reinforcement?..like building a ship in a bottle, but sticky/gooey as well.
I have some background working fiberglass, but CF is ten times stiffer and harder. I had a CF Shelby cobra body made by a sailboat company off a Factory-5 six-section mold. it is full of bubbles, pin holes and really big air pockets that did not stick to the mold. the doors and sides of the fenders are concave where they should be flat; looks like crap and the biggest reason I never finished the car. I wish there was someone like you nearby that I could apprentice with.
If you make diy prepreg, it is easy to cut into precise shapes or cut straight lights. People have a hard time trimming cf edges when they cut raw fabric or when they try to use it too soon after applying resin. Epoxy will stick to almost anything but immediately after it has been mixed, it is not tacky at all. It won't stick to the mold and you'll pull the fibers apart if you attempt to trim it. 

With the fast hardener I use, it's cured within an hour. 10-15 minutes after it has been mixed and applied to the cf, it has become tacky and firm enough to apply or trim without any of the usual issues. This is one of the reasons why people get such professional results with prepreg. If you look at the pics, you'll see that the weave is perfectly intact whereas, with many diy projects you see, the weave looks a mess. There is a good YouTube clip showing how to make diy prepreg that will help. They only miss the step of removing all the air bubbles with a squeegee.

For difficult patterns, I use a different process to other people to make it easier. I cure the first layer separately from the rest. It's like the difference between making a paper airplane with 1 piece of paper or 10 folded together. The one that is 10 sheets thick is not going to hold it's shape very well. A single layer of cf conforms to curves easier and can be trimmed with decent scissors when cured. Once I have two perfect first layers fully cured and trimmed, it is easy to apply the other layers behind it and it is easy lay the cf along the edge without going over, so there is nothing to trim. This method lets me use up all the small scraps of cf so there is less wastage and the two mold halves fit together with no material poking through the seam line.

The other great thing about this method is that you don't waste all of your material before knowing that the surface layer is perfect. Nothing worse than using up all of your fabric only to find that the surface has holes, air pockets or other deformed parts.

Buy yourself some good fabric scissors. They don't have to be expensive. Michaels sells small titanium tipped ones for $8 so the resin doesn't stick to them. I use the $3 scissors and use a fresh pair for every new project. Makes a lot of difference.
 
Well that helps, but I can't load you tube vids on my old computer anymore for some reason; you tube just stopped working about a month ago. Got a new computer on the way though.
I'm not sure what you mean by home made Pre-preg..I thought it was a dry material that was activated with heat. 
I still can't see how you can trim the CF while it is still wet in the mold. I know that the closest I could get to the mold line, and only if it is straight, is about .030" with scissors, even with tiny surgical scissors, and it would not be very straight either. I think I would have to grind it with a hand rotary tool after it was cured, but it would be difficult to perfectly match the parting line height without grinding into the mold parting surface in places. Even then, there would be small gaps when assembling the halves and the slightest amount of warpage would mean the halves will not line up in all places. Then how do you get inside to add bonding strips, esp without the halves moving out of whack. Maybe if you pin the mold halves together and leave the parts in the mold, then reach inside, from the open end with thin sticks to position the bonding strips. Is this close?
BTW, I had my own Mold and pattern business for 8 years, after working 4 years in a commercial pattern shop.(for green sand casting and investment molding). I think I would start a project like this by making a plaster mold off of a gun stock, using modeling clay up to the parting line for the first half. Plaster doesn't warp or shrink as much as fiberglass would, but it is not flexible, so there could be no back-drafted areas on the part, or it would not release. Sounds like a difficult and time consuming venture. I think I would rather digitize a stock, mill it out in two halves on a CNC machine, pocket the inside leaving about an 1/8" wall thickness with ribbing/bulkheads, glue the halves together, fill with high density foam, then re-pocket for the action. Any parting line mis-match could be easily sanded out and the finished part would still be very light.
 
"steeve"Well that helps, but I can't load you tube vids on my old computer anymore for some reason; you tube just stopped working about a month ago. Got a new computer on the way though.
I'm not sure what you mean by home made Pre-preg..I thought it was a dry material that was activated with heat. 
I still can't see how you can trim the CF while it is still wet in the mold. I know that the closest I could get to the mold line, and only if it is straight, is about .030" with scissors, even with tiny surgical scissors, and it would not be very straight either. I think I would have to grind it with a hand rotary tool after it was cured, but it would be difficult to perfectly match the parting line height without grinding into the mold parting surface in places. Even then, there would be small gaps when assembling the halves and the slightest amount of warpage would mean the halves will not line up in all places. Then how do you get inside to add bonding strips, esp without the halves moving out of whack. Maybe if you pin the mold halves together and leave the parts in the mold, then reach inside, from the open end with thin sticks to position the bonding strips. Is this close?
BTW, I had my own Mold and pattern business for 8 years, after working 4 years in a commercial pattern shop.(for green sand casting and investment molding). I think I would start a project like this by making a plaster mold off of a gun stock, using modeling clay up to the parting line for the first half. Plaster doesn't warp or shrink as much as fiberglass would, but it is not flexible, so there could be no back-drafted areas on the part, or it would not release. Sounds like a difficult and time consuming venture. I think I would rather digitize a stock, mill it out in two halves on a CNC machine, pocket the inside leaving about an 1/8" wall thickness with ribbing/bulkheads, glue the halves together, fill with high density foam, then re-pocket for the action. Any parting line mis-match could be easily sanded out and the finished part would still be very light.
Where to begin....

You don't want to use plaster for this type of mold ever. It's not strong enough, not dry enough, too porous, too time consuming because it starts as a liquid which means tedious parting lines / blocking all holes etc. Even gypsum is not strong enough. You would end up with white bits stuck in between the fibers on the surface that would be impossible to remove. I wasted a lot of time trying to make it work. Unlike with metal casting, carbon fiber can not be sanded and shaped afterwards. The corse sandpaper use to remove all the crud from something like a lost wax process would rip the fibers and give you holes in your part. Plaster may seem cheap but you have to use a ridiculous amount for something like a stock. I guarantee you'll end up wasting all of it and starting again. 

Everyone trims the cf with scissors. If you do it at the right state in it's curing cycle (with good scissors) it's not difficult. A small amount of overlap is ok and even desirable as the rigid mold halves will compress them together. This will cause all the edges to be stuck together all the way around. You then go over the back of the seam line with more cf. you cover the whole floor of the stock in the part you can reach. Then in front of the comb which is accessible by hand at this point. Then the ceiling and floor of the shoulder stock which is accessible at the back (which should be open as you haven't added a butt-plate yet). I use a rigid rod to push the cf down where I can't reach. 

Prepreg just means the resin has been applied before you start the process. Most commercial prepreg uses headset resin which partially cures to a tacky state so it can be stuck to the mold. It is then cured the rest of the way in an autoclave. You can make prepreg from regular room temp epoxy too. When partially cured and tacky, it feels and can be used just like commercial prepreg. It's easy to cut then too.

out of all the mold materials I have tried (and there were a lot), I have found epoxy putty to work the best. It's strong, cheap, economical (as you use less material, easy to use, good working time, not liquid so you don't need a parting line on your plug, no warping etc. both halves are mode on the plug with the second half made to slightly overlap the first to ensure a perfect fit. It's easy to sand smooth too.

I don't use fiberglass in the process. I don't like. Never have. It's not rigid at all so you need to use a lot of layers which is expensive and time consuming. The resin stinks. It sticks to everything and I often broke the part or th mold during demolding because stocks have so many areas to get locked. It's not repairable. I can snap an epoxy putty mold in two and still fix it. 

For curing, I clamp the two mold halves together. I use 4 C clamps which are very cheap and effective. Some people use screws. Others use string, bongo ties and any number of other things to hold the two parts firmly together. Use whatever you have. Books, weighs. Anything heavy.

Hope that helps


The Cabela sale is over now right?? I went to their site and the Marauder is regular priced now. The one I bought from Plinker is deadly. Not a squirrel around and if one does stop in, his time is limited.....I am very happy with the way Marauders shoot. I do not know what barrel I have but it must be a good one because the gun shoots great
 
"zebra"The Marauder is a great project gun. Why not have a go at making your own stock?

This is my latest day stock project. Not sure what action it will be bedded for yet. It was going to be for a Huntsman but now I am thinking my AT44 could benefit from a better stock.

I would be interested on how you did that to the stock. Beautiful
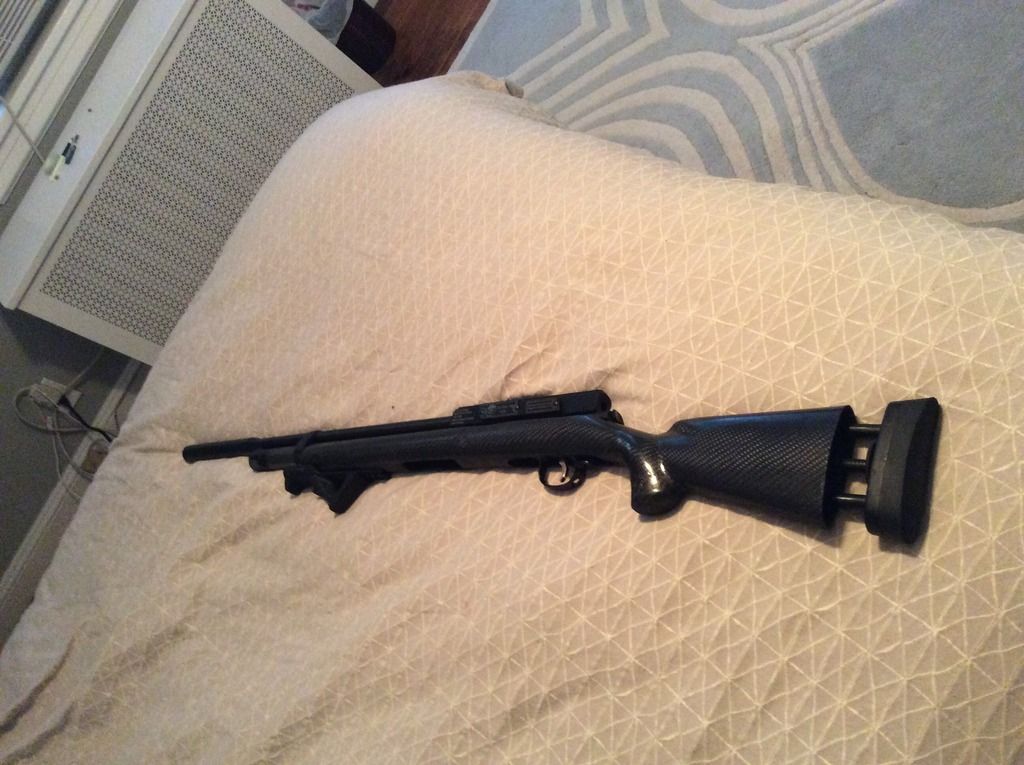


I actually made this stock for the purpose of writing a tutorial to show people how to make a cf stock at home without any special equipment. I wanted to take pics at each stage in the process and I have been writing it up in sections. There is a lot to write so it will take me a while to finish but I am going to start posting it in sections instead of waiting until the end. The first section will go up later today or tomorrow. 

Here are some update pics of the project as I started the inletting and sanding the surface layer. Hopefully they will post ok as I have been having some trouble uploading images to this site. Sometimes they appear and others they don't and I can't figure out what's different...


[color=rgba(0, 0, 0, 0.701961)][/color]
 
"airborne"That is beautiful and I am very interested on how you accomplished this look...
I posted the first section of the tutorial in the General airguns section. It covers the mold making process which is the most important. The next section, which covers the lay-up for this stock, will be added tomorrow or Wednesday. 

I tried to to cover as much detail as possible but feel free to ask any questions.